Cranberry Walnut Bread is one of those comforting loaves that feels special without any fuss. The cranberries give it a lovely tang and chewiness, while the walnuts add a satisfying crunch and nutty depth. What makes it even better is that it requires absolutely no kneading, making it perfect for even the busiest days or for anyone who finds kneading a chore. The magic happens through time and a simple mixture of basic ingredients. I often make this for weekend brunches or just to have a delicious, homemade bread on hand for toast or sandwiches. The aroma that fills the kitchen as it bakes is truly wonderful.
Ingredients:
- ½ teaspoon active dry yeast
- 1 ½ cups warm water (warmed to 110 to 115 degrees F)
- 1 teaspoon granulated sugar
- 2 teaspoons Kosher salt
- 3 cups bread flour, plus 2 tablespoons (plus more for surface)
- ¾ cup dried cranberries
- ½ cup dried walnuts, roughly chopped
- 1 tablespoon honey
- 1 tablespoon orange zest
Getting Started: The Dough
The first step is to wake up your yeast. In a large mixing bowl, combine the warm water, active dry yeast, and granulated sugar. Give it a gentle stir. The water temperature is important here; too hot and you’ll kill the yeast, too cold and it won’t activate properly. Aim for that 110 to 115 degree F range – it should feel comfortably warm, like a baby’s bathwater. Let this mixture sit for about 5 to 10 minutes. You’re looking for it to get foamy on top. This foam is a sign that your yeast is alive.
Cranberry Walnut Bread (No-Knead)
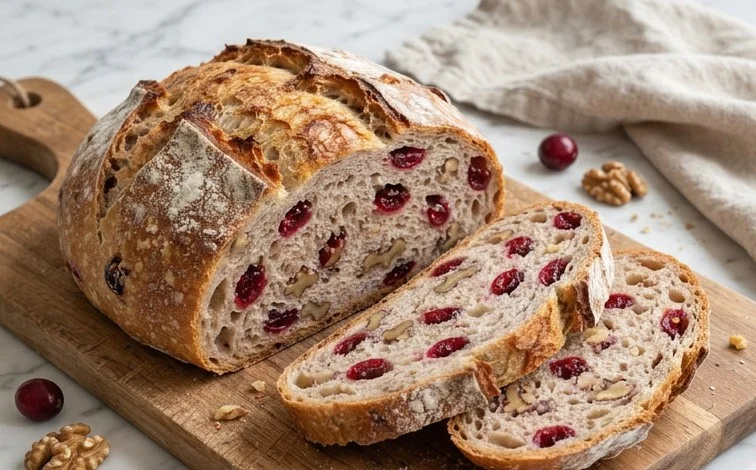
This Cranberry Walnut Bread is one of those comforting loaves that feels special without any fuss. The cranberries give it a lovely tang and chewiness, while the walnuts add a satisfying crunch and nutty depth. What makes it even better is that it requires absolutely no kneading, making it perfect for even the busiest days or for anyone who finds kneading a chore. The magic happens through time and a simple mixture of basic ingredients. I often make this for weekend brunches or just to have a delicious, homemade bread on hand for toast or sandwiches. The aroma that fills the kitchen as it bakes is truly wonderful.
Ingredients:
- ½ teaspoon active dry yeast
- 1 ½ cups warm water (warmed to 110 to 115 degrees F)
- 1 teaspoon granulated sugar
- 2 teaspoons Kosher salt
- 3 cups bread flour, plus 2 tablespoons (plus more for surface)
- ¾ cup dried cranberries
- ½ cup dried walnuts, roughly chopped
- 1 tablespoon honey
- 1 tablespoon orange zest
Getting Started: The Dough
The first step is to wake up your yeast. In a large mixing bowl, combine the warm water, active dry yeast, and granulated sugar. Give it a gentle stir. The water temperature is important here; too hot and you’ll kill the yeast, too cold and it won’t activate properly. Aim for that 110 to 115 degree F range – it should feel comfortably warm, like a baby’s bathwater. Let this mixture sit for about 5 to 10 minutes. You’re looking for it to get foamy on top. This foam is a sign that your yeast is alive and ready to work its magic, creating the airy texture in our bread. If you don’t see foam, your yeast might be old, or the water temperature was off, and you’ll want to start with fresh yeast.
Once your yeast is bubbly, add the Kosher salt, 3 cups of bread flour, the dried cranberries, chopped walnuts, honey, and orange zest to the bowl. Mix everything together with a sturdy spoon or a spatula until just combined. The dough will be very shaggy and sticky – don’t worry about developing gluten or making it smooth. That’s the beauty of no-knead. It’s meant to be rustic. Make sure the cranberries and walnuts are distributed throughout the dough as best you can. Overmixing isn’t an issue here, so don’t stress about it.
The Long, Slow Rise
Now for the patient part, which is also the easiest part. Cover the bowl tightly with plastic wrap or a damp kitchen towel. Let the dough rise in a warm place for 12 to 18 hours. This slow, long fermentation develops fantastic flavor and allows the gluten to relax and create that characteristic open crumb without any kneading. A slightly cooler spot, like a slightly cool oven with the light on, can also work. The dough should at least double in size and be bubbly. You might even see some larger pockets of air. Don’t rush this step; it’s where a lot of the flavor develops. If your kitchen is particularly warm, you might find it takes closer to 12 hours. If it’s cooler, it might lean towards the longer end of the range.
Shaping and Second Rise
After the long rise, the dough will be significantly larger and quite sticky. Generously flour a clean work surface with bread flour. Use a lightly floured spatula or your floured hands to gently scrape the dough out of the bowl onto the floured surface. You’ll want to add those extra 2 tablespoons of bread flour now, either by gently folding it into the dough or just by sprinkling it over the top. The goal is to create a somewhat cohesive ball of dough without overworking it. Gently fold the edges of the dough towards the center a few times, just enough to create some surface tension and shape it into a round or oval. Again, don’t knead. Think of it as coaxing it into a shape.
Once you have your dough shaped, you need to let it rest and rise again. You can either place it directly onto a piece of parchment paper for easy transfer later, or put it into a well-floured proofing basket (a bowl lined with a floured tea towel works too). Cover the dough loosely with plastic wrap or a damp towel again and let it rise for another 1 to 2 hours, or until it looks visibly puffed up and is about 50% larger. This second rise helps build more airiness before baking.
Baking to Golden Perfection
This bread is best baked in a preheated Dutch oven or oven-safe pot with a lid. This creates a steamy environment, which is key for achieving a beautiful, crisp crust. About 30 minutes before your second rise is finished, place your Dutch oven (with the lid on) into your oven and preheat it to 450 degrees F (230 degrees C).
When the dough has completed its second rise, carefully remove the hot Dutch oven from the oven. If your dough is on parchment paper, carefully lift the parchment with the dough and gently lower it into the hot Dutch oven. If you used a proofing basket, invert the dough directly into the Dutch oven. You can score the top of the dough with a sharp knife or a lame if you like, which helps control where the bread expands as it bakes, but it’s not strictly necessary for this rustic loaf. Put the lid back on the Dutch oven and carefully place it back into the preheated oven. Bake for 30 minutes with the lid on.
After 30 minutes, carefully remove the lid from the Dutch oven. The bread will be pale but will have risen significantly. Continue to bake for another 15 to 25 minutes, uncovered, or until the crust is a deep golden brown and the bread sounds hollow when tapped on the bottom. The exact time will depend on your oven. Carefully remove the bread from the Dutch oven using oven mitts and place it on a wire rack to cool completely. Resist the urge to slice into it too soon; letting it cool allows the crumb to set properly. This loaf is wonderful served warm with butter, or as an accompaniment to soup or a cheese board. Enjoy this simple, yet incredibly rewarding, homemade bread.
Conclusion:
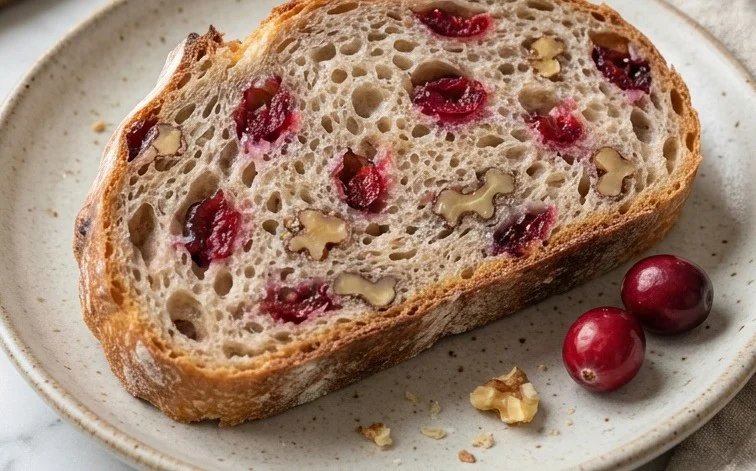
This no-knead Cranberry Walnut Bread truly lives up to its comforting reputation. It delivers a wonderful balance of tangy cranberries and crunchy walnuts in every slice, all without the effort of traditional kneading. The process is simple and rewarding, proving that great bread doesn’t need to be complicated. It’s perfect for a leisurely weekend breakfast, a special addition to a holiday meal, or just a delicious homemade treat to enjoy any day of the week. The aroma alone makes the baking process worthwhile.
For serving, this bread is fantastic on its own, toasted with a smear of butter, or even as a base for a festive open-faced sandwich with cream cheese and a drizzle of honey. If you want to change things up, consider adding a bit more orange zest for a brighter citrus note, or try toasting the walnuts lightly before adding them to the dough for a deeper flavor. Storage is simple; keep it wrapped well at room temperature for up to 3 days, or slice and freeze for longer enjoyment.
Frequently Asked Questions:
Can I use fresh cranberries instead of dried?
While dried cranberries are recommended for their concentrated flavor and chewy texture, you can use fresh cranberries. You might need to add a little more sugar to the dough or to the cranberries themselves, as fresh ones are much more tart. Chop them into smaller pieces to ensure they distribute evenly and bake properly without overwhelming the bread.
What if I don’t have bread flour?
All-purpose flour can be substituted for bread flour, but the texture of your loaf might be slightly less chewy. Bread flour has a higher protein content, which contributes to that desirable gluten structure that gives bread its characteristic chew. If using all-purpose, the dough might feel a bit softer, so be prepared to adjust with a tiny bit more flour if it seems excessively sticky.
Cranberry Walnut Bread (No-Knead)
A simple, no-knead bread recipe bursting with festive cranberry and walnut flavors, with a hint of orange zest. Perfect for holiday gatherings or any time you crave a delicious, homemade loaf.
Ingredients
-
½ teaspoon active dry yeast
-
1 ½ cups warm water (warmed to 110 to 115 degrees F)
-
1 teaspoon granulated sugar
-
2 teaspoons Kosher salt
-
3 cups bread flour, plus 2 tablespoons
-
¾ cup dried cranberries
-
½ cup dried walnuts, roughly chopped
-
1 tablespoon honey
-
1 tablespoon orange zest
Instructions
-
Step 1
In a large bowl, whisk together the warm water, active dry yeast, and granulated sugar. Let it sit for about 5-10 minutes until frothy. -
Step 2
Add the Kosher salt, 3 cups of bread flour, dried cranberries, dried walnuts, honey, and orange zest to the bowl. Stir with a wooden spoon until just combined and a shaggy dough forms. Add the extra 2 tablespoons of flour if the dough seems too wet. -
Step 3
Cover the bowl tightly with plastic wrap and let it rise in a warm place for at least 1 hour, or until doubled in size. -
Step 4
Preheat your oven to 450 degrees F (230 degrees C). Place a Dutch oven or oven-safe pot with a lid in the oven while it preheats. -
Step 5
Generously flour a clean surface. Turn the dough out onto the floured surface. Gently shape the dough into a round loaf. It will be sticky. -
Step 6
Carefully remove the preheated Dutch oven from the oven. Remove the lid. Gently place the shaped dough into the hot Dutch oven. Score the top of the loaf with a sharp knife or razor if desired. Cover with the lid. -
Step 7
Bake for 30 minutes with the lid on. Then, remove the lid and bake for another 15-20 minutes, or until the crust is golden brown and the internal temperature reaches 200-210 degrees F (93-99 degrees C). -
Step 8
Carefully remove the bread from the Dutch oven and let it cool completely on a wire rack before slicing.
Important Information
Nutrition Facts (Per Serving)
It is important to consider this information as approximate and not to use it as definitive health advice.
Allergy Information
Please check ingredients for potential allergens and consult a health professional if in doubt.

Leave a Comment