The scent of oranges and warm spices filling the kitchen is one of my favorite things, especially during cooler months. This rustic no-knead bread is a wonderfully simple way to achieve that. It’s got a lovely tang from the orange zest and a chewy sweetness from the cranberries, all within a crusty, open crumb. The beauty of a no-knead bread is how little effort it requires for such a rewarding result. You mix it up, let it do its thing for a good while, and then bake it. No kneading, no fuss. This Rustic No-Knead Cranberry Orange Bread is a testament to the magic of time and simple ingredients. It’s the kind of bread that makes your home feel instantly cozy and welcoming. I love pulling it out of the oven, the steam carrying that incredible citrus and spice aroma. The crust is wonderfully crackly, and the inside is soft with pockets of bright cranberries and fragrant orange zest. It’s honestly one of the most satisfying bakes you can do with minimal active time, making it perfect for busy weekends or just when you need a little baking therapy without the workout.
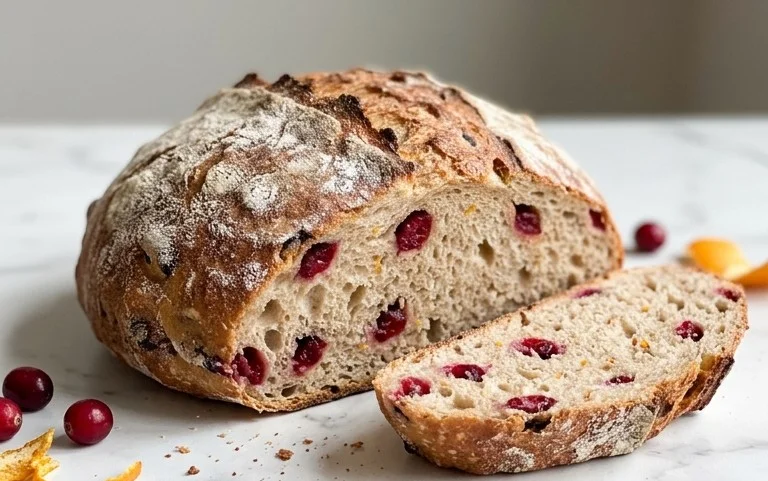
Rustic No-Knead Cranberry Orange Bread
The scent of oranges and warm spices filling the kitchen is one of my favorite things, especially during cooler months. This rustic no-knead bread is a wonderfully simple way to achieve that. It’s got a lovely tang from the orange zest and a chewy sweetness from the cranberries, all within a crusty, open crumb. The beauty of a no-knead bread is how little effort it requires for such a rewarding result. You mix it up, let it do its thing for a good while, and then bake it. No kneading, no fuss.
Ingredients:
- 3 cups all purpose flour
- ½ tsp. active dry yeast
- 2 tsp. salt
- 1½ cups water
- zest of 2 oranges
- ¾ cup “plumped” dried cranberries
Getting Started: The Dough
The foundation of this bread is a simple dough. The key is letting time do the work for you. First, in a large bowl, I whisk together the flour, active dry yeast, and salt. Make sure these dry ingredients are evenly distributed. You don’t want all the yeast clumped in one spot.
Next, add the water. I use lukewarm water – not hot, not cold. Just a comfortable temperature for your fingers. Pour it into the dry ingredients and stir with a wooden spoon or a sturdy spatula until everything is just combined. It will look shaggy and a bit sticky; that’s exactly what you want. Don’t overmix. The goal here is to hydrate the flour.
Now, for the flavor. Add the zest from your two oranges. I like to zest them before juicing them for other recipes. Gently fold the zest into the dough. You’ll start to catch that bright citrus aroma right away.
Finally, the cranberries. For this recipe, it’s important to “plump” the dried cranberries. This means soaking them for a bit to rehydrate them. I usually put them in a small bowl and cover them with warm water for about 15-20 minutes. Drain them well before adding them to the dough. Gently fold the plumped cranberries into the sticky dough. Again, don’t go crazy with mixing; just distribute them evenly.
The Long, Slow Rise
Cover the bowl tightly with plastic wrap or a damp kitchen towel. Let this dough rest at room temperature for at least 12 hours, or even up to 18 hours. This long, slow fermentation is what develops the flavor and texture of the bread without any kneading. During this time, the yeast will work its magic, creating tiny air bubbles that will give your bread its characteristic open crumb. You’ll notice the dough has puffed up and become bubbly.
Shaping and Final Proof
After the long rise, the dough will be beautifully aerated and slightly sticky. You’ll need a bit of flour for this next step. Generously flour your work surface and gently turn the dough out of the bowl. Be careful not to deflate all those precious air bubbles.
Gently shape the dough into a round or an oval. You don’t need to knead it; just lightly fold the edges under to create a taut surface. Think of it as tucking it in. Let the dough rest on the floured surface for about 30 minutes, uncovered, while you preheat your oven and your Dutch oven.
Baking the Bread
This is where the magic truly happens. Preheat your oven to 450°F (230°C). Place a Dutch oven (with its lid on) into the oven while it preheats. A Dutch oven is fantastic for baking bread because it traps steam, which helps create that wonderfully crisp crust.
Once the oven and Dutch oven are fully heated, carefully remove the hot Dutch oven from the oven. Remove the lid. I usually like to sprinkle a little extra flour on the bottom of the Dutch oven or use a piece of parchment paper to make transferring the dough easier. Carefully place your shaped dough into the hot Dutch oven. You can score the top of the dough with a sharp knife or a razor blade if you like, which helps control how the bread expands during baking. This step is optional.
Put the lid back on the Dutch oven and carefully place it back into the oven. Bake for 30 minutes with the lid on. This initial baking period with the lid on traps steam and allows the bread to rise beautifully.
After 30 minutes, carefully remove the lid. You’ll see the bread has puffed up and is starting to turn a pale golden color. Continue baking for another 15-20 minutes, or until the crust is a deep golden brown and the bread sounds hollow when tapped on the bottom. The internal temperature should be around 200-210°F (93-99°C).
Cooling for Perfection
Once baked, carefully remove the bread from the Dutch oven and place it on a wire rack to cool completely. Resist the urge to slice into it immediately. Letting it cool allows the interior to set properly. As it cools, you’ll hear its crust crackling – a beautiful sound! This bread is wonderful served warm with a bit of butter, or it’s perfect for making sandwiches or enjoying with soup. It also keeps well for a few days, stored at room temperature in a bread box or a loosely tied bag.
Conclusion:
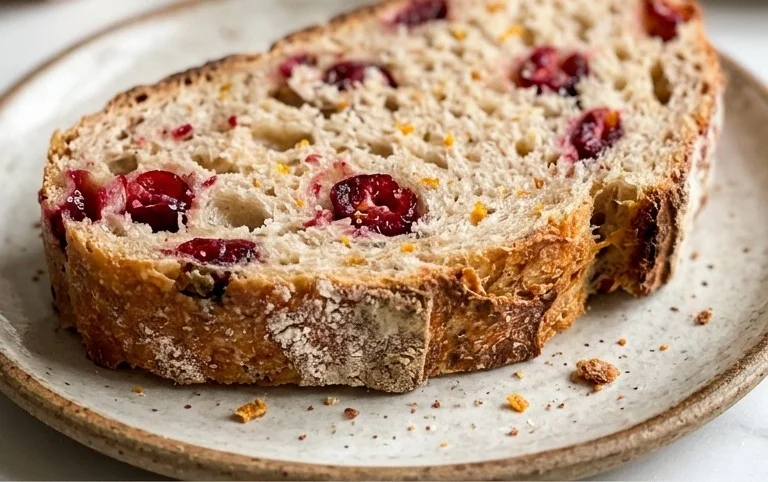
This Rustic No-Knead Cranberry Orange Bread is truly a joy to make and even more of a joy to eat. The combination of tart cranberries and bright orange zest in a perfectly crusty, yet tender loaf, is hard to beat. It’s a bread that feels special enough for guests but is simple enough for a weeknight treat. You don’t need any fancy equipment or advanced baking skills; just a bowl, a spoon, and a bit of patience. It’s incredibly rewarding to see that shaggy dough transform into a beautiful, golden-brown loaf.
For serving, I love this bread toasted with a smear of butter or cream cheese. It also makes a fantastic base for French toast or bread pudding. If you want to switch things up, you can try adding a teaspoon of cinnamon or nutmeg to the dry ingredients for an extra layer of spice. A handful of chopped walnuts or pecans can add a delightful crunch, too.
Frequently Asked Questions:
Can I use fresh cranberries instead of dried?
Yes, you can use fresh cranberries, but you might want to add them towards the end of the first rise or just before shaping to prevent them from breaking down too much during the long fermentation. You’ll likely need a bit more to get the same level of sweetness and tartness. About 1 cup of fresh cranberries would be a good starting point.
My dough didn’t rise much. What could I have done wrong?
The most common culprits are old yeast or water that was too hot or too cold. Make sure your yeast is active by testing it in a little warm water with a pinch of sugar. Also, ensure the water you use is lukewarm (around 105-115°F or 40-46°C). Sometimes, a very cold kitchen can also slow down the rise; try to let the dough rise in the warmest spot you have.
How should I store this bread?
Once completely cooled, store the bread at room temperature in a paper bag or a bread box for up to 2-3 days. Avoid plastic bags, as they can make the crust soggy. If you need to store it for longer, you can slice it and freeze it. It thaws beautifully at room temperature or can be toasted directly from frozen.
Rustic No-Knead Cranberry Orange Bread
A simple and flavorful no-knead bread bursting with the bright zest of oranges and tart cranberries. Perfect for breakfast or as a side.
Ingredients
-
3 cups all purpose flour
-
½ tsp. active dry yeast
-
2 tsp. salt
-
1½ cups water
-
zest of 2 oranges
-
¾ cup “plumped” dried cranberries
Instructions
-
Step 1
In a large bowl, whisk together the flour, yeast, and salt. Add the water and orange zest. Stir until just combined, forming a shaggy dough. Cover the bowl with plastic wrap. -
Step 2
Let the dough rest at room temperature for 12 to 18 hours, or until it has doubled in size and is very bubbly. -
Step 3
Gently fold in the “plumped” dried cranberries until evenly distributed. The dough will be sticky. -
Step 4
Generously flour a work surface. Turn the dough out onto the floured surface and shape it into a round or oval loaf. Let it rest, uncovered, for 30 minutes. -
Step 5
While the dough is resting, preheat your oven to 450°F (230°C) with a Dutch oven inside (with the lid on). -
Step 6
Carefully remove the hot Dutch oven from the oven. Remove the lid. Gently place the dough into the hot Dutch oven. Score the top of the loaf if desired. -
Step 7
Cover the Dutch oven with the lid and bake for 30 minutes. Remove the lid and bake for another 15-20 minutes, or until the crust is deep golden brown. -
Step 8
Remove the bread from the Dutch oven and let it cool completely on a wire rack before slicing.
Important Information
Nutrition Facts (Per Serving)
It is important to consider this information as approximate and not to use it as definitive health advice.
Allergy Information
Please check ingredients for potential allergens and consult a health professional if in doubt.


Leave a Comment