
Christmas pretzel rods are a simple yet delightful way to bring some festive cheer to your holiday baking. They combine the satisfying crunch of pretzels with sweet, colorful candy coatings and cheerful sprinkles. They’re easy enough for kids to help with, making them a perfect activity for a snowy afternoon. The sweet and salty combination is always a winner, and the festive decorations make them look as good as they taste. Making these pretzel rods is a tradition in my home, especially because they look so appealing on a dessert platter and are always the first to disappear. The crunch of the pretzel against the smooth, sweet coating is a textural delight that everyone enjoys. Plus, you can customize them with your favorite sprinkle colors to match any holiday party theme. It’s a treat that truly embodies the spirit of giving and sharing during the Christmas season.

Christmas Pretzel Rods Recipe
These Christmas pretzel rods are a simple yet delightful way to bring some festive cheer to your holiday baking. They combine the satisfying crunch of pretzels with sweet, colorful candy coatings and cheerful sprinkles. They’re easy enough for kids to help with, making them a perfect activity for a snowy afternoon. The sweet and salty combination is always a winner, and the festive decorations make them look as good as they taste.
Ingredients:
- Pretzel rods
- Brown candy coating (milk chocolate morsels, or chocolate almond bark)
- White candy coating (white chocolate morsels, or vanilla almond bark)
- Green candy coating
- Red candy coating
- Assorted sprinkles:
- Confetti Holly Mix
- Wilton Holiday Nonpareils
- Wilton Christmas Snowflake Sprinkles
- Crushed peppermint
Melting the Candy Coating
The first step is to get your candy coatings ready. It’s important to melt them gently to avoid scorching, which can make them unusable. You can do this using a microwave or a double boiler. If you’re using the microwave, place one color of candy coating in a microwave-safe bowl. Heat in 30-second intervals, stirring well after each interval. Continue this process until the coating is smooth and completely melted. Avoid overheating, as melted candy coating can become thick and difficult to work with if it gets too hot. Repeat this process for each color of candy coating you plan to use, using separate bowls for each. If the coating becomes too thick while you’re working, you can stir in a tiny amount of vegetable oil (about 1/2 teaspoon at a time) to thin it out. Be careful not to add too much, or the coating will become greasy and won’t set properly.
Dipping the Pretzel Rods
Once your candy coatings are melted and smooth, it’s time for the fun part: dipping the pretzel rods. Take a pretzel rod and hold it by one end. Dip about two-thirds of the pretzel rod into the melted candy coating, rotating it to ensure it’s evenly coated. You can use a spoon to help spread the coating if needed. Let any excess coating drip back into the bowl for a few seconds. This is key to avoiding thick, clumpy coatings.
Adding the Sprinkles
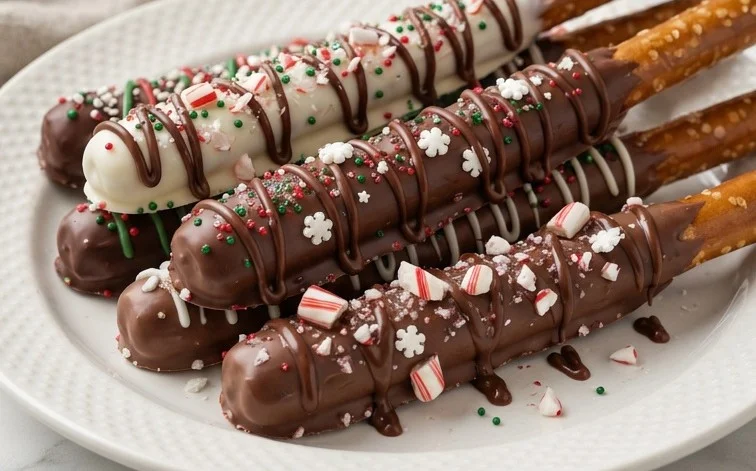
Immediately after dipping a pretzel rod, while the candy coating is still wet, you’ll want to add your decorations. If you’re using the Confetti Holly Mix, gently press a few of the holly shapes onto the wet coating. For the Wilton Holiday Nonpareils and the Wilton Christmas Snowflake Sprinkles, you can either sprinkle them over the wet coating or gently roll the dipped portion of the pretzel rod in a shallow dish filled with the sprinkles. For the crushed peppermint, sprinkle it over the wet coating for a festive touch. Work quickly, as the candy coating will start to set. You can dip some rods in brown coating and sprinkle them with festive colors, then dip other rods in red or green and add white nonpareils for contrast. Don’t be afraid to mix and match the sprinkles for a truly unique look.
Creating Festive Designs
To create more elaborate designs, you can let the first layer of candy coating set completely. Once hardened, you can drizzle other colors of melted candy coating over the rods. To do this, place a small amount of a different colored candy coating into a piping bag with a small tip, or a resealable plastic bag with a corner snipped off. Drizzle the melted candy in lines, zigzags, or swirls over the set coating. While this second layer of drizzle is still wet, you can add more sprinkles or a few more pieces of crushed peppermint. For a classic look, dip the rods in brown coating, let it set, then drizzle with red and green candy coating and add holiday sprinkles. You can also create a striped effect by alternating dips in different colors of candy coating, allowing each layer to partially set before adding the next. Remember, practice makes perfect, so don’t worry if your first few attempts aren’t perfectly uniform.
Allowing the Pretzel Rods to Set
After you’ve dipped and decorated all your pretzel rods, the most challenging part: waiting for them to set! Carefully place the finished pretzel rods on a baking sheet lined with parchment paper or wax paper. Ensure they aren’t touching each other, as they might stick. Place the baking sheet in the refrigerator for about 10-15 minutes, or at room temperature for about 30-60 minutes, until the candy coating is completely firm. Chilling them speeds up the setting process significantly. Once they are fully hardened, they are ready to be enjoyed or packaged. If you plan to store them for more than a few days, it’s best to keep them in an airtight container at room temperature or in the refrigerator to prevent the pretzels from becoming stale or the candy coating from softening in warmer temperatures.
Storage and Serving Suggestions
Once completely set, these Christmas pretzel rods can be stored in an airtight container at room temperature for up to a week. If your home is warm, or if you’ve used a lot of milk chocolate which can soften easily, storing them in the refrigerator can help maintain their firmness, but let them come to room temperature slightly before serving for the best texture. They are perfect for holiday parties, cookie exchanges, or as sweet gifts. You can tie a few together with festive ribbon for an easy DIY present. They also look wonderful arranged on a platter alongside other Christmas treats. The contrast of the crunchy pretzel, smooth candy, and festive sprinkles makes them a crowd-pleaser for all ages. Experiment with different color combinations and sprinkle mixes to create a truly personalized batch that reflects your holiday spirit.
Conclusion:
These Christmas pretzel rods are a fantastic addition to any holiday gathering or cookie exchange. They’re incredibly versatile, allowing for endless decoration possibilities to match your festive theme. Their simple sweet and salty profile makes them a hit with both kids and adults, and they come together quickly, leaving you more time to enjoy the season. The crunchy pretzel paired with smooth candy coating and fun sprinkles is a delightful combination that’s hard to resist. Try making a big batch; they disappear fast! They are wonderful served alongside hot cocoa or as part of a larger dessert spread during your Christmas celebrations.
FAQ:
Can I use different types of pretzels?
Yes, absolutely! While pretzel rods provide the perfect shape for dipping and decorating, you can also use pretzel twists or even pretzel squares. Just adjust the dipping technique to fully coat them. The key is the pretzel’s salty crunch, which contrasts beautifully with the sweet coating.
How should I store leftover pretzel rods?
Store your finished Christmas pretzel rods in an airtight container at room temperature. Placing parchment paper between layers can prevent them from sticking together. They will stay fresh and crunchy for up to a week, making them a great make-ahead holiday treat.
What if my candy melts are too thick?
If your candy coating becomes too thick, you can thin it slightly with a teaspoon of vegetable shortening or coconut oil. Stir it in gradually until you reach a smooth, dippable consistency. Avoid adding liquid oils like olive oil, as they can cause the candy coating to seize up.
Christmas Pretzel Rods
Festive and easy-to-make pretzel rods dipped in colorful candy coatings and decorated with holiday sprinkles and crushed peppermint.
Ingredients
-
24 pretzel rods
-
1 cup brown candy coating
-
1 cup white candy coating
-
1 cup green candy coating
-
1 cup red candy coating
-
Assorted sprinkles: Confetti Holly Mix
-
Assorted sprinkles: Wilton Holiday Nonpareils
-
Assorted sprinkles: Wilton Christmas Snowflake Sprinkles
-
Crushed peppermint
Instructions
-
Step 1
Prepare a baking sheet by lining it with parchment paper. -
Step 2
Melt the brown candy coating according to package directions. Dip each pretzel rod about two-thirds of the way into the melted brown coating, letting excess drip off. Place on the prepared baking sheet. -
Step 3
Melt the white candy coating and repeat the dipping process with some of the remaining pretzel rods. -
Step 4
Melt the green and red candy coatings separately. Drizzle or dip the remaining pretzel rods partially in green and red coatings, creating stripes or swirls as desired. -
Step 5
While the candy coating is still wet, immediately sprinkle the decorated pretzel rods with assorted sprinkles (Confetti Holly Mix, Wilton Holiday Nonpareils, Wilton Christmas Snowflake Sprinkles) and crushed peppermint. -
Step 6
Allow the pretzel rods to set completely at room temperature or in the refrigerator for about 10 minutes until the candy coating is firm.
Important Information
Nutrition Facts (Per Serving)
It is important to consider this information as approximate and not to use it as definitive health advice.
Allergy Information
Please check ingredients for potential allergens and consult a health professional if in doubt.



Leave a Comment