
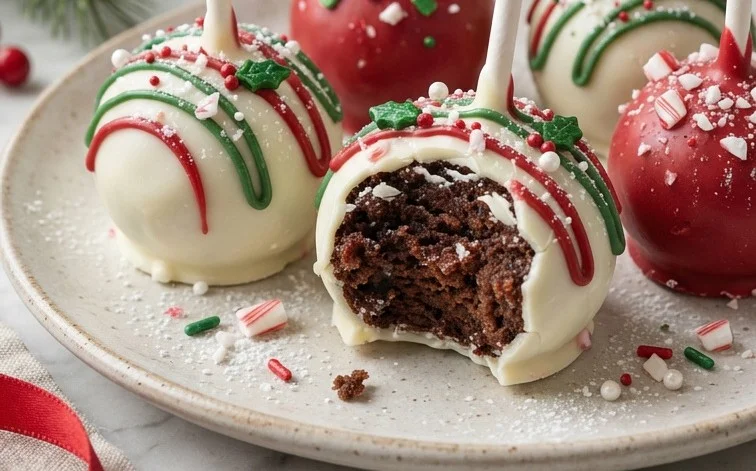
Festive Christmas Cake Pops, particularly the red velvet kind, are a wonderful treat to make for Christmas. Their deep red color just screams holiday cheer, and they’re so fun to decorate. Making them involves a bit of crumbling, mixing, and rolling, but the result is always worth it, especially when you see the smiles they bring. These cake pops are perfect for holiday parties, bake sales, or just as a special homemade gift. The process starts with creating the cake pop mixture. You’ll need to take your two 8-inch red velvet cake rounds and crumble them into fine pieces. You can do this by hand, or if you want to be really thorough, you can pulse them in a food processor until you have fine crumbs. The goal is to get rid of any large chunks so they don’t interfere with the texture. Once the cakes are crumbled, add the 1 cup of prepared vanilla frosting to the crumbs. The frosting acts as the binder, holding everything together. Mix this thoroughly until it forms a cohesive dough. It should be moist enough to hold its shape when squeezed, but not so wet that it’s sticky. If it feels too dry, you can add a tiny bit more frosting, about a tablespoon at a time, until it reaches the right consistency. If it’s too wet, you can add a few more crumbs, a tablespoon at a time, until it’s manageable.

Festive Christmas Cake Pops
Red velvet cake pops are a wonderful treat to make for Christmas. They have a beautiful deep red color that just screams holiday cheer, and they’re so fun to decorate. Making them involves a bit of crumbling, mixing, and rolling, but the result is always worth it, especially when you see the smiles they bring. These are perfect for holiday parties, bake sales, or just as a special homemade gift.
Ingredients:
- Two 8-inch red velvet cake rounds
- 1 cup prepared vanilla frosting
- 3 12-ounce bags chocolate wafers, assorted colors
- Vegetable shortening, as needed
- 30-40 wooden lollipop sticks
- Sprinkles and sanding sugar, assorted colors
Making the Cake Pop Mixture
The first step to making these festive cake pops is to prepare the cake mixture. You’ll need to take your two 8-inch red velvet cake rounds and crumble them into fine pieces. You can do this by hand, or if you want to be really thorough, you can pulse them in a food processor until you have fine crumbs. The goal is to get rid of any large chunks. Once the cakes are crumbled, add the 1 cup of prepared vanilla frosting to the crumbs. The frosting acts as the binder, holding everything together. Mix this thoroughly until it forms a cohesive dough. It should be moist enough to hold its shape when squeezed, but not so wet that it’s sticky. If it feels too dry, you can add a tiny bit more frosting, about a tablespoon at a time, until it reaches the right consistency. If it’s too wet, you can add a few more cake crumbs.
Shaping the Cake Pops
Now comes the fun part of shaping your cake pops. You’ll want to roll the cake mixture into small balls, about 1 inch in diameter. It’s helpful to use a cookie scoop or a tablespoon to get consistent sizes, which makes for neater pops. As you roll them, gently squeeze the mixture to ensure it’s packed well. This helps prevent them from falling apart later. Place the rolled balls onto a baking sheet lined with parchment paper. Make sure they aren’t touching each other, as they might stick together. You should aim for about 30 to 40 cake pops, depending on how large you make each ball.
Preparing the Candy Melts
For dipping, we’ll be using chocolate wafers. You’ll need your three 12-ounce bags of assorted colored chocolate wafers. It’s best to melt these in separate bowls, as you might want to use different colors for dipping. The easiest way to melt them is in the microwave. Place about a third of a bag of wafers in a microwave-safe bowl. Heat on 50% power for 30-second intervals, stirring well after each interval. Continue until the wafers are mostly melted and smooth. You might have a few small pieces remaining; the residual heat will melt them as you stir. If the melted chocolate seems too thick to dip smoothly, you can add a small amount of vegetable shortening, about 1 teaspoon at a time, and stir until it reaches a smooth, fluid consistency. This will make dipping much easier and give you a nice, even coating. Repeat this process for each bag of chocolate wafers, using different bowls for different colors.
Assembling and Dipping the Cake Pops
This is where the lollipop sticks come in. Take a wooden lollipop stick and dip the tip about half an inch into the melted chocolate. Then, insert the chocolate-dipped end into one of your cake balls, about halfway up. This little bit of chocolate acts as “glue” to help secure the cake pop to the stick. Once the stick is inserted, place the cake pop back onto the parchment-lined baking sheet and let it chill in the refrigerator for about 10-15 minutes. This helps the cake ball firm up around the stick, preventing it from sliding off when you dip it. After chilling, take a cake pop and dip it into the melted chocolate, swirling it gently to ensure it’s fully coated. Let any excess chocolate drip back into the bowl. You can use a spoon or a skewer to help smooth the coating if needed. Immediately after dipping, while the chocolate is still wet, you can add your decorations.
Decorating for the Holidays
Now it’s time to make these cake pops look like little Christmas decorations! While the chocolate coating is still wet, sprinkle them with your assorted colored sprinkles and sanding sugar. You can be creative here: maybe some red and green sanding sugar for a classic look, or silver and gold sprinkles for a touch of elegance. If you’re using different colors of melted chocolate, you can also drizzle contrasting colors over the top of your dipped cake pops for added visual appeal. Once decorated, place the cake pops back on the parchment-lined baking sheet to set completely. This can take anywhere from 30 minutes to an hour at room temperature, or you can speed up the process by placing them in the refrigerator for about 15-20 minutes. Ensure they are completely hardened before attempting to store or serve them.
Storing your festive Christmas cake pops is simple. Once fully set, you can stand them upright in a vase or a decorative jar to display them. For longer storage, you can wrap each cake pop individually in cellophane bags and tie them with ribbon. They can be stored at room temperature in an airtight container for up to a week, as long as your kitchen isn’t too warm. Avoid storing them in the refrigerator for extended periods, as this can sometimes cause condensation to form on the coating, making them look less appealing. Enjoy sharing these delightful homemade treats with family and friends throughout the holiday season!
Conclusion:
Making these Festive Christmas Cake Pops is a rewarding process, resulting in a delightful treat that’s almost too pretty to eat. The combination of moist red velvet cake and sweet frosting, all coated in a smooth chocolate shell, makes them a hit with all ages. They’re perfect for adding a festive touch to any holiday gathering. You can serve them on a platter as a colorful display, or individually wrapped as party favors. For variations, consider using different colored candy melts or even adding edible glitter to the melted chocolate for extra sparkle. You could also experiment with different cake flavors if red velvet isn’t your favorite, though the red is especially festive. Making these cake pops is a wonderful way to get into the holiday spirit. Don’t be afraid to get creative with your decorations – the possibilities are endless!
What is the best way to store cake pops?
Cake pops are best stored at room temperature in an airtight container for up to 3-4 days. Avoid refrigerating them, as this can cause the chocolate coating to sweat and become sticky.
Can I make cake pops ahead of time?
Yes, you can absolutely make them ahead of time. Once they are fully set and decorated, store them in an airtight container at room temperature. They are a great make-ahead option for busy holiday schedules.
How do I get a smooth coating?
To achieve a smooth chocolate coating, ensure your candy melts are at the right consistency. Melt them slowly and gently, adding a small amount of vegetable shortening if they become too thick. Dip your cake pops quickly and allow any excess to drip off before placing them on parchment paper to set.
Festive Christmas Cake Pops
Delicious and festive cake pops perfect for holiday celebrations, made with red velvet cake and a variety of colorful chocolate coatings and sprinkles.
Ingredients
-
Two 8-inch red velvet cake rounds
-
1 cup prepared vanilla frosting
-
3 12-ounce bags chocolate wafers, assorted colors
-
Vegetable shortening, as needed
-
30-40 wooden lollipop sticks
-
Sprinkles and sanding sugar, assorted colors
Instructions
-
Step 1
Crumble the red velvet cake rounds into a large bowl. -
Step 2
Add the vanilla frosting to the cake crumbles and mix until well combined and a dough-like consistency is formed. -
Step 3
Roll the mixture into small balls, about 1 inch in diameter, and place them on a parchment-lined baking sheet. -
Step 4
Melt the assorted colored chocolate wafers in separate microwave-safe bowls according to package directions, adding a small amount of vegetable shortening if needed to achieve a smooth consistency. -
Step 5
Dip the tip of a wooden lollipop stick into melted chocolate and insert it about halfway into a cake ball. Repeat for all cake balls. Let set for a few minutes. -
Step 6
Dip each cake pop into the melted chocolate, ensuring it is fully coated. Gently tap off excess chocolate. Immediately decorate with sprinkles and sanding sugar before the chocolate sets. -
Step 7
Place the decorated cake pops upright in a vase or holder to allow them to dry completely.
Important Information
Nutrition Facts (Per Serving)
It is important to consider this information as approximate and not to use it as definitive health advice.
Allergy Information
Please check ingredients for potential allergens and consult a health professional if in doubt.


Leave a Comment