
Snowball cookies are a classic for a reason. They’re wonderfully tender, melt-in-your-mouth delicious, and coated in a sweet dusting of powdered sugar that makes them look like little snow-covered delights. They have a wonderfully crumbly texture from the finely chopped nuts and the perfect balance of sweetness from the butter and sugar. I love making these during the cooler months, but honestly, they’re a treat any time of year. They are simple enough for a beginner baker but impressive enough to share at any gathering. The key is using good quality ingredients and paying attention to the texture as you mix. Ingredients: 2 cups flour (white, spelt, whole wheat pastry, or Bob’s Red Mill gluten-free blend all work well) 1/2 cup finely chopped walnuts (almonds or pecans are great alternatives too) 1 cup butter (softened to room temperature, or 1 cup coconut oil for a dairy-free option) 1/2 cup powdered sugar (also known as confectioners’ sugar or icing sugar) Optional: additional powdered sugar (or cocoa powder, for rolling the finished cookies) Preparing the Dough The first step to achieving that perfect snowball cookie texture is to cream together the butter and powdered sugar until it’s light and fluffy. This aeration is what helps give the cookies their tender crumb. If you’re using butter, make sure it’s softened, not melted. You can test this by pressing a finger into the butter; it should leave an indentation easily. If it’s too cold, it will be difficult to cream properly and can result in a greasy dough. Aim for a pale yellow, airy mixture that holds soft peaks. If using coconut oil, ensure it’s at room temperature; it should be solid but soft, similar to softened butter. Next, gently incorporate the dry ingredients into the creamed mixture. It’s important not to overmix at this stage. Overmixing develops the gluten in the flour, leading to tough cookies instead of the desired tender, crumbly texture. Mix just until the flour streaks disappear. The dough will be soft and slightly sticky. If it feels too wet to handle, you can chill it for about 15-30 minutes. Some bakers like to add the finely chopped nuts at this point, folding them in gently. Others prefer to add them with the dry ingredients to ensure even distribution. Either method works well, but be sure the nuts are chopped very finely; large pieces can interfere with the cookie’s delicate structure.

Snowball Cookies
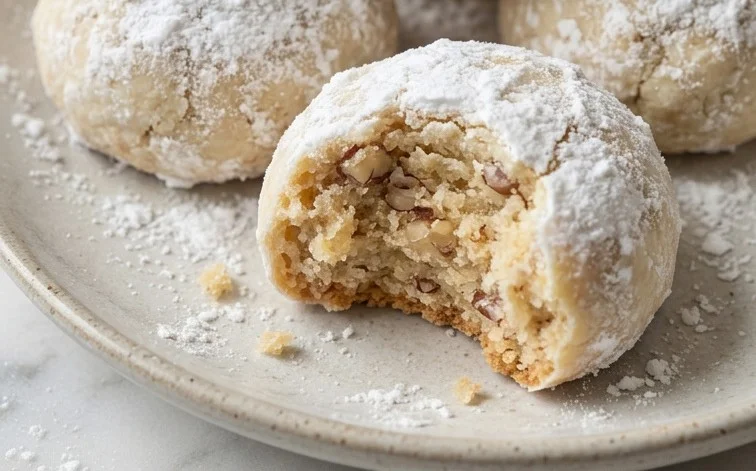
These delicate snowball cookies are a classic for a reason. They’re wonderfully tender, melt-in-your-mouth delicious, and coated in a sweet dusting of powdered sugar that makes them look like little snow-covered delights. They have a wonderfully crumbly texture from the finely chopped nuts and the perfect balance of sweetness from the butter and sugar. I love making these during the cooler months, but honestly, they’re a treat any time of year. They are simple enough for a beginner baker but impressive enough to share at any gathering. The key is using good quality ingredients and paying attention to the texture as you mix.
Ingredients:
- 2 cups flour (white, spelt, whole wheat pastry, or Bob’s Red Mill gluten-free blend all work well)
- 1/2 cup finely chopped walnuts (almonds or pecans are great alternatives too)
- 1 cup butter (softened to room temperature, or 1 cup coconut oil for a dairy-free option)
- 1/2 cup powdered sugar (also known as confectioners’ sugar or icing sugar)
- Optional: additional powdered sugar (or cocoa powder, for rolling the finished cookies)
Preparing the Dough
The first step to achieving that perfect snowball cookie texture is to cream together the butter and powdered sugar until it’s light and fluffy. This aeration is what helps give the cookies their tender crumb. If you’re using butter, make sure it’s softened, not melted. You can test this by pressing a finger into the butter; it should leave an indentation easily. If it’s too cold, it won’t cream properly, and if it’s too soft, it can make the dough greasy. Using a stand mixer with a paddle attachment makes this process very easy, but you can also use a hand mixer or even a sturdy whisk and some elbow grease.
Once your butter and sugar mixture is wonderfully light and creamy, it’s time to add the dry ingredients. Gently mix in the flour and the finely chopped nuts. I like to chop my nuts quite finely, almost to a powder, but with a few tiny pieces still visible. This gives you a lovely nut flavor and a delicate crunch without overwhelming the cookie. If you prefer a smoother texture, you can pulse the nuts in a food processor a few times, but be careful not to turn them into a paste. Add the flour and nuts gradually, mixing on a low speed until just combined. Overmixing at this stage can develop the gluten in the flour, leading to tougher cookies, which is the opposite of what we want for these melt-in-your-mouth treats. The dough will be quite soft and crumbly at this point, which is exactly how it should be.
Shaping and Baking
- Form the Snowballs: Take small portions of the dough, about one tablespoon each, and roll them between your palms to form small balls. They don’t need to be perfectly round; a slightly rustic shape adds to their charm. Aim for balls that are roughly the size of a walnut. If the dough feels too sticky to handle, you can chill it in the refrigerator for about 15-20 minutes. This makes it firmer and easier to work with. Place the formed balls onto a baking sheet lined with parchment paper. Give them a little space, about an inch apart, as they won’t spread significantly during baking.
- First Bake: Preheat your oven to 325 degrees Fahrenheit (160 degrees Celsius). Bake the cookies for about 18 to 22 minutes. You’re looking for the cookies to be very lightly golden on the bottom. They should not brown on top; the idea is to keep them pale and delicate. The edges might just start to firm up. They will feel soft when you touch them right out of the oven, and that’s okay. They continue to cook and firm up as they cool.
- Cooling and Rolling: Let the cookies cool on the baking sheet for about 5 to 10 minutes. This allows them to set up enough so they don’t fall apart when you move them. While they are still warm, but firm enough to handle, gently roll them in a bowl of powdered sugar. If you want a very thick coating, you can roll them twice. For a lighter dusting, one coating is perfect. Make sure to get an even coating all around. This step is what gives them their signature “snowball” appearance.
- Optional Double Coating: For an even more festive look and an extra layer of sweetness, you can let the cookies cool completely after the first rolling, and then give them a second roll in fresh powdered sugar. This second coating will stick well to the slightly drier surface and create a beautiful, snowy effect. If you’re feeling adventurous, you can even mix a tablespoon or two of unsweetened cocoa powder into the powdered sugar for a marbled or speckled effect, or just use cocoa powder on its own for chocolate-dusted snowballs.
- Storing Your Snowballs: Once coated, place the snowball cookies on a wire rack to dry completely. Store them in an airtight container at room temperature. They are best enjoyed within 3 to 5 days. Because they are so tender, it’s best to place a piece of parchment paper between layers if you’re stacking them in a container to prevent them from sticking together. They do not need to be refrigerated. If you want to get ahead, you can form the dough balls and freeze them on a baking sheet until firm, then transfer them to a freezer bag. Bake from frozen, adding a few extra minutes to the baking time.
Conclusion:
These snowball cookies are a delightful addition to any cookie plate, offering a tender, melt-in-your-mouth experience with every bite. Their simple elegance and wonderfully crumbly texture make them a favorite for holidays and everyday treats alike. The ease of preparation means you can whip up a batch without much fuss, and they store beautifully, making them great for make-ahead baking. For a change, try rolling the cooled cookies in unsweetened cocoa powder for a chocolatey twist, or add a touch of almond extract to the dough for an extra layer of flavor. These snowball cookies are truly versatile and always a crowd-pleaser.
Frequently Asked Questions:
Q: Can I make snowball cookies ahead of time?
A: Absolutely! Snowball cookies are excellent for making ahead. Once baked and completely cooled, store them in an airtight container at room temperature. They tend to get even more tender as they sit. For best results, add the final dusting of powdered sugar just before serving if you want them to look their freshest, although they hold up well even when sugared.
Q: How do I prevent my snowball cookies from spreading?
A: The key to preventing spread is ensuring your butter (or coconut oil) is properly softened but not melted, and that you don’t overmix the dough once the flour is added. Proper chilling of the dough, if it feels too soft, also helps maintain the cookie’s shape during baking. Ensure your oven is accurately preheated.
Q: Can I use a different type of nut?
A: Yes, you can easily substitute the walnuts. Finely chopped almonds or pecans work wonderfully and offer slightly different flavor profiles. Just make sure they are chopped very fine to maintain the cookie’s delicate texture.
Snowball Cookies
Delicate and crumbly snowball cookies, perfect for holiday baking. These melt-in-your-mouth delights are coated in a dusting of powdered sugar.
Ingredients
-
2 cups flour (white, spelt, ww pastry, or Bob’s gf)
-
1/2 cup finely chopped walnuts
-
1 cup butter
-
1/2 cup powdered sugar
-
optional additional powdered sugar
Instructions
-
Step 1
Cream together the butter and powdered sugar until light and fluffy. -
Step 2
Gradually add the flour, mixing until just combined. Stir in the finely chopped nuts. -
Step 3
Chill the dough for at least 30 minutes. -
Step 4
Preheat oven to 325°F (160°C). Line baking sheets with parchment paper. -
Step 5
Roll dough into small balls, about 1 inch in diameter. -
Step 6
Bake for 15-18 minutes, or until the edges are lightly golden. -
Step 7
Let cool on the baking sheets for a few minutes before transferring to a wire rack to cool completely. Once cool, generously roll in additional powdered sugar.
Important Information
Nutrition Facts (Per Serving)
It is important to consider this information as approximate and not to use it as definitive health advice.
Allergy Information
Please check ingredients for potential allergens and consult a health professional if in doubt.

Leave a Comment