
Coquito, the beloved Puerto Rican coconut nog, is a creamy, spiced, and utterly delicious holiday staple. It’s rich and satisfying, tasting like Christmas in a glass with its tropical sweetness and warm spices. This drink embodies warmth and festivity, making it a must-have for any holiday gathering, especially when made with simple, wholesome ingredients. Ingredients: 1 (12 oz) can evaporated milk 1 (14 oz) can sweetened condensed milk 2 cups (1 15 oz can) cream of coconut (like Coco Lopez) 1/4 tsp cinnamon 1/8 tsp nutmeg 1 tsp vanilla 1 1/2 cup white apple juice cinnamon sticks for garnish Making the Coquito Creating coquito is a straightforward process that mostly involves combining and chilling. The magic happens as the flavors meld together. My favorite part is the aroma that fills the kitchen as the spices mingle with the coconut and dairy. It’s a scent that immediately signals comfort and celebration. Step 1: Combine the Milks and Coconut Cream Begin by gathering your ingredients. You’ll need a large bowl or a pitcher to mix everything in. Pour in the entire can of evaporated milk. Evaporated milk provides a smooth, creamy base without adding too much extra liquid. Next, add the full can of sweetened condensed milk. This is what gives coquito its characteristic sweetness and luxurious texture. Be sure to scrape out as much as possible from the can to get every bit of that sweetness. Then, add the cream of coconut. This is the star ingredient that brings the tropical coconut flavor and silky smoothness. Ensure you use cream of coconut (often found in the mocktail mixer aisle), not coconut cream or milk, as it’s already sweetened and thickened. Stir everything until well combined.
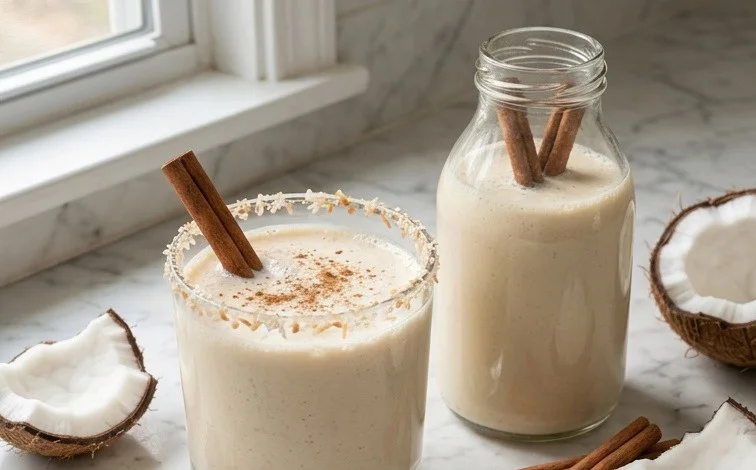
Coquito | Puerto Rican Coconut Nog
Coquito, the beloved Puerto Rican coconut nog, is a creamy, spiced, and utterly delicious holiday staple. It’s rich and satisfying, tasting like Christmas in a glass with its tropical sweetness and warm spices. This drink embodies warmth and festivity, making it a must-have for any holiday gathering, especially when made with simple, wholesome ingredients.
Ingredients:
- 1 (12 oz) can evaporated milk
- 1 (14 oz) can sweetened condensed milk
- 2 cups (1 15 oz can) cream of coconut (like Coco Lopez)
- 1/4 tsp cinnamon
- 1/8 tsp nutmeg
- 1 tsp vanilla
- 1 1/2 cup white apple juice
- cinnamon sticks for garnish
Making the Coquito
Creating coquito is a straightforward process that mostly involves combining and chilling. The magic happens as the flavors meld together. My favorite part is the aroma that fills the kitchen as the spices mingle with the coconut and dairy. It’s a scent that immediately signals comfort and celebration.
-
Step 1: Combine the Milks and Coconut Cream
Begin by gathering your ingredients. You’ll need a large bowl or a pitcher to mix everything in. Pour in the entire can of evaporated milk. Evaporated milk provides a smooth, creamy base without adding too much extra liquid. Next, add the full can of sweetened condensed milk. This is what gives coquito its characteristic sweetness and luxurious texture. Be sure to scrape out as much as possible from the can to get every bit of that sweetness. Then, add the cream of coconut. This is the star ingredient for that intense coconut flavor and richness. Brands like Coco Lopez are widely available and work wonderfully. Make sure to stir the cream of coconut can well before opening, as it can sometimes separate.
-
Step 2: Introduce the Spices and Vanilla
Once the creamy bases are combined, it’s time to add the aromatics. Measure out 1/4 teaspoon of ground cinnamon and 1/8 teaspoon of ground nutmeg. These warm spices are essential to the traditional coquito flavor profile. Don’t be tempted to add too much, as they can become overpowering. A little goes a long way in complementing the sweetness. Following that, stir in 1 teaspoon of vanilla extract. Vanilla enhances the other flavors and adds another layer of warmth and depth. Whisk these ingredients gently into the milk and coconut mixture until they are evenly distributed. You should start to see a beautiful, creamy, pale yellow color developing.
-
Step 3: Add the Apple Juice and Mix Thoroughly
Now comes the addition of the white apple juice. Measure out 1 1/2 cups of plain white apple juice. This might seem like an unusual ingredient in a creamy drink, but it plays a vital role. The apple juice adds a subtle brightness and a touch of fruity complexity that cuts through the richness of the milks and coconut. It also helps to slightly thin the mixture, making it more drinkable. Pour the apple juice into the bowl with the other ingredients. Using a whisk, thoroughly combine everything. Ensure there are no pockets of unmixed ingredients. Whisk until the mixture is completely smooth and homogenous. If you find small lumps of spices, continue whisking until they disappear. The consistency at this stage should be thick and creamy.
-
Step 4: Chill and Allow Flavors to Meld
This is arguably the most important step for developing the best flavor. Transfer your coquito mixture into a pitcher or a large airtight container. Cover it securely. Now, refrigerate the coquito. It needs at least 4 hours to chill properly, but overnight is even better. This chilling period is crucial because it allows all the flavors to meld together beautifully. The spices will infuse more deeply into the creamy base, and the overall taste will become more balanced and complex. The longer it chills, the more delicious it will be. Before serving, give it a good shake or stir, as some separation might occur, which is completely normal.
-
Step 5: Serve and Garnish
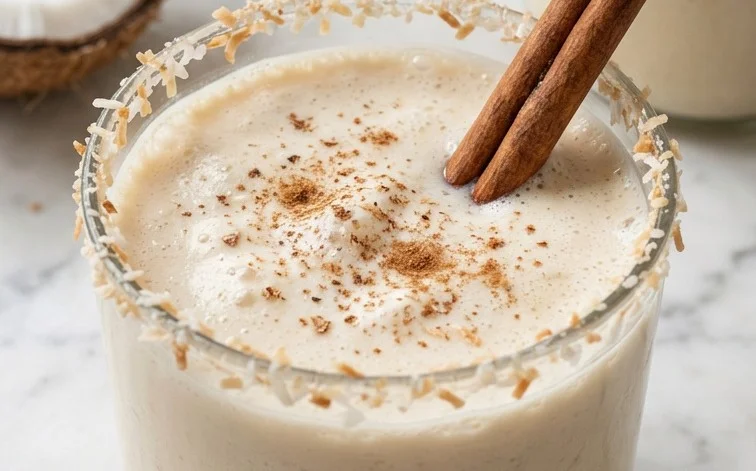
When you’re ready to serve your coquito, give it another thorough stir. Pour it into small glasses or festive mugs. The traditional garnish for coquito is a sprinkle of ground cinnamon on top or a cinnamon stick placed in the glass. The cinnamon stick not only looks beautiful but also releases its aroma as you sip, enhancing the drinking experience. Serve it cold. This drink is best enjoyed straight from the refrigerator. It’s a perfect accompaniment to holiday desserts or as a standalone treat. If you want to make individual servings for a party, you can pre-pour them into small bottles or jars and keep them chilled until ready to serve. You can also add a little extra grated nutmeg just before serving for an extra aromatic touch.
Tips for the Best Coquito
For an extra smooth texture, some people prefer to blend all the ingredients in a blender for about 30 seconds. This will ensure everything is perfectly incorporated and emulsified. When selecting your cream of coconut, look for brands that are specifically for drinks, as they tend to be sweeter and thicker than coconut milk or cream. If you find your coquito is too thick after chilling, you can add a splash more evaporated milk or a bit more apple juice to reach your desired consistency. Store any leftover coquito in the refrigerator for up to a week. It should be shaken or stirred well before each serving.
Conclusion:
Making coquito at home is a rewarding experience, filling your kitchen with festive aromas and ending with a wonderfully creamy, spiced coconut drink. This recipe focuses on achieving that classic Puerto Rican taste using readily available ingredients, ensuring your holiday gatherings are complete. Serve it chilled, garnished with a cinnamon stick, for a beautiful presentation. It pairs wonderfully with holiday cookies, pastries, or simply enjoyed on its own as a special treat. Consider adding a pinch of ground cloves along with the cinnamon and nutmeg for an extra layer of warmth. If you prefer a thicker consistency, you can slightly reduce the apple juice. Coquito is best enjoyed cold, so be sure to make it at least a few hours ahead of serving to allow it to chill properly and the flavors to deepen. Store any leftovers in an airtight container in the refrigerator for up to a week. Experimenting with the spice levels is also a great way to personalize it to your liking. Give this delightful coquito a try this holiday season; it’s sure to become a favorite tradition.
Frequently Asked Questions
What is the best way to serve Coquito?
Coquito is traditionally served chilled. For the best flavor and texture, refrigerate the coquito for at least 4 hours, or preferably overnight, before serving. Garnish each glass with a cinnamon stick or a sprinkle of ground cinnamon just before serving.
Can I make Coquito ahead of time?
Yes, absolutely. Coquito is best made ahead of time. This allows the flavors to meld together beautifully. It can be stored in an airtight container in the refrigerator for up to a week.
What kind of cream of coconut should I use?
For authentic coquito, use sweetened cream of coconut, such as Coco Lopez or similar brands. This is a thick, syrupy product specifically designed for mixed drinks and desserts, and it provides the signature sweetness and texture. Do not confuse it with coconut cream or coconut milk, which are unsweetened and have different consistencies.
Coquito | Puerto Rican Coconut Nog
A traditional Puerto Rican creamy coconut-based beverage, perfect for celebrations. This non-alcoholic version captures the essence of authentic coquito with a delightful blend of coconut, spices, and sweet milk.
Ingredients
-
1 (12 oz) can evaporated milk
-
1 (14 oz) can sweetened condensed milk
-
2 cups (1 15 oz can) cream of coconut
-
1/4 tsp cinnamon
-
1/8 tsp nutmeg
-
1 tsp vanilla extract
-
1 1/2 cup white apple juice
-
Cinnamon sticks, for garnish
Instructions
-
Step 1
Combine the evaporated milk, sweetened condensed milk, and cream of coconut in a large blender. -
Step 2
Add the cinnamon, nutmeg, and vanilla extract to the blender. -
Step 3
Pour in the white apple juice. This replaces traditional non-alcoholic alternative for a non-alcoholic version. -
Step 4
Blend all ingredients on high speed until smooth and well combined, about 1-2 minutes. -
Step 5
Taste and adjust spices if desired. -
Step 6
Pour the coquito into a pitcher or individual bottles. -
Step 7
Chill in the refrigerator for at least 2 hours, or until thoroughly cold. The flavors meld beautifully when chilled. -
Step 8
Serve chilled. Garnish each serving with a cinnamon stick before serving.
Important Information
Nutrition Facts (Per Serving)
It is important to consider this information as approximate and not to use it as definitive health advice.
Allergy Information
Please check ingredients for potential allergens and consult a health professional if in doubt.


Leave a Comment