
Snowball cookies are a delightful little treat, perfectly tender and subtly sweet, that practically melt in your mouth. They get their name from their appearance, resembling delicate snowballs, especially when dusted with powdered sugar. I love making these around the holidays, but they’re wonderful any time of year when you crave something comforting and easy to make. The key to their success is a light hand and not overworking the dough. They bake up quickly, so it’s a satisfying project for an afternoon. Ingredients: 2 cups flour (white, spelt, whole wheat pastry, or Bob’s Red Mill gluten-free blend work well) 1/2 cup finely chopped walnuts (or almonds or pecans) 1 cup butter (unsalted, softened to room temperature, or coconut oil for a dairy-free option) 1/2 cup powdered sugar (also known as confectioners’ sugar or icing sugar) Optional additional powdered sugar (or cocoa powder, for rolling) Preparing the Dough The first step is to cream together the butter and powdered sugar. This creates the base for our tender cookies. Make sure your butter is properly softened – it should yield to gentle pressure but not be melted or greasy. If you’re using coconut oil, ensure it’s solid at room temperature but soft enough to whip. I like to use an electric mixer for this, but a sturdy whisk and a bit of arm work will also do the trick. Beat them together until the mixture is light and fluffy, which usually takes a few minutes. This aeration is important for a good c
Dough Assembly
Next, you’ll add the flour and finely chopped nuts to the creamed butter and sugar mixture. Start by adding about half the flour and mix on low speed until just combined. It might seem crumbly at first, but that’s normal. Gradually add the remaining flour, mixing until the dough just comes together. Be very careful not to overmix at this stage. Overworking the dough develops the gluten in the flour, which can make your snowball cookies tough instead of tender. If the dough feels a bit too sticky to handle, you can add a tablespoon more flour at a time, but do so sparingly. The goal is a dough that holds together when pressed but isn’t wet or sticky. Once the dough is formed, gently gather it into a ball. Some recipes call for chilling the dough at this point, but these snowball cookies don’t necessarily need it if your butter was at the right temperature. If your kitchen is very warm, or your butter was a little too soft, a brief 15-30 minute chill can help make the dough easier to shape. You can do this by wrapping the dough ball in plastic wrap and placing it in the refrigerator.
Shaping and Baking
Now it’s time to form your snowballs. Take small portions of dough, about a tablespoon each, and roll them between your palms to form compact balls. They don’t need to be perfectly round; a slightly rustic look is part of their charm. Place the dough balls about an inch apart on baking sheets lined with parchment paper. This parchment paper is helpful because it prevents sticking and makes cleanup a breeze. You can also skip the parchment if you’re using a good non-stick baking sheet, but it’s an extra layer of insurance. Bake the cookies in a preheated oven at 350°F (175°C). The baking time is quite short, typically 10-14 minutes. You’re looking for the edges to be lightly golden, but the centers should still be pale. They won’t spread much, so don’t worry about leaving too much space between them, but give them a little room so they bake evenly. Keep a close eye on them as ovens can vary. Overbaking is a common mistake that leads to dry, hard cookies, so err on the side of underbaking slightly if you’re unsure. Let the cookies cool on the baking sheets for about 5 minutes before transferring them to a wire rack to cool completely. This brief cooling period on the sheet allows them to set up a bit, making them less likely to break when you move them.
Finishing Touches
Once the snowball cookies have cooled completely, it’s time for the final dusting. Place additional powdered sugar (or cocoa powder, if you prefer a chocolatey dusting) in a shallow bowl or on a plate. Gently roll each cooled cookie in the sugar or cocoa until it’s lightly coated, resembling a fresh snowball. Don’t drench them; a light coating is best. This final step adds that signature look and a touch of extra sweetness. If you opted for cocoa powder, the contrast with the cookie is lovely. Make sure the cookies are fully cool before rolling, otherwise, the sugar will melt and become sticky, and you’ll end up with a glaze rather than a dusting. This powdered sugar coating is what gives the snowball cookies their iconic appearance and a pleasant, sweet finish that complements the nutty, buttery cookie base.
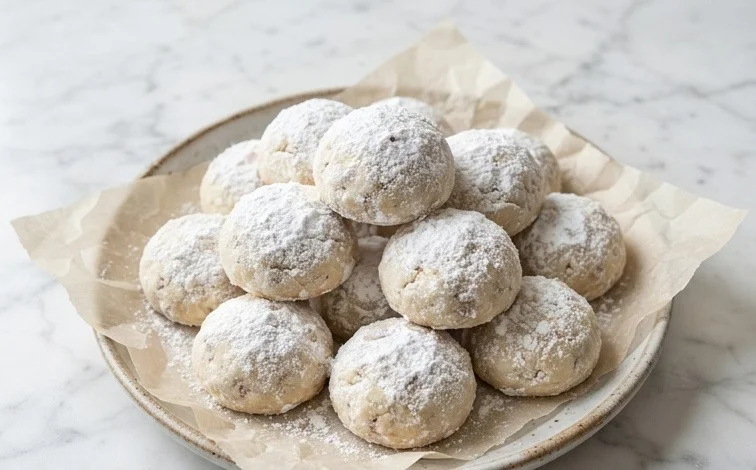
Snowball Cookies
Snowball cookies are a delightful little treat, perfectly tender and subtly sweet, that practically melt in your mouth. They get their name from their appearance, resembling delicate snowballs, especially when dusted with powdered sugar. I love making these around the holidays, but they’re wonderful any time of year when you crave something comforting and easy to make. The key to their success is a light hand and not overworking the dough. They bake up quickly, so it’s a satisfying project for an afternoon.
Ingredients:
- 2 cups flour (white, spelt, whole wheat pastry, or Bob’s Red Mill gluten-free blend work well)
- 1/2 cup finely chopped walnuts (or almonds or pecans)
- 1 cup butter (unsalted, softened to room temperature, or coconut oil for a dairy-free option)
- 1/2 cup powdered sugar (also known as confectioners’ sugar or icing sugar)
- Optional additional powdered sugar (or cocoa powder, for rolling)
Preparing the Dough
The first step is to cream together the butter and powdered sugar. This creates the base for our tender cookies. Make sure your butter is properly softened – it should yield to gentle pressure but not be melted or greasy. If you’re using coconut oil, ensure it’s solid at room temperature but soft enough to whip. I like to use an electric mixer for this, but a sturdy whisk and a bit of arm work will also do the trick. Beat them together until the mixture is light and fluffy, which usually takes a few minutes. This aeration is important for a good cookie texture.
Next, we’ll add the dry ingredients. Add the flour to the creamed butter and sugar mixture. If you’re using nuts, now is the time to stir them in. It’s really important not to overmix the dough once the flour is added. Overmixing develops the gluten in the flour, which can lead to tough cookies instead of the desired tender crumb. Just mix until everything is barely combined. You should still see a few streaks of flour. The dough will be soft and a little crumbly, which is exactly what we want.
Forming and Baking the Snowballs
Now it’s time to shape our cookies. The dough will be a bit soft, so chilling it can make it easier to handle. You can either wrap the entire bowl of dough in plastic wrap and refrigerate it for about 30 minutes, or you can roll the dough into small balls right away if it’s manageable. I usually aim for balls that are about 1 inch in diameter, similar to a small walnut. You can use a cookie scoop for uniform size, or simply roll them between your palms. Place the dough balls about 2 inches apart on a baking sheet lined with parchment paper. The parchment paper helps prevent sticking and makes for easier cleanup.
Bake the cookies in a preheated oven at 325 degrees Fahrenheit (160 degrees Celsius). They don’t need a super hot oven, as we’re looking for a gentle bake that keeps them pale and tender, not browned. Baking time is typically between 12 to 15 minutes. Keep a close eye on them. They should look set and slightly puffed, but they shouldn’t develop any significant color on the bottom or edges. If they start to brown too quickly, your oven might be running a little hot.
Cooling and Finishing
Once they’re out of the oven, let the snowball cookies cool on the baking sheet for about 5 to 10 minutes. They will still be quite delicate at this stage. After this initial cooling period, you can carefully transfer them to a wire rack to cool completely. This is when they firm up enough to be handled without falling apart.
The final step is the fun part – coating them in powdered sugar. Once the cookies are completely cool, you can roll them in additional powdered sugar. For a snowier look, don’t be shy! You can sift a generous amount of powdered sugar over them, or place some in a shallow bowl and roll each cookie to coat it evenly. If you want a chocolatey twist, you can mix some cocoa powder into the powdered sugar before rolling. This dusting not only adds a lovely finish but also enhances the sweet, melt-in-your-mouth texture.
Store your finished snowball cookies in an airtight container at room temperature. They are best enjoyed within a few days, but their delicate texture means they might start to soften over time. If you find they become too soft for your liking, you can briefly place them back on a baking sheet in a very low oven (around 200 degrees Fahrenheit or 90 degrees Celsius) for a few minutes to help them firm up again. These cookies are a simple pleasure, perfect for sharing or enjoying with a cup of tea or coffee.

Conclusion:
These snowball cookies are a simple yet elegant treat that’s incredibly satisfying to make and even more delightful to eat. Their tender, crumbly texture and subtle sweetness, enhanced by the nutty crunch and a delicate dusting of powdered sugar, make them a crowd-pleaser. They are perfect for afternoon tea, holiday gatherings, or just a sweet moment with your coffee. The versatility of the ingredients, allowing for different nuts or even a dairy-free option, means you can tailor them to your liking. Don’t be afraid to experiment with other toppings too; a light sprinkle of cinnamon sugar after the initial dusting can add a warm note. Remember, the key is a light hand with the dough and careful baking to ensure that melt-in-your-mouth texture. Give these wonderful snowball cookies a try; I’m sure you’ll love them as much as I do.
Frequently Asked Questions:
Why are my snowball cookies hard?
Hard snowball cookies are usually the result of overmixing the dough or overbaking. When you overmix, the gluten in the flour develops too much, making the cookies tough. Always mix the dough until it just comes together. For baking, watch for lightly golden edges and pale centers, and try to remove them from the oven as soon as they are done, as they continue to cook slightly on the hot baking sheet.
Can I make snowball cookies ahead of time?
Yes, absolutely! Snowball cookies can be made a day or two in advance and stored in an airtight container at room temperature. They tend to soften slightly over time, which can actually enhance their melt-in-your-mouth quality. Make sure they are completely cooled before storing them in a container, and avoid placing them in the refrigerator, as this can dry them out.
What kind of nuts are best for snowball cookies?
The recipe calls for walnuts, but almonds and pecans are also excellent choices and work beautifully in snowball cookies, providing a lovely texture and flavor contrast. Finely chopped nuts are essential for a smooth dough and even distribution. You can also omit the nuts entirely if you prefer a simpler cookie, or substitute with seeds like sunflower or pumpkin seeds for a different kind of crunch, ensuring they are also finely chopped.
Snowball Cookies
Classic snowball cookies, also known as Mexican wedding cookies or Russian tea cakes, are buttery, crumbly, and melt-in-your-mouth delicious, coated in a sweet dusting of powdered sugar.
Ingredients
-
2 cups flour
-
1/2 cup finely chopped walnuts
-
1 cup butter
-
1/2 cup powdered sugar
-
optional additional powdered sugar
Instructions
-
Step 1
Preheat oven to 350°F (175°C). Line baking sheets with parchment paper. -
Step 2
In a large bowl, cream together the butter and powdered sugar until light and fluffy. -
Step 3
Gradually beat in the flour until just combined. Stir in the finely chopped walnuts. -
Step 4
Roll the dough into small balls, about 1 inch in diameter. -
Step 5
Place the balls on the prepared baking sheets, about 1 inch apart. -
Step 6
Bake for 10-12 minutes, or until the edges are lightly golden. Do not overbake. -
Step 7
Let the cookies cool on the baking sheets for a few minutes before transferring them to a wire rack to cool completely. -
Step 8
Once cooled, roll the cookies in additional powdered sugar (or cocoa powder, if using) until generously coated. Store in an airtight container.
Important Information
Nutrition Facts (Per Serving)
It is important to consider this information as approximate and not to use it as definitive health advice.
Allergy Information
Please check ingredients for potential allergens and consult a health professional if in doubt.


Leave a Comment