
Classic Peanut Butter Blossoms are a holiday classic for a reason. The moment you press that iconic Hershey’s Kiss into the warm, soft cookie, you know you’re creating something special. These cookies are a perfect balance of salty peanut butter and sweet chocolate, with a delightful chewy texture. They’re surprisingly easy to make, making them a fantastic choice for baking with kids or for a quick homemade treat. The aroma of peanut butter and vanilla baking in your kitchen is simply irresistible. Ingredients: 1 3/4 cup All-Purpose Flour 1 tsp Baking Soda 1/2 tsp Salt 1/2 cup Creamy Peanut Butter 1/2 cup Unsalted Butter (room temperature) 1/2 cup Granulated Sugar 1/2 cup Light Brown Sugar (lightly packed) 1 Large Egg 2 tbsp Milk 1 tsp Vanilla Extract 1/2 cup Granulated Sugar (additional amount for coating cookies) 11 oz Bag of Hershey Kisses Cooking Instructions: 1. Prepare the Dry Ingredients: The first step is to get your dry ingredients ready. In a medium-sized bowl, whisk together the 1 3/4 cups of all-purpose flour, 1 teaspoon of baking soda, and 1/2 teaspoon of salt. Whisking ensures that the baking soda and salt are evenly distributed throughout the flour, which is important for the cookies to rise properly and have a balanced flavor. If these leavening agents aren’t distributed well, you might end up with some cookies that are flat and others that are too puffy. Set this bowl aside for now. 2. Cream the Butter and Sugars: In a large mixing bowl, beat together the 1/2 cup of room temperature unsalted butter, 1/2 cup of granulated sugar, and 1/2 cup of light brown sugar. Use an electric mixer on medium speed until the mixture is light and fluffy, about 2 to 3 minutes. This process, called creaming, incorporates air into the dough, which helps the cookies have a tender crumb and bake evenly. Don’t rush this step; it’s crucial for texture. Scrape down the sides of the bowl as needed to ensure everything is well combined. 3. Add Wet Ingredients: Beat in the 1 large egg until just combined. Then, stir in the 2 tablespoons of milk and 1 teaspoon of vanilla extract. Mix until everything is smoothly incorporated. The dough will be thick and creamy at this stage. Be careful not to overmix once the egg is added, as this can lead to tougher cookies. 4. Combine Wet and Dry: Gradually add the dry ingredients mixture (from step 1) to the wet ingredients in the large mixing bowl. Mix on low speed or by hand until just combined. Stop mixing as soon as you no longer see streaks of flour. Overmixing at this point develops the gluten too much, resulting in a tough cookie. It’s better to have a few small lumps than to overmix. 5. Chill the Dough: Cover the bowl with plastic wrap and refrigerate the dough for at least 30 minutes, or up to 2 days. Chilling the dough prevents the cookies from spreading too much in the oven and also makes them easier to handle and roll. If you skip chilling, your cookies might end up flatter than you want. 6. Prepare for Baking: Preheat your oven to 375°F (190°C). Line baking sheets with parchment paper or silicone baking mats. Set aside the 1/2 cup of additional granulated sugar in a shallow bowl for coating the cookies. Unwrap the Hershey Kisses so they are ready to go. 7. Roll and Coat the Dough: Scoop rounded tablespoons of the chilled dough and roll them into balls. Roll each ball in the additional granulated sugar until it’s evenly coated. This sugar coating gives the cookies a lovely sparkle and a bit of extra sweetness. Place the sugared dough balls about 2 inches apart on the prepared baking sheets. 8. Bake and Add Kisses: Bake for 8 to 10 minutes, or until the edges are lightly golden brown. The centers should still look soft. Immediately after removing the cookies from the oven, gently press one Hershey’s Kiss into the center of each warm cookie. The heat of the cookie will soften the Kiss just enough to embed it and create that signature blossom look. The aroma that fills your kitchen now is truly wonderful. 9. Cool and Enjoy: Let the cookies cool on the baking sheets for a few minutes before transferring them to a wire rack to cool completely. The peanut butter blossoms will firm up as they cool. Enjoy these classic treats!
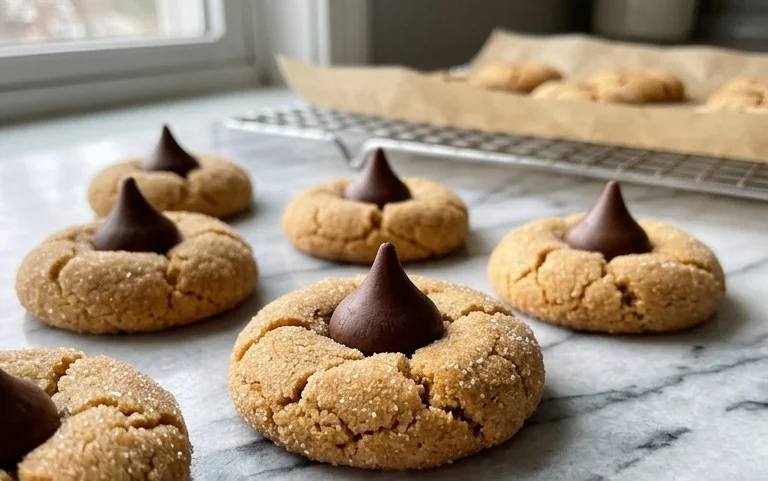
Classic Peanut Butter Blossoms
Peanut Butter Blossoms are a holiday classic for a reason. The moment you press that iconic Hershey’s Kiss into the warm, soft cookie, you know you’re creating something special. These cookies are a perfect balance of salty peanut butter and sweet chocolate, with a delightful chewy texture. They’re surprisingly easy to make, making them a fantastic choice for baking with kids or for a quick homemade treat. The aroma of peanut butter and vanilla baking in your kitchen is simply irresistible.
Ingredients:
- 1 3/4 cup All-Purpose Flour
- 1 tsp Baking Soda
- 1/2 tsp Salt
- 1/2 cup Creamy Peanut Butter
- 1/2 cup Unsalted Butter (room temperature)
- 1/2 cup Granulated Sugar
- 1/2 cup Light Brown Sugar (lightly packed)
- 1 Large Egg
- 2 tbsp Milk
- 1 tsp Vanilla Extract
- 1/2 cup Granulated Sugar (additional amount for coating cookies)
- 11 oz Bag of Hershey Kisses
Cooking Instructions:
1. Prepare the Dry Ingredients:
The first step is to get your dry ingredients ready. In a medium-sized bowl, whisk together the 1 3/4 cups of all-purpose flour, 1 teaspoon of baking soda, and 1/2 teaspoon of salt. Whisking ensures that the baking soda and salt are evenly distributed throughout the flour, which is important for the cookies to rise properly and have a balanced flavor. If these leavening agents aren’t distributed well, you might end up with some cookies that are flat and others that are too puffy. Set this bowl aside for now.
2. Cream the Butter and Sugars:
In a large mixing bowl, using an electric mixer or a sturdy whisk, cream together the 1/2 cup of unsalted butter (make sure it’s at room temperature so it creams nicely and doesn’t leave lumps) and the 1/2 cup of granulated sugar. Beat this until it’s light and fluffy. This process incorporates air into the mixture, which contributes to the cookie’s texture. Next, add the 1/2 cup of light brown sugar. Continue to cream them together until the mixture is well combined and appears pale. This combination of granulated and brown sugar provides both structure and chewiness to the cookies.
3. Incorporate Wet Ingredients:
Once your butter and sugar mixture is creamy, it’s time to add the wet ingredients. Crack in your 1 large egg. The egg acts as a binder, holding the cookie ingredients together, and also adds richness and moisture. Then, add the 2 tablespoons of milk and 1 teaspoon of vanilla extract. Vanilla extract is essential for that classic sweet cookie flavor that pairs so well with peanut butter. Beat everything together until it’s just combined. Be careful not to overmix at this stage, as overmixing can develop the gluten in the flour too much, leading to tougher cookies.
4. Combine Wet and Dry Mixtures:
Now, it’s time to bring the two mixtures together. Gradually add the dry ingredients you prepared earlier to the wet ingredients. Mix on low speed until the flour is just incorporated. Stop mixing as soon as you no longer see streaks of dry flour. It’s important to scrape down the sides of the bowl with a spatula to ensure everything is mixed evenly. The dough should be thick and slightly sticky at this point. Overmixing the dough after adding the flour can result in tough cookies, so resist the urge to keep beating it.
5. Shape and Bake the Cookies:
Preheat your oven to 375 degrees Fahrenheit (190 degrees Celsius). Line baking sheets with parchment paper to prevent sticking and make cleanup easier. In a small, shallow bowl, pour the additional 1/2 cup of granulated sugar. Take a heaping teaspoon of dough and roll it into a ball between your palms. Then, roll each dough ball in the additional granulated sugar until it’s completely coated. Place the sugared dough balls about 2 inches apart on the prepared baking sheets. Bake for 9 to 11 minutes, or until the edges are lightly golden and the centers look slightly soft. They will continue to firm up as they cool. Immediately after taking the cookies out of the oven, gently press one Hershey’s Kiss into the center of each warm cookie. The heat of the cookie will soften the Kiss just enough to make it press in easily and create that signature blossom shape. Let the cookies cool on the baking sheet for a few minutes before transferring them to a wire rack to cool completely.
Tips for Perfect Peanut Butter Blossoms:
Room temperature ingredients are your best friend here. Softened butter creams much more effectively, and an egg at room temperature incorporates better into the batter. If your butter is too cold, it can lead to a greasy dough. If your egg is straight from the fridge, it might curdle the butter mixture. Don’t skip the rolling in sugar step! This not only adds a lovely sweet crunch to the outside of the cookie but also helps prevent them from spreading too much in the oven. When pressing in the Hershey’s Kiss, do it right away. If the cookie cools too much, it will be harder to press the Kiss in without cracking the cookie. If the Kiss starts to look melty and shiny, that’s a good sign you’ve achieved the perfect softened state. These cookies are best stored in an airtight container at room temperature for up to 3-4 days. They also freeze wonderfully, either baked or unbaked. For unbaked dough balls, freeze them on a baking sheet until firm, then transfer to a freezer bag. Bake from frozen, adding a minute or two to the baking time.
Conclusion:
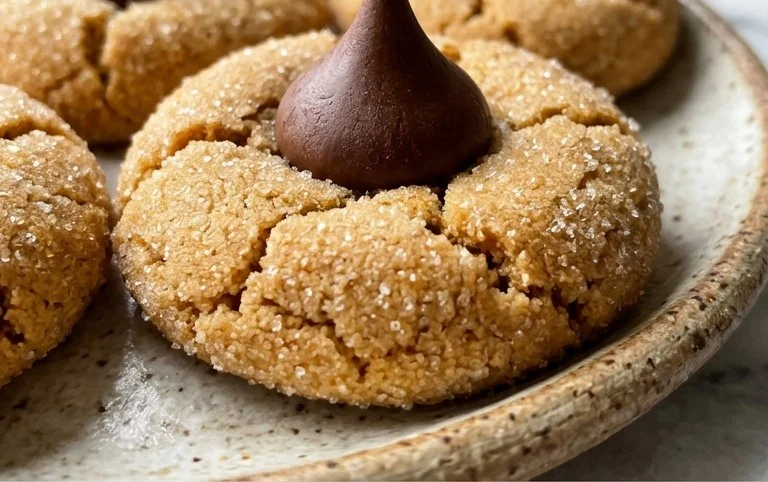
These Classic Peanut Butter Blossoms truly live up to their name, offering a delightful combination of chewy peanut butter cookie and rich chocolate top. They are a timeless treat that brings smiles with every bite, perfect for holiday gatherings, bake sales, or just because. The simple elegance of pressing a Hershey’s Kiss into the warm cookie is part of the magic, making them a joy to create and share. You’ve made a batch of cookies that perfectly balances salty peanut butter with sweet chocolate, with a wonderful texture that’s both chewy and satisfying. Give them a try, and I promise you’ll be making them again and again, just like I do.
FAQs:
Can I make the dough ahead of time?
Absolutely! You can prepare the dough and store it in the refrigerator for up to 2 days. Chilling not only makes the dough easier to handle for rolling but also enhances the flavor. Just let it sit at room temperature for a few minutes before scooping if it’s too firm.
What if I don’t have Hershey’s Kisses?
While Hershey’s Kisses are iconic for this cookie, you can substitute them with other foil-wrapped chocolate kisses or even small chocolate chunks. Just make sure they are about the same size. Some people even like to use a dollop of frosting on top after the cookie has cooled slightly, though the classic look comes from the Kiss.
How should I store Peanut Butter Blossoms?
Store the cooled cookies in an airtight container at room temperature for up to 5 days. If you stack them, place parchment paper between layers to prevent sticking. They also freeze well, either baked or as unbaked dough balls, for longer storage.
Classic Peanut Butter Blossoms
A classic cookie recipe featuring a soft peanut butter cookie topped with a chocolate kiss.
Ingredients
-
1 3/4 cup All-Purpose Flour
-
1 tsp Baking Soda
-
1/2 tsp Salt
-
1/2 cup Creamy Peanut Butter
-
1/2 cup Unsalted Butter (room temperature)
-
1/2 cup Granulated Sugar
-
1/2 cup Light Brown Sugar (lightly packed)
-
1 Large Egg
-
2 tbsp Milk
-
1 tsp Vanilla Extract
-
1/2 cup Granulated Sugar (additional amount for coating cookies)
-
11 oz Bag of Hershey Kisses
Instructions
-
Step 1
Preheat oven to 375°F (190°C). Line baking sheets with parchment paper. -
Step 2
In a medium bowl, whisk together the flour, baking soda, and salt. -
Step 3
In a large bowl, cream together the peanut butter, butter, granulated sugar, and light brown sugar until light and fluffy. -
Step 4
Beat in the egg, milk, and vanilla extract until well combined. -
Step 5
Gradually add the dry ingredients to the wet ingredients, mixing until just combined. -
Step 6
Roll dough into 1-inch balls and then roll each ball in the additional granulated sugar. Place cookies 2 inches apart on the prepared baking sheets. -
Step 7
Bake for 8-10 minutes, or until the edges are lightly golden. -
Step 8
Immediately press a Hershey’s Kiss into the center of each cookie. Let cool on the baking sheet for a few minutes before transferring to a wire rack to cool completely.
Important Information
Nutrition Facts (Per Serving)
It is important to consider this information as approximate and not to use it as definitive health advice.
Allergy Information
Please check ingredients for potential allergens and consult a health professional if in doubt.

Leave a Comment