
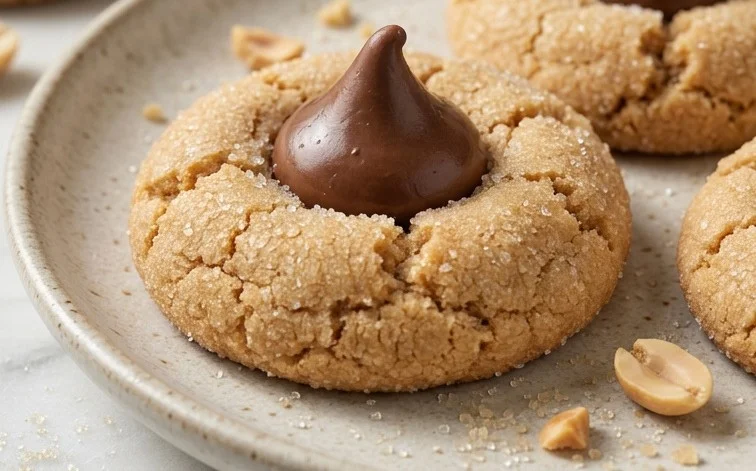
Classic Peanut Butter Blossoms are a holiday cookie classic for a reason. Their sweet, nutty flavor and the iconic chocolate kiss nestled in the center make them a crowd-pleaser. They’re surprisingly easy to make, perfect for baking with kids, and always disappear fast. The magic really happens when the warm cookie meets the melting chocolate, creating a delightful two-texture treat. The unmistakable crisscross pattern on top, a signature of peanut butter cookies, hints at the chewy, tender bite within. These cookies bring back memories of childhood kitchens and festive gatherings, and their simple charm is undeniable. With just a few pantry staples and a little bit of mixing, you can recreate this beloved treat that feels both nostalgic and wonderfully present. It’s the kind of cookie that makes any occasion feel a little more special, especially when shared.
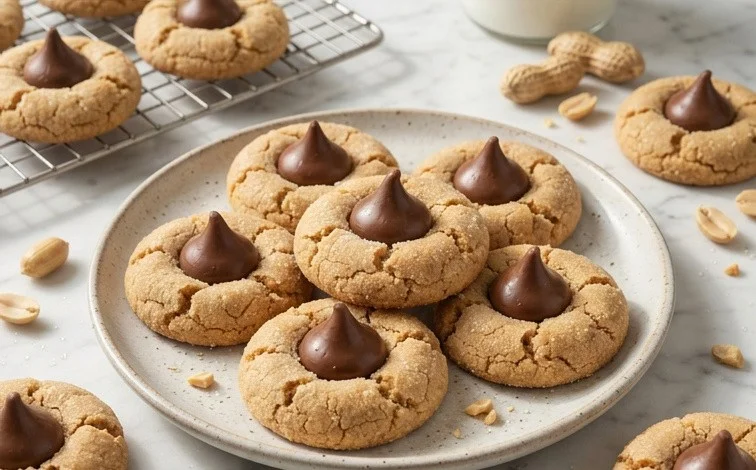
Classic Peanut Butter Blossoms
Peanut Butter Blossoms are a holiday cookie classic for a reason. Their sweet, nutty flavor and the iconic chocolate kiss nestled in the center make them a crowd-pleaser. They’re surprisingly easy to make, perfect for baking with kids, and always disappear fast. The magic really happens when the warm cookie meets the melting chocolate, creating a delightful two-texture treat.
Ingredients:
- 1 3/4 cup All-Purpose Flour
- 1 tsp Baking Soda
- 1/2 tsp Salt
- 1/2 cup Creamy Peanut Butter
- 1/2 cup Unsalted Butter (room temperature)
- 1/2 cup Granulated Sugar
- 1/2 cup Light Brown Sugar (lightly packed)
- 1 Large Egg
- 2 tbsp Milk
- 1 tsp Vanilla Extract
- 1/2 cup Granulated Sugar (additional amount for coating cookies)
- 11 oz Bag of Hershey Kisses
Getting Started: Preparing Your Dough
- Preheat and Prep: Before you even touch your ingredients, preheat your oven to 375°F (190°C). Line baking sheets with parchment paper or silicone baking mats. This prevents sticking and makes cleanup so much easier. Having everything ready to go means you can move smoothly through the recipe.
- Dry Ingredients: In a medium bowl, whisk together the all-purpose flour, baking soda, and salt. Whisking ensures that the leavening agent (baking soda) and salt are evenly distributed throughout the flour, which is key for consistent cookie rise and flavor. Set this aside.
- Creaming the Butter and Sugars: In a large bowl, using an electric mixer on medium speed, cream together the room temperature unsalted butter and the 1/2 cup of granulated sugar until light and fluffy. This process incorporates air into the butter and sugar, which helps give the cookies their tender texture. Next, add the lightly packed light brown sugar and continue to beat until well combined and fluffy, about 2-3 minutes total. Ensure your butter is truly at room temperature – not melted, but soft enough to indent easily with your finger.
- Adding Wet Ingredients: To the creamed butter and sugar mixture, add the creamy peanut butter. Beat until just combined. Then, beat in the large egg, milk, and vanilla extract until the mixture is smooth and well blended. The milk helps to create a slightly softer dough. It’s important not to overmix at this stage; just mix until everything is incorporated.
- Combining Wet and Dry: Gradually add the dry ingredients to the wet ingredients, mixing on low speed until just combined. Be careful not to overmix the dough once the flour is added, as this can lead to tough cookies. Stop mixing as soon as you no longer see streaks of dry flour. The dough will be soft and a bit sticky, which is normal.
Shaping and Baking the Cookies
- Forming the Cookie Balls: Place the additional 1/2 cup of granulated sugar in a shallow bowl. Roll the cookie dough into balls, about 1 inch in diameter. You can use a cookie scoop for uniform size. Once you have a dough ball, roll it gently in the extra granulated sugar until it’s coated all over. This sugar coating gives the cookies a lovely crisp exterior and a bit of sparkle. Place the sugared dough balls about 2 inches apart on the prepared baking sheets.
- The “Blossom” Touch: Bake the cookies for 8 to 10 minutes, or until the edges are lightly golden brown but the centers still look slightly soft. This is the critical moment before adding the Hershey’s Kiss. You want the cookies to be set enough to hold their shape but still warm and soft enough for the chocolate to melt into them. As soon as you remove the baking sheets from the oven, gently press one Hershey’s Kiss into the center of each warm cookie. The residual heat from the cookie will start to melt the chocolate, making it glossy and soft.
- Cooling and Enjoying: Let the cookies cool on the baking sheets for about 5 minutes. This allows them to firm up slightly before you try to move them. Then, carefully transfer the cookies to a wire rack to cool completely. If you try to move them too soon, they might fall apart. The Hershey’s Kiss will continue to soften as the cookie cools.
Tips for Perfect Peanut Butter Blossoms
Room temperature ingredients are key for the creaming process. If your butter is too cold, it won’t cream properly with the sugar, leading to a denser cookie. Conversely, if it’s melted, your cookies will spread too much and won’t have that desirable chewy texture. When measuring your flour, spoon it into the measuring cup and level it off with a straight edge; don’t scoop directly from the bag, as this can compact the flour and result in too much being used.
Don’t overbake these cookies! The centers should look slightly underdone when you take them out of the oven. They will continue to bake a little on the hot baking sheet, and the chocolate topping needs that warmth to melt perfectly. If you bake them until they look completely done, they might turn out dry. For the best results, aim for that slightly soft, chewy center.
If you don’t have parchment paper, make sure to generously grease your baking sheets. However, parchment paper is highly recommended for its non-stick properties and ease of cleanup. It also helps ensure the bottoms of your cookies don’t brown too quickly.
Once completely cooled, you can store these Peanut Butter Blossoms in an airtight container at room temperature for up to 3-4 days. They also freeze well, either baked or as unbaked dough balls. If freezing baked cookies, make sure they are fully cooled first, then place them in a freezer-safe bag or container. If freezing dough balls, place them on a baking sheet until frozen solid, then transfer them to a freezer bag. You can bake them directly from frozen, adding a minute or two to the baking time.
Conclusion:
Classic Peanut Butter Blossoms are truly a timeless treat that brings joy with every bite. Their comforting peanut butter flavor combined with the sweet, melted chocolate kiss makes them a holiday favorite and a year-round delight. They’re a fantastic cookie for sharing, gifting, or simply enjoying with a glass of milk. Don’t be afraid to get the kids involved in rolling the dough balls and pressing in the kisses – it’s a fun activity for everyone.
Serving Suggestions: These cookies are wonderful served warm, straight from the oven, or cooled completely. They pair perfectly with hot chocolate, coffee, or a cold glass of milk. Consider arranging them on a platter with other holiday cookies for a festive assortment.
Variations: While the classic Hershey’s Kiss is traditional, you could try other small chocolates like caramels or even a dollop of peanut butter frosting in the center after baking. For a different flavor profile, add a pinch of cinnamon to the dough.
FAQs:
Q: Why do my peanut butter cookies spread too much?
This can happen if your butter and sugar aren’t creamed properly, if you overmix the dough after adding flour, or if the oven temperature is too low. Ensure your oven is accurately preheated and try chilling the dough for 30 minutes before baking if you consistently have issues with spreading. Using the correct amount of flour is also key; spooning it into the measuring cup and leveling off is more accurate than scooping.
Q: Can I make Peanut Butter Blossoms ahead of time?
Yes, you can! The dough can be made and chilled for up to 3 days before baking. Once baked and cooled, store the cookies in an airtight container at room temperature for up to 5 days. You can also freeze baked cookies for up to 3 months.
Q: What kind of peanut butter should I use?
Creamy peanut butter is typically used for the smoothest texture in the cookie dough. Natural peanut butters, where the oil separates, can sometimes lead to a greasier cookie or one that spreads more. Stick to standard commercial creamy peanut butter for best results in this recipe.
Classic Peanut Butter Blossoms
A timeless holiday cookie featuring a soft peanut butter base topped with a Hershey Kiss.
Ingredients
-
1 3/4 cup All-Purpose Flour
-
1 tsp Baking Soda
-
1/2 tsp Salt
-
1/2 cup Creamy Peanut Butter
-
1/2 cup Unsalted Butter (room temperature)
-
1/2 cup Granulated Sugar
-
1/2 cup Light Brown Sugar (lightly packed)
-
1 Large Egg
-
2 tbsp Milk
-
1 tsp Vanilla Extract
-
1/2 cup Granulated Sugar (additional amount for coating cookies)
-
11 oz Bag of Hershey Kisses
Instructions
-
Step 1
Preheat oven to 375°F (190°C). Line baking sheets with parchment paper. -
Step 2
In a small bowl, whisk together flour, baking soda, and salt. Set aside. -
Step 3
In a large bowl, cream together peanut butter, softened butter, granulated sugar, and brown sugar until light and fluffy. -
Step 4
Beat in the egg and vanilla extract until well combined. -
Step 5
Gradually add the dry ingredients to the wet ingredients, alternating with milk, mixing until just combined. Do not overmix. -
Step 6
Roll dough into 1-inch balls and coat generously in the additional granulated sugar. Place on prepared baking sheets. -
Step 7
Bake for 8-10 minutes, or until edges are lightly golden. Do not overbake. -
Step 8
Immediately upon removing from the oven, press a Hershey Kiss into the center of each cookie. The residual heat will soften the chocolate. Let cookies cool on the baking sheets for a few minutes before transferring to a wire rack to cool completely.
Important Information
Nutrition Facts (Per Serving)
It is important to consider this information as approximate and not to use it as definitive health advice.
Allergy Information
Please check ingredients for potential allergens and consult a health professional if in doubt.

Leave a Comment