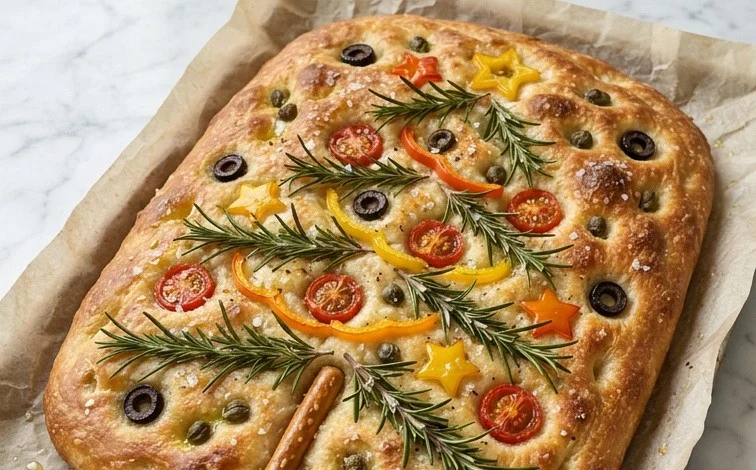
This Christmas Tree Focaccia is a beautiful and delicious centerpiece for any holiday gathering. It’s surprisingly simple to make, and the aroma of fresh rosemary and baking bread fills the kitchen, creating a truly festive atmosphere. The fluffy, airy texture of the focaccia paired with the savory toppings makes it a crowd-pleaser that’s both a visual delight and a joy to eat. I love making this for friends and family during the holidays; it’s a fun project and the result is always so rewarding.
Ingredients:
- 3 cups bread flour
- 1/4 tsp active dry yeast
- 1 1/4 tsp coarse salt
- 1 2/3 cup warm water (around 105-115°F / 40-46°C)
- Pear, thinly sliced
- Pearl onions, halved or quartered if large
- Cherry tomatoes, halved
- Red onion, thinly sliced
- Fresh rosemary sprigs
- Coarse salt, for topping
- Plenty of olive oil (a few tablespoons, you might need a little more than you think)
Making the Dough
The foundation of any good focaccia is a well-hydrated dough. This recipe uses a high ratio of water to flour, which is what gives focaccia its characteristic open crumb and chewy texture. Activate the Yeast: In a large bowl, combine the warm water and the active dry yeast. Give it a gentle stir and let it sit for about 5-10 minutes. You should see a foamy layer develop on the surface, which indicates the yeast is alive and active. If you don’t see foam, your yeast might be expired or the water wasn’t the right temperature. It’s best to start with fresh yeast.
Mix the Dough: Add the bread flour and coarse salt to the bowl with the activated yeast mixture. Stir with a wooden spoon or a sturdy spatula until a shaggy dough forms and there are no dry bits of flour left. The dough will be very sticky and loose; this is exactly what we want for a light and airy focaccia. This high hydration is key to the texture. If it seems impossibly wet, resist the urge to add more flour. Instead, keep mixing. You are developing gluten, which will give the dough structure.
First Rise (Bulk Fermentation): Cover the bowl tightly with plastic wrap or a damp kitchen towel. Let the dough rise in a warm place for about 1.5 to 2 hours, or until it has at least doubled in size. This slow rise allows the flavors to develop and the yeast to work its magic. A spot like a slightly warm oven (turned off, of course) or near a sunny window works well. For a deeper flavor, you can also let it rise in the refrigerator overnight after the initial mixing.
Prepare the Pan: Generously grease a 9×13 inch baking pan with olive oil. Don’t be shy with the oil; it helps create a crispy bottom crust and prevents sticking. Pour the risen dough into the prepared pan. Gently stretch and spread the dough to fill the pan, using oiled hands. If the dough resists, let it rest for 10-15 minutes, then try again. It will relax and spread more easily.
Second Rise (Proofing): Cover the pan loosely with plastic wrap and let the dough rest and rise for another 30-45 minutes, or until it looks puffy and has increased in volume again. This second rise is important for creating those signature dimples and an airy interior.
Shape the Tree: Once the dough has proofed, uncover it. Drizzle a little more olive oil over the top. Gently press your fingertips into the dough to create dimples all over its surface. Now, for the Christmas tree shape: using a sharp knife or kitchen shears, cut the dough from one of the shorter ends, creating a triangle shape. You can make one large triangle or a few smaller stacked triangles. Use the scraps to form a small trunk at the bottom of the tree, if desired.
Decorate and Bake
This is where the fun really begins. Add Toppings: Arrange your chosen toppings – the thinly sliced pear, halved pearl onions, halved cherry tomatoes, and thinly sliced red onion – onto the dimpled dough to resemble ornaments and garland on a Christmas tree. Don’t be afraid to get creative with your design. The pear slices can look like baubles, the tomatoes and onions like colorful lights. Press them gently into the dough so they bake in nicely. Tuck in a few fresh rosemary sprigs to look like pine needles or festive greenery. Drizzle a bit more olive oil over the toppings and sprinkle generously with coarse salt.
Bake: Preheat your oven to 400°F (200°C). Bake for 25-30 minutes, or until the focaccia is golden brown and cooked through. The aroma will fill your kitchen and signal that your beautiful Christmas tree is ready. Keep an eye on it; oven temperatures can vary. If the top is browning too quickly, you can loosely tent it with foil.
Cool and Serve: Let the focaccia cool in the pan for at least 10-15 minutes before transferring it to a wire rack. This allows the crust to set. Serve warm or at room temperature. It’s wonderful on its own, or served alongside soups and salads. The Christmas Tree Focaccia is truly a showstopper and a delightful way to celebrate the holidays.
Christmas Tree Focaccia
This Christmas Tree Focaccia is a beautiful and delicious centerpiece for any holiday gathering. It’s surprisingly simple to make, and the aroma of fresh rosemary and baking bread fills the kitchen, creating a truly festive atmosphere. The fluffy, airy texture of the focaccia paired with the savory toppings makes it a crowd-pleaser that’s both a visual delight and a joy to eat. I love making this for friends and family during the holidays; it’s a fun project and the result is always so rewarding.
Ingredients:
- 3 cups bread flour
- 1/4 tsp active dry yeast
- 1 1/4 tsp coarse salt
- 1 2/3 cup warm water (around 105-115°F / 40-46°C)
- Pear, thinly sliced
- Pearl onions, halved or quartered if large
- Cherry tomatoes, halved
- Red onion, thinly sliced
- Fresh rosemary sprigs
- Coarse salt, for topping
- Plenty of olive oil (a few tablespoons, you might need a little more than you think)
Making the Dough
The foundation of any good focaccia is a well-hydrated dough. This recipe uses a high ratio of water to flour, which is what gives focaccia its characteristic open crumb and chewy texture.
- Activate the Yeast: In a large bowl, combine the warm water and the active dry yeast. Give it a gentle stir and let it sit for about 5-10 minutes. You should see a foamy layer develop on the surface, which indicates the yeast is alive and active. If you don’t see foam, your yeast might be expired or the water wasn’t the right temperature. It’s best to start with fresh yeast.
- Mix the Dough: Add the bread flour and 1 1/4 tsp of coarse salt to the bowl with the foamy yeast mixture. Stir everything together with a spoon or a spatula until a shaggy, sticky dough forms. It will look quite wet and unmanageable at this stage, and that’s exactly what we want. Don’t be tempted to add more flour at this point. The stickiness is key to the airy texture.
- Knead (or Don’t!): For focaccia, traditional kneading isn’t strictly necessary. We’ll use a method called “stretch and fold” which is much easier and develops the gluten beautifully. Lightly oil your hands so the dough doesn’t stick to you. Reach into the bowl, grab a portion of the dough, stretch it upwards, and fold it back over itself. Rotate the bowl and repeat this process about 4-6 times. Do this every 30 minutes for about 2 hours. You’ll notice the dough becoming smoother and more elastic with each set of folds. Cover the bowl with plastic wrap or a damp kitchen towel between folds. The dough should at least double in size.
Shaping and Topping the Christmas Tree
Once the dough has risen beautifully, it’s time to shape it into our festive tree. This is where the magic happens!
- Prepare the Pan and Dough: Generously coat a baking sheet or a rimmed baking pan (about 9×13 inches or similar) with a good amount of olive oil – don’t be shy! Pour the risen dough into the oiled pan. Gently stretch and press the dough to fill the pan, or as much of it as it will naturally spread. It might not reach all the corners perfectly, and that’s okay. Let the dough rest in the pan, uncovered, for another 30-45 minutes. This final rest will help it puff up even more before baking. While the dough is resting, preheat your oven to 400°F (200°C).
- Create the Tree Shape and Dimples: After the final rest, lightly oil your fingertips. Press your fingers into the dough all over to create the characteristic dimples of focaccia. Now, carefully shape the dough into a Christmas tree. You can do this by gently pushing and pulling the dough towards the center to create a triangular shape. Leave a wider base and taper it towards the top. Don’t worry about perfection; a slightly rustic, handmade look is part of its charm.
- Add the Decorations: Now for the fun part! Drizzle a little more olive oil over the top of the dough. Arrange your toppings to resemble Christmas tree decorations. Use the thinly sliced pear, pearl onions, halved cherry tomatoes, and thinly sliced red onion. You can create patterns, clusters, or a more scattered look – it’s your edible artwork! Place fresh rosemary sprigs strategically to mimic branches or festive garland. Finally, sprinkle a generous pinch of coarse salt over the entire surface.
Baking and Serving
The aroma as this bakes is incredible, and the golden-brown crust is so inviting.
- Bake the Focaccia: Place the prepared pan in the preheated oven. Bake for 25-30 minutes, or until the focaccia is deeply golden brown and the toppings are tender and slightly caramelized. The bottom should also be golden and firm to the touch. Keep an eye on it to ensure it doesn’t burn, especially the delicate rosemary. If it’s browning too quickly, you can loosely tent it with foil.
Once it’s out of the oven, let it cool in the pan for about 10-15 minutes before slicing and serving. This allows the internal structure to set and makes it easier to cut. This Christmas Tree Focaccia is fantastic served warm as an appetizer, part of a holiday buffet, or even as a light meal with a soup or salad. Enjoy the festive flavors and the joy it brings to your table!
Conclusion:
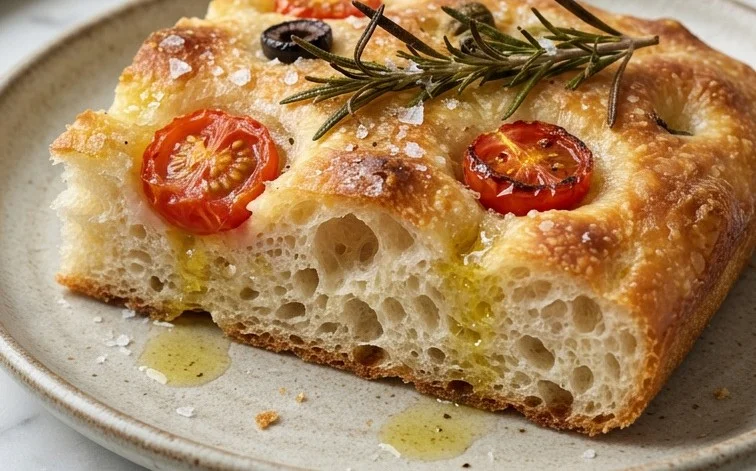
This Christmas Tree Focaccia is more than just a bread; it’s a festive edible decoration that brings joy and deliciousness to your holiday table. Its soft, airy crumb, crispy golden crust, and the beautiful arrangement of toppings make it a memorable part of any celebration. It’s a wonderfully satisfying bake, and the process of shaping and decorating it is a fantastic activity for all ages. I hope you have as much fun making and sharing this as I do.
Serving Suggestions: This focaccia is fantastic served warm as an appetizer, alongside a holiday soup, or as part of a festive buffet. You can also slice it into smaller pieces for holiday parties. Consider pairing it with a light salad or dipping it in good quality olive oil with balsamic vinegar.
Variations: Feel free to experiment with different toppings! Sliced olives can make great ornaments, and thin strips of roasted red peppers can add more color. For a different flavor profile, you could add a sprinkle of garlic powder or dried herbs to the dough itself before the first rise.
Frequently Asked Questions
Can I make the dough ahead of time?
Yes, absolutely! After mixing the dough, you can cover it tightly and refrigerate it for up to 24 hours. Let it sit at room temperature for about an hour before proceeding with the second rise and shaping. This slow, cold fermentation develops even more flavor.
My focaccia didn’t get puffy. What went wrong?
This can happen if your yeast wasn’t active, your water was too hot or too cold, or if the dough was overworked. Ensure your yeast is fresh and that the water is the correct temperature. Also, avoid adding too much extra flour, as the sticky dough is meant to be that way. Gentle handling during shaping is also key to preserving the air bubbles.
How should I store leftover focaccia?
Store any leftover Christmas Tree Focaccia in an airtight container or wrapped tightly in plastic wrap at room temperature for up to 2 days. To refresh it, you can briefly warm it in a moderate oven for a few minutes.
Christmas Tree Focaccia
A festive and flavorful focaccia bread shaped and decorated like a Christmas tree, perfect for holiday gatherings.
Ingredients
-
3 cups bread flour
-
1/4 tsp active dry yeast
-
1 1/4 tsp coarse salt
-
1 2/3 cup warm water
-
Pear, cut into decorative shapes
-
Pearl onions
-
Cherry tomatoes
-
Thinly sliced red onion
-
Fresh rosemary sprigs
-
Coarse salt, for sprinkling
-
Plenty of olive oil
Instructions
-
Step 1
In a large bowl, whisk together bread flour, active dry yeast, and 1 1/4 tsp coarse salt. Add warm water and mix until a shaggy dough forms. -
Step 2
Turn the dough out onto a lightly floured surface and knead for 8-10 minutes, or until smooth and elastic. Place in a lightly oiled bowl, cover, and let rise in a warm place for 1-1.5 hours, or until doubled in size. -
Step 3
Gently punch down the dough. Pour a generous amount of olive oil into a 9×13 inch baking pan. Spread the dough evenly in the pan, pressing it into the corners. Let it rest for another 30 minutes. -
Step 4
Preheat your oven to 425°F (220°C). Dimple the top of the focaccia with your fingers. Drizzle liberally with olive oil and sprinkle with coarse salt. -
Step 5
Decorate the focaccia to resemble a Christmas tree using pear slices for ornaments, pearl onions as lights, cherry tomatoes for baubles, and thinly sliced red onion for garland. Place rosemary sprigs for branches and a small piece of pear or red onion as a star on top. -
Step 6
Bake for 20-25 minutes, or until golden brown and cooked through. Let cool slightly before slicing and serving.
Important Information
Nutrition Facts (Per Serving)
It is important to consider this information as approximate and not to use it as definitive health advice.
Allergy Information
Please check ingredients for potential allergens and consult a health professional if in doubt.



Leave a Comment