Christmas Tree Focaccia is a showstopper for any holiday table. It’s surprisingly simple to make, and the combination of soft, chewy bread with the savory toppings is always a hit. The beautiful green of the rosemary sprigs and the pops of color from the vegetables make it a festive centerpiece. I love making this when we have guests over during the holidays; it always gets rave reviews. Ingredients: 3 cups bread flour 1/4 tsp active dry yeast 1 1/4 tsp coarse salt 1 2/3 cup warm water (around 105-115°F or 40-46°C) Pear, cut into thin slices Pearl onions, peeled Cherry tomatoes, halved Red onion, thinly sliced Fresh rosemary sprigs Coarse salt, for finishing Plenty of olive oil (at least a few tablespoons, possibly more) Making the Dough The first step is creating a simple, wet dough that will give you that wonderfully airy focaccia texture. Activate the Yeast: In a large mixing bowl, combine the warm water and the active dry yeast. Give it a gentle stir and let it sit for about 5-10 minutes. You should see the yeast start to get foamy and bubbly on the surface. This tells you the yeast is alive and ready to work its magic. If you don’t see any bubbles, your yeast might be old, or the water wasn’t the right temperature. It’s best to start over with fresh yeast and properly warmed water to ensure your dough rises. Mix the Dough: To the activated yeast mixture, add the bread flour and the 1 1/4 teaspoons of coarse salt. Mix everything together with your hands or a stand mixer fitted with a dough hook until a shaggy dough forms. It will be very wet and sticky, and that’s exactly what you want for a light focaccia. Don’t be tempted to add more flour at this stage; the high hydration is key to the bread’s texture. Let it Rest: Cover the bowl with plastic wrap or a damp kitchen towel and let the dough rise in a warm place for about 1 to 1.5 hours, or until it has doubled in size. This slow fermentation develops flavor and creates those signature large air bubbles. Preparing the Pan: While the dough is rising, generously grease a 9×13 inch baking pan with olive oil. Don’t be shy with the oil here; it helps create a crispy bottom crust and prevents sticking. Once the dough has risen, gently scrape it into the prepared pan. Be careful not to deflate it too much. With oiled hands, gently stretch and press the dough to fill the pan. It might resist at first, so let it rest for 10-15 minutes if needed, then continue stretching. Creating the Tree Shape: Now for the fun part. Use a sharp knife or pizza cutter to score the dough into a large triangle shape, representing the Christmas tree. Don’t cut all the way through, just score the surface. Then, arrange your toppings to create a festive design. Use rosemary sprigs for the ‘branches’ and outline. Place thinly sliced pears, pearl onions, halved cherry tomatoes, and thinly sliced red onion to decorate the tree. Get creative with the placement! Add a few more rosemary sprigs for a ‘star’ on top. Drizzle generously with more olive oil and sprinkle with coarse salt. Second Rise and Baking: Let the shaped and topped focaccia rest uncovered for another 20-30 minutes while you preheat your oven to 400°F (200°C). This second rise allows the dough to puff up around the toppings. Bake for 25-35 minutes, or until the focaccia is golden brown and sounds hollow when tapped on the bottom. The vegetables should be tender and slightly caramelized. Cooling and Serving: Let the Christmas Tree Focaccia cool in the pan for at least 10-15 minutes before slicing. This is important to let the structure set. Slice into squares or rectangles, making sure to cut along your scored lines. Serve warm or at room temperature. It makes a wonderful appetizer or side dish during the holiday season.
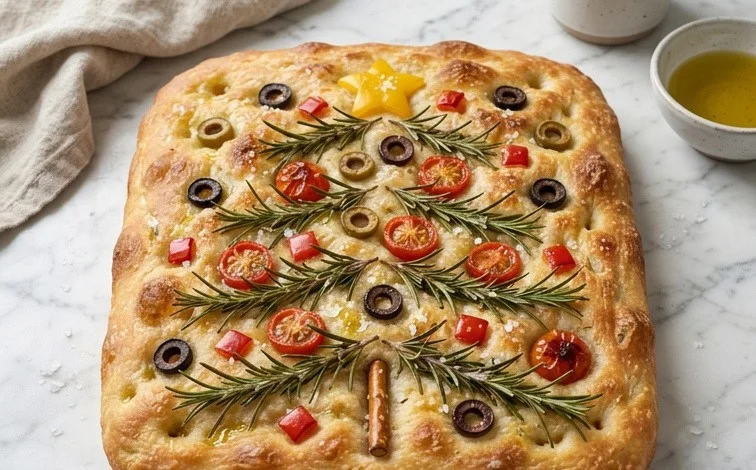
Christmas Tree Focaccia
This Christmas Tree Focaccia is a showstopper for any holiday table. It’s surprisingly simple to make, and the combination of soft, chewy bread with the savory toppings is always a hit. The beautiful green of the rosemary sprigs and the pops of color from the vegetables make it a festive centerpiece. I love making this when we have guests over during the holidays; it always gets rave reviews.
Ingredients:
- 3 cups bread flour
- 1/4 tsp active dry yeast
- 1 1/4 tsp coarse salt
- 1 2/3 cup warm water (around 105-115°F or 40-46°C)
- Pear, cut into thin slices
- Pearl onions, peeled
- Cherry tomatoes, halved
- Red onion, thinly sliced
- Fresh rosemary sprigs
- Coarse salt, for finishing
- Plenty of olive oil (at least a few tablespoons, possibly more)
Making the Dough
The first step is creating a simple, wet dough that will give you that wonderfully airy focaccia texture.
- Activate the Yeast: In a large mixing bowl, combine the warm water and the active dry yeast. Give it a gentle stir and let it sit for about 5-10 minutes. You should see the yeast start to get foamy and bubbly on the surface. This tells you the yeast is alive and ready to work its magic. If you don’t see any bubbles, your yeast might be old, or the water wasn’t the right temperature. It’s best to start over with fresh yeast and properly warmed water to ensure your dough rises.
- Mix the Dough: To the activated yeast mixture, add the bread flour and the 1 1/4 teaspoons of coarse salt. Mix everything together with a wooden spoon or a spatula until there are no dry patches of flour left. The dough will be very wet and sticky, more like a thick batter than a traditional bread dough. This is exactly what you want for a light and airy focaccia. Don’t be tempted to add more flour at this stage; it will make the bread dense.
- First Rise (Bulk Fermentation): Cover the bowl tightly with plastic wrap or a damp kitchen towel. Let the dough rest in a warm place for about 1.5 to 2 hours, or until it has doubled in size. The warm water and yeast will work together to create air bubbles, making the dough light and puffy. You can tell it’s ready when it looks visibly larger and has a bubbly surface. This slow rise develops flavor and a lovely texture.
Shaping and Topping the Focaccia
Once the dough has had its first rise, it’s time to shape it into our Christmas tree and add those festive toppings.
- Prepare the Pan and Dough: Generously coat a baking sheet or a rimmed baking pan (about 9×13 inches or similar) with a good amount of olive oil. Pour the risen dough directly onto the oiled pan. The oil will prevent sticking and help create that delicious crispy bottom. Gently spread the dough out to fill the pan using lightly oiled hands. It doesn’t need to be perfectly even; some rustic bumps and divots are part of the charm of focaccia. Let the dough rest for another 20-30 minutes, uncovered, while you preheat your oven. Preheat your oven to 425°F (220°C).
- Create the Tree Shape and Add Toppings: Drizzle a little more olive oil over the surface of the dough. Now, using your fingertips, dimple the dough all over. You want to create those classic focaccia craters. For the tree shape, use your fingers to gently pull and shape the dough towards one end of the pan, creating a triangular form that tapers to a point. Leave a little extra space around the edges for the dough to spread slightly.
Now for the decorating: Arrange the pear slices and pearl onions to form the “branches” of your Christmas tree. The cherry tomatoes and thinly sliced red onion can be placed strategically to add color and resemble ornaments. Finally, tuck fresh rosemary sprigs in between the vegetables to represent the needles of the tree. Don’t forget to sprinkle a little more coarse salt over the entire surface of the focaccia. The salt helps to draw out moisture and adds a savory crunch. Make sure your rosemary sprigs are well-placed to give that distinct tree shape. You can also use other vegetables here if you like, such as olives or colorful bell pepper strips, but stick to things that bake well.
Baking and Serving
The final steps are all about getting that perfect golden crust and enjoying your creation.
- Bake the Focaccia: Place the prepared focaccia in the preheated oven. Bake for 20-25 minutes, or until the focaccia is golden brown on top and the edges are nicely crisped. You’ll know it’s done when it sounds hollow when tapped on the bottom. The vegetables should be tender and slightly roasted. Keep an eye on it during the last few minutes of baking to ensure it doesn’t get too dark.
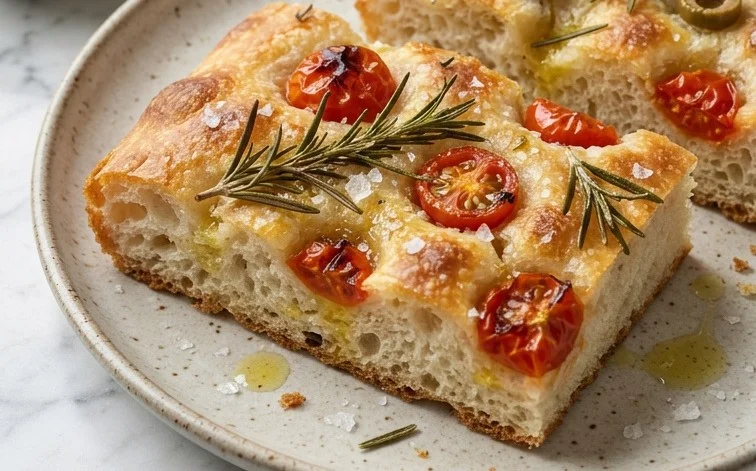
- Cool and Serve: Once baked, remove the focaccia from the oven. While it’s still warm, you can drizzle a little more olive oil over the top if you like for extra shine and flavor. Let it cool in the pan for about 10-15 minutes before carefully transferring it to a wire rack to cool completely. This resting period allows the internal structure to set. You can serve this Christmas Tree Focaccia warm or at room temperature. It’s fantastic on its own, or you can serve it alongside soups, salads, or as part of a holiday appetizer spread. The combination of the soft, airy bread, the sweet pear, the slightly sharp onion, and the fragrant rosemary makes for a truly delightful holiday treat. Leftovers can be stored in an airtight container at room temperature for a day or two, though it’s best enjoyed fresh.
Conclusion:
This Christmas Tree Focaccia truly is a centerpiece that tastes as good as it looks. The soft, airy bread combined with the fresh, savory toppings creates a delightful texture and flavor combination that’s perfect for holiday gatherings. It’s a surprisingly straightforward bake that brings so much cheer to the table. Whether you serve it as an appetizer, a side dish, or even a light lunch, it’s guaranteed to impress your guests. Don’t be afraid to get creative with your toppings; this recipe is wonderfully versatile. You can add olives, different types of onions, or even some sundried tomatoes for extra color and taste. For a slightly different flavor profile, consider adding a sprinkle of garlic powder or dried herbs to the dough itself. This focaccia is best enjoyed the day it’s made, but leftovers can be stored in an airtight container at room temperature for a day or two. Reheat gently in a low oven to refresh it.
Frequently Asked Questions:
Can I make the dough ahead of time?
Yes, you can. After the first rise, you can cover the dough tightly and refrigerate it for up to 24 hours. Let it come to room temperature for about an hour before proceeding with shaping and topping.
What if I don’t have pearl onions?
You can substitute with finely chopped regular yellow or white onion. Just make sure to chop them small enough so they don’t overpower the other ingredients or fall off easily.
How do I ensure the bread is cooked through?
The best way is to check the bottom crust. It should be golden brown and feel firm. Tapping the bottom of the focaccia and hearing a hollow sound is a good indicator that it’s fully baked.
Christmas Tree Focaccia
A festive and delicious focaccia bread shaped and decorated to resemble a Christmas tree, perfect for holiday gatherings.
Ingredients
-
3 cups bread flour
-
1/4 tsp active dry yeast
-
1 1/4 tsp coarse salt
-
1 2/3 cup warm water
-
Pear, for decoration
-
Pearl onions, for decoration
-
Cherry tomatoes, for decoration
-
Thinly sliced red onion, for decoration
-
Fresh rosemary sprigs, for decoration
-
Coarse salt, for topping
-
Plenty of olive oil
Instructions
-
Step 1
In a large bowl, whisk together bread flour, active dry yeast, and 1 1/4 tsp coarse salt. Gradually add warm water and mix until a shaggy dough forms. -
Step 2
Turn dough out onto a lightly floured surface and knead for 5-7 minutes until smooth and elastic. Place dough in a lightly oiled bowl, cover, and let rise in a warm place for 1 hour, or until doubled in size. -
Step 3
Preheat oven to 425°F (220°C). Generously oil a baking sheet or a 9×13 inch baking pan with olive oil. Press the dough into the oiled pan, creating dimples with your fingers. -
Step 4
Drizzle the top of the dough generously with olive oil. Artfully arrange the pear, pearl onions, cherry tomatoes, and red onion slices to resemble a Christmas tree shape. Tuck fresh rosemary sprigs amongst the vegetables for a festive look. -
Step 5
Sprinkle the top with additional coarse salt. Let the focaccia rest for another 15 minutes. -
Step 6
Bake for 20-25 minutes, or until golden brown and cooked through. Let cool slightly before slicing and serving.
Important Information
Nutrition Facts (Per Serving)
It is important to consider this information as approximate and not to use it as definitive health advice.
Allergy Information
Please check ingredients for potential allergens and consult a health professional if in doubt.


Leave a Comment