
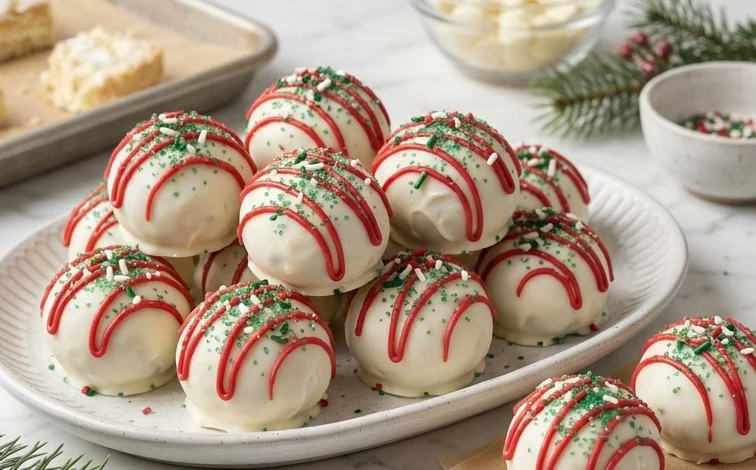
Little Debbie Christmas Tree Cakes are transformed into irresistible bite-sized delights with this no-bake recipe for Christmas Tree Cake Balls. These are the cakes we all remember from childhood, and turning them into cake balls feels like a special holiday magic trick. They are wonderfully simple to assemble, making them a perfect activity for kids or a quick, impressive addition to any holiday cookie platter. The combination of the soft, cakey interior, the creamy binding agent, and the sweet, crunchy coating is pure joy in every bite. My kitchen always smells so festive when I’m making these. Preparing the Cake Base The first step is to break down the Christmas Tree Cakes. You want to get them into a crumbly consistency so they can be mixed with the cream cheese. The easiest way to do this is to place the entire cakes, frosting and all, into a large bowl. Then, using a potato masher or even clean hands, mash them up really well. You’re aiming for a texture that resembles coarse breadcrumbs. It’s important to get them broken down as much as possible at this stage, as it will make incorporating the cream cheese much smoother. Don’t worry about perfectly uniform crumbs; a little bit of texture is fine. Next, add the softened cream cheese to the mashed cake mixture. Make sure your cream cheese is truly softened, meaning it’s at room temperature and gives slightly when pressed. If it’s too cold, it will be difficult to mix and could result in lumps. Mix this thoroughly until a thick dough forms. This dough should be moldable.
Ingredients:
- 10 Little Debbie Christmas Tree Cakes (this usually comes in 2 boxes)
- 8 ounces cream cheese, softened
- 16 ounces vanilla almond bark
- 1 cup red candy melts
- green sugar sprinkles
How to Make Christmas Tree Cake Balls
These little treats are a fun way to repurpose those iconic Little Debbie Christmas Tree Cakes into something even more irresistible. They are simple to make, requiring no baking, and are always a hit at holiday gatherings. The rich, creamy interior combined with the sweet candy coating and festive sprinkles makes them a perfect bite-sized indulgence. My kitchen always smells so festive when I’m making these.
Preparing the Cake Base
The first step is to break down the Christmas Tree Cakes. You want to get them into a crumbly consistency so they can be mixed with the cream cheese. The easiest way to do this is to place the entire cakes, frosting and all, into a large bowl. Then, using a potato masher or even clean hands, mash them up really well. You’re aiming for a texture that resembles coarse breadcrumbs. It’s important to get them broken down as much as possible at this stage, as it will make incorporating the cream cheese much smoother. Don’t worry about perfectly uniform crumbs; a little bit of texture is fine.
Next, add the softened cream cheese to the mashed cake mixture. Make sure your cream cheese is truly softened, meaning it’s at room temperature and gives slightly when pressed. If it’s too cold, it will be difficult to mix and could result in lumps. Use a sturdy spatula or a wooden spoon to mix the cream cheese into the cake crumbs. Continue mixing until everything is well combined and forms a dough-like consistency. It should hold together when you pinch it. If the mixture feels too wet, you can pop it in the refrigerator for about 15-20 minutes to firm up slightly. Conversely, if it seems too dry, you might need a tiny bit more softened cream cheese, but be careful not to add too much or they will become too soft to roll.
Forming and Chilling the Cake Balls
Once your cake mixture is ready, it’s time to roll it into balls. I usually aim for a size that’s about one inch in diameter, similar to a large marble or a small truffle. You can use a cookie scoop to get uniform sizes, or just roll them by hand. To prevent sticking, you can lightly grease your hands with a tiny bit of cooking spray or a neutral oil, or work with slightly chilled dough. Roll each ball firmly but gently. Don’t overwork the dough, as this can make the finished cake balls tough. Place the rolled cake balls onto a baking sheet lined with parchment paper. Ensure they are not touching each other, as they might stick together. After you have rolled all the cake balls, place the entire baking sheet into the refrigerator for at least 30 minutes. This chilling step is crucial. It firms up the cake balls, making them much easier to dip in the melted candy coating without falling apart.
Melting and Tempering the Coatings
While the cake balls are chilling, you can prepare your coatings. You’ll need to melt the vanilla almond bark and the red candy melts. The best way to do this is in separate microwave-safe bowls. Break the almond bark into pieces and microwave in 30-second intervals, stirring well after each interval, until fully melted and smooth. Do the same for the red candy melts. It’s important not to overheat candy melts, as they can seize up and become lumpy. You want them smooth and fluid. If you have a double boiler, that’s another excellent method for melting them gently. Once melted, stir each coating until very smooth. If the coatings seem too thick, you can add a tiny amount of vegetable shortening (about half a teaspoon at a time) to thin them out, stirring well after each addition. This helps create a smooth coating that will adhere well to the cake balls.
Dipping and Decorating the Cake Balls
Now for the fun part! Take your chilled cake balls out of the refrigerator. One by one, drop a cake ball into the melted vanilla almond bark. Use a fork or a toothpick to gently roll the cake ball in the coating until it’s completely covered. Lift it out and let any excess coating drip back into the bowl. Carefully place the coated cake ball back onto the parchment-lined baking sheet. Repeat this process with all the cake balls. Once the vanilla almond bark has set slightly, you can begin decorating. Melt the red candy melts as described earlier. You can use a piping bag with a fine tip, or a small zip-top bag with a corner snipped off, to drizzle the red candy melts over the vanilla-coated cake balls. While the red candy melt drizzle is still wet, sprinkle generously with the green sugar sprinkles. The sprinkles will stick best when the candy is soft. Allow the red candy drizzle to set completely before handling.
Finishing and Storage
Once all your cake balls are dipped, drizzled, and sprinkled, let them sit at room temperature until the candy coating is completely hardened. This usually takes about 30 minutes to an hour, depending on the temperature of your kitchen. If you need them to set faster, you can place the baking sheet back in the refrigerator for about 10-15 minutes, but be aware that this can sometimes cause a slight condensation on the candy coating.
These Christmas Tree Cake balls are best stored in an airtight container at room temperature. They should stay fresh for about 3-5 days. If your kitchen is particularly warm, storing them in the refrigerator might be a good idea to prevent them from softening, but allow them to come to room temperature for about 15-20 minutes before serving for the best texture. They are wonderful for holiday parties, cookie exchanges, or just as a festive treat to enjoy yourself.
Conclusion:
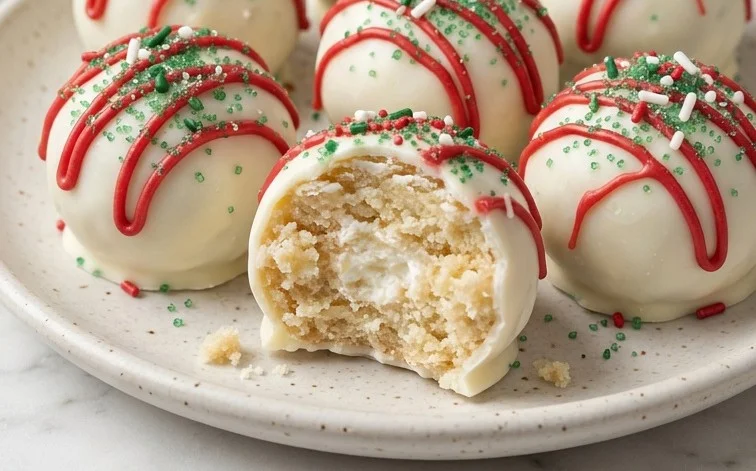
These Christmas Tree Cake Balls are a fantastic way to bring some extra festive cheer to your holiday season. They take a beloved store-bought treat and give it a homemade, extra-special twist without requiring any baking. The simple process means everyone can join in, and the result is a crowd-pleasing dessert that looks as good as it tastes. They are perfect for potlucks, school parties, or just enjoying at home with a warm drink. For a little variation, you could try dipping some in dark chocolate or white chocolate melts for a different look and flavor. You could also add a pinch of cinnamon or nutmeg to the cake and cream cheese mixture for a warmer spice note. Store any leftovers in an airtight container in the refrigerator for up to a week, though they rarely last that long!
Frequently Asked Questions:
Can I use different Little Debbie cakes?
While this recipe is specifically designed for the Christmas Tree Cakes, you could experiment with other Little Debbie snack cakes like Swiss Rolls or Oatmeal Creme Pies. The texture and flavor will change, but it could be an interesting variation. Just ensure they are broken down well.
How do I get the candy melts to set smoothly?
Ensure your candy melts are heated gently, either in the microwave in 30-second intervals, stirring in between, or over a double boiler. Do not overheat them, as they can become thick and clumpy. If they seem too thick, add a teaspoon of vegetable shortening (not oil) to help thin them out for smoother dipping.
How should I store leftover cake balls?
Store the cake balls in a single layer or with parchment paper between layers in an airtight container in the refrigerator. They will keep well for about 5-7 days. For longer storage, you can freeze them in a single layer on a baking sheet until firm, then transfer them to a freezer-safe bag or container for up to 2 months.
Little Debbie Christmas Tree Cake Balls
Turn iconic Little Debbie Christmas Tree Cakes into festive and easy no-bake cake balls, perfect for holiday parties.
Ingredients
-
10 Little Debbie Christmas Tree Cakes (2 boxes)
-
8 ounces cream cheese, softened
-
16 ounces vanilla almond bark
-
1 cup red candy melts
-
Green sugar sprinkles
Instructions
-
Step 1
Crumble the Little Debbie Christmas Tree Cakes into a large bowl, including the frosting. Make sure there are no large chunks. -
Step 2
Add the softened cream cheese to the crumbled cake mixture. Mix thoroughly until well combined and a dough-like consistency is formed. -
Step 3
Roll the mixture into small balls, about 1-inch in diameter. Place them on a parchment-lined baking sheet. -
Step 4
Melt the vanilla almond bark according to package directions. Dip each cake ball into the melted almond bark, ensuring it is fully coated. Return to the parchment-lined baking sheet. -
Step 5
Melt the red candy melts according to package directions. Drizzle the melted red candy melts over the almond bark-coated cake balls. -
Step 6
Immediately sprinkle the green sugar sprinkles over the wet candy melts before they set. Let the cake balls set completely at room temperature or in the refrigerator.
Important Information
Nutrition Facts (Per Serving)
It is important to consider this information as approximate and not to use it as definitive health advice.
Allergy Information
Please check ingredients for potential allergens and consult a health professional if in doubt.


Leave a Comment