
Christmas cookie boxes are one of my favorite holiday traditions. It’s more than just baking; it’s about curating a collection of edible gifts that spread joy and warmth. This year, I’ve put together 12 delightful recipes, ranging from classic gingerbread to delicate shortbread, all designed to be perfectly packaged together. Beyond the recipes, I’ll share my tips for making your cookie box look as stunning as it tastes. Gingerbread Cut-Out Cookies These classic gingerbread cookies are perfect for shaping into festive figures. They hold their shape beautifully when baked and have that quintessential spiced flavor. Ingredients: 3 cups all-purpose flour, plus more for dusting 1 teaspoon ground ginger 1 teaspoon ground cinnamon ½ teaspoon ground cloves ½ teaspoon salt 1 cup (2 sticks) unsalted butter, softened 1 cup packed light brown sugar 1 large egg 1 teaspoon pure vanilla extract ½ cup molasses Instructions: In a medium bowl, whisk together the flour, ginger, cinnamon, cloves, and salt. Set aside. In a large bowl, cream together the softened butter and brown sugar with an electric mixer until light and fluffy. This usually takes about 3-5 minutes. Don’t rush this step, as creaming helps create a tender cookie. Beat in the egg and vanilla extract until well combined. Scrape down the sides of the bowl as needed. Gradually add the dry ingredients to the wet ingredients, mixing on low speed until just combined. The dough will be stiff.
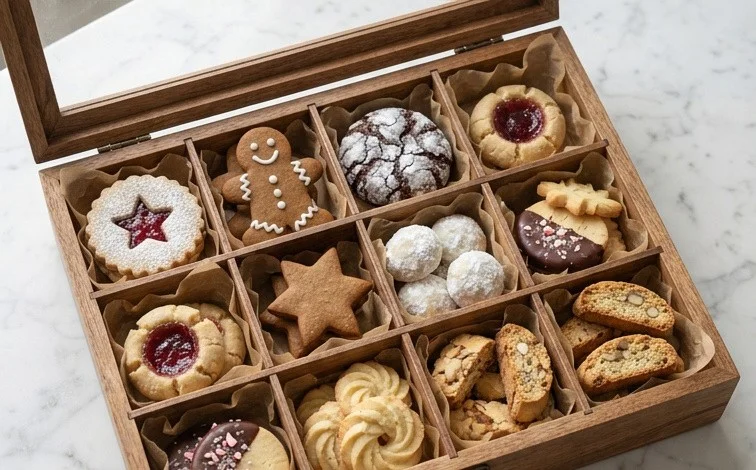
Christmas Cookie Box: 12 Recipes and a Styling Guide
Creating a Christmas cookie box is one of my favorite holiday traditions. It’s more than just baking; it’s about curating a collection of edible gifts that spread joy and warmth. This year, I’ve put together 12 delightful recipes, ranging from classic gingerbread to delicate shortbread, all designed to be perfectly packaged together. Beyond the recipes, I’ll share my tips for making your cookie box look as stunning as it tastes.
Gingerbread Cut-Out Cookies
These classic gingerbread cookies are perfect for shaping into festive figures. They hold their shape beautifully when baked and have that quintessential spiced flavor.
Ingredients:
- 3 cups all-purpose flour, plus more for dusting
- 1 teaspoon ground ginger
- 1 teaspoon ground cinnamon
- ½ teaspoon ground cloves
- ½ teaspoon salt
- 1 cup (2 sticks) unsalted butter, softened
- 1 cup packed light brown sugar
- 1 large egg
- 1 teaspoon pure vanilla extract
- ½ cup molasses
Instructions:
- In a medium bowl, whisk together the flour, ginger, cinnamon, cloves, and salt. Set aside.
- In a large bowl, cream together the softened butter and brown sugar with an electric mixer until light and fluffy. This usually takes about 3-5 minutes. Don’t rush this step, as creaming helps create a tender cookie.
- Beat in the egg and vanilla extract until well combined. Scrape down the sides of the bowl as needed.
- Gradually add the dry ingredients to the wet ingredients, mixing on low speed until just combined. The dough will be stiff.
- Add the molasses and mix until just incorporated. Be careful not to overmix at this stage.
- Divide the dough in half. Flatten each half into a disk, wrap tightly in plastic wrap, and refrigerate for at least 2 hours, or until firm. Chilling the dough is essential for easy rolling and cutting.
- Preheat your oven to 350°F (175°C). Line baking sheets with parchment paper.
- On a lightly floured surface, roll out one disk of dough to about ¼-inch thickness. Use festive cookie cutters to cut out shapes. Reroll scraps as needed, chilling the dough again if it becomes too soft.
- Carefully transfer the cut-out cookies to the prepared baking sheets, leaving about 2 inches between them.
- Bake for 8-10 minutes, or until the edges are lightly golden. The centers should still look soft.
- Let the cookies cool on the baking sheets for a few minutes before transferring them to wire racks to cool completely. Once cooled, you can decorate them with royal icing.
Classic Sugar Cookies
These are the versatile sugar cookies that everyone loves. They are a blank canvas for decorating and have a wonderful buttery flavor.
Ingredients:
- 3 cups all-purpose flour
- 1 teaspoon baking powder
- ½ teaspoon salt
- 1 cup (2 sticks) unsalted butter, softened
- 1 ½ cups granulated sugar
- 2 large eggs
- 1 teaspoon pure vanilla extract
Instructions:
- In a medium bowl, whisk together the flour, baking powder, and salt. Set aside.
- In a large bowl, cream together the softened butter and granulated sugar until light and fluffy using an electric mixer. This aerates the mixture, contributing to a lighter cookie.
- Beat in the eggs one at a time, mixing well after each addition. Stir in the vanilla extract.
- Gradually add the dry ingredients to the wet ingredients, mixing on low speed until just combined. The dough will be soft.
- Divide the dough in half, flatten each half into a disk, wrap in plastic wrap, and refrigerate for at least 1 hour, or until firm enough to handle.
- Preheat your oven to 375°F (190°C). Line baking sheets with parchment paper.
- On a lightly floured surface, roll out one disk of dough to about ¼-inch thickness. Cut out shapes using cookie cutters.
- Place the cookies on the prepared baking sheets, about 2 inches apart.
- Bake for 8-10 minutes, or until the edges are lightly golden.
- Let the cookies cool on the baking sheets for a few minutes before transferring them to wire racks to cool completely. Decorate with simple icing or sprinkles once cooled.
Cranberry Orange Biscotti
Biscotti are a wonderful addition to a cookie box because they are long-lasting and have a delightful crunch. The combination of cranberry and orange is especially festive.
Ingredients:
- 2 ½ cups all-purpose flour
- 1 teaspoon baking powder
- ½ teaspoon salt
- ¾ cup granulated sugar
- ½ cup (1 stick) unsalted butter, softened
- 2 large eggs
- 1 teaspoon vanilla extract
- Zest of 1 large orange
- ½ cup dried cranberries
Instructions:
- Preheat your oven to 350°F (175°C). Line a baking sheet with parchment paper.
- In a medium bowl, whisk together the flour, baking powder, and salt.
- In a large bowl, cream together the softened butter and sugar until well combined.
- Beat in the eggs one at a time, then stir in the vanilla extract and orange zest.
- Gradually add the dry ingredients to the wet ingredients, mixing until just combined. Stir in the dried cranberries.
- The dough will be sticky. Turn it out onto a lightly floured surface and divide it in half.
- Shape each half into a log about 10 inches long and 3 inches wide. Place the logs on the prepared baking sheet, about 4 inches apart.
- Bake for 25-30 minutes, or until the logs are golden brown and firm to the touch.
- Remove the logs from the oven and let them cool on the baking sheet for about 15 minutes. Reduce the oven temperature to 325°F (160°C).
- Using a serrated knife, carefully slice the logs into ½-inch thick cookies.
- Arrange the sliced biscotti cut-side down on the baking sheet. Bake for another 10-15 minutes per side, or until golden brown and dry.
- Transfer the biscotti to wire racks to cool completely. Store in an airtight container.
Peanut Butter Blossoms
These cookies are a crowd-pleaser, with the soft peanut butter cookie topped with a classic chocolate kiss. They’re simple to make and always disappear quickly.
Ingredients:
- 2 ¼ cups all-purpose flour
- 1 teaspoon baking soda
- ½ teaspoon salt
- ¾ cup creamy peanut butter
- ¾ cup (1 ½ sticks) unsalted butter, softened
- ¾ cup granulated sugar
- ¾ cup packed light brown sugar
- 2 large eggs
- 1 teaspoon vanilla extract
- About 36 chocolate kisses, unwrapped
- Extra granulated sugar for rolling
Instructions:
- In a medium bowl, whisk together the flour, baking soda, and salt. Set aside.
- In a large bowl, cream together the peanut butter, softened butter, granulated sugar, and brown sugar until smooth and well combined.
- Beat in the eggs one at a time, followed by the vanilla extract.
- Gradually add the dry ingredients to the wet ingredients, mixing on low speed until just combined.
- Roll the dough into 1-inch balls. In a separate shallow bowl, place some extra granulated sugar and roll each ball in the sugar to coat.
- Place the sugar-coated balls about 2 inches apart on ungreased baking sheets.
- Bake at 375°F (190°C) for 9-11 minutes, or until the edges are lightly golden.
- Immediately after removing from the oven, gently press one unwrapped chocolate kiss into the center of each warm cookie. The heat from the cookie will soften the chocolate kiss, making it easy to press in.
- Let the cookies cool on the baking sheets for a few minutes to allow the chocolate to set slightly before transferring them to wire racks to cool completely.
Shortbread Cookies
Simple, buttery shortbread is a testament to quality ingredients. These cookies have a melt-in-your-mouth texture and a delicate flavor.
Ingredients:
- 2 cups all-purpose flour
- ½ cup granulated sugar
- 1 cup (2 sticks) unsalted butter, cold and cut into cubes
- ¼ teaspoon salt
Instructions:
- In a large bowl, whisk together the flour, sugar, and salt.
- Add the cold, cubed butter to the dry ingredients. Using a pastry blender or your fingertips, cut the butter into the flour mixture until it resembles coarse crumbs.
- Mix until the dough just comes together. It will be crumbly but should hold together when squeezed.
- Turn the dough out onto a lightly floured surface and gently bring it together. Do not overwork it.
- Press the dough evenly into an 8-inch square pan or roll it out to ½-inch thickness and cut into shapes.
- Prick the surface of the dough all over with a fork.
- Bake at 300°F (150°C) for 30-40 minutes, or until the edges are lightly golden and the surface is set.
- Let the shortbread cool in the pan for 10-15 minutes before cutting it into desired shapes (bars or squares).
- Transfer the pieces to a wire rack to cool completely.
Styling Your Christmas Cookie Box
The beauty of a homemade cookie box lies not just in the variety of cookies but also in how they are presented. Here’s how I make mine look like a festive masterpiece:
First, choose your box. A sturdy cardboard box with a lid is ideal. You can find these at craft stores or even repurpose a nice gift box. Line the bottom of the box with parchment paper or festive tissue paper. This not only adds a decorative touch but also prevents cookies from sticking and absorbs any excess moisture.
Next, arrange your cookies. I like to start with the larger, sturdier cookies at the bottom and around the edges to create a base and a border. This helps to secure the smaller, more delicate cookies in the center. Think about color and texture contrast. Place brightly decorated sugar cookies next to plain shortbread, or crunchy biscotti beside soft peanut butter blossoms.
Use dividers or small paper cups to separate different types of cookies, especially if they have very different textures or might transfer color. This keeps everything neat and prevents flavors from mingling too much. You can create your own dividers from cardstock or purchase decorative ones.
Fill any empty spaces with smaller cookies or decorative elements. Small candies, candied nuts, or even sprigs of fresh rosemary (if the recipient enjoys that scent) can add visual interest and a festive touch. Avoid overcrowding; the cookies should have a little breathing room.
Finally, add a finishing touch. A ribbon tied around the box, a handwritten gift tag with the names of the cookies included, or a sprinkle of edible glitter on top can make your cookie box truly special.
Remember, the goal is to create a visually appealing and delicious gift that shows you put thought and effort into it. Enjoy the process of baking and gifting!
Conclusion:
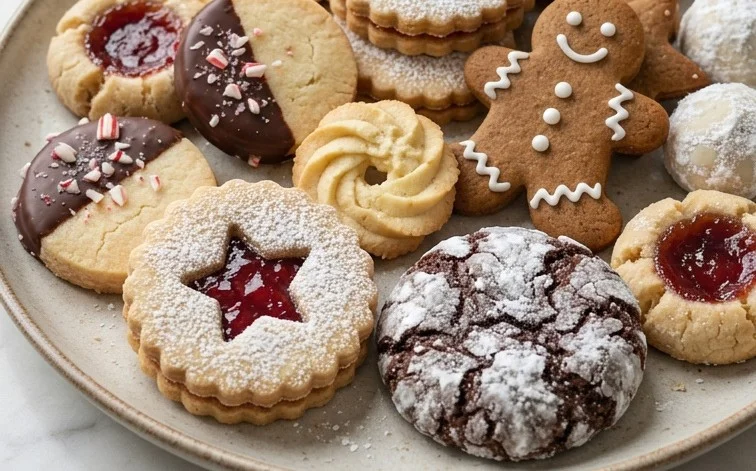
Creating a Christmas cookie box is a rewarding way to share the holiday spirit. This collection of 12 recipes offers a variety of flavors and textures, ensuring there’s something for everyone. From the spiced warmth of gingerbread to the buttery crispness of shortbread, these cookies are designed to impress. Remember to mix and match shapes and colors to make your box visually appealing. These cookies are wonderful for gifting to neighbors, colleagues, or as a sweet treat for your own holiday gatherings. Don’t be afraid to get creative with decorating; a simple glaze or a sprinkle of sanding sugar can make a big difference.
Frequently Asked Questions:
Can I make these cookies ahead of time?
Yes, most of the cookies in this Christmas cookie box collection can be made a few days in advance. Store them in airtight containers at room temperature to maintain freshness. Some cookies, like gingerbread cut-outs, even improve in flavor after a day or two. For longer storage, you can freeze baked cookies for up to 3 months.
How should I package my Christmas cookie box?
Presentation is key! Use sturdy boxes lined with parchment or wax paper. Arrange the cookies artfully, filling any gaps with smaller cookies or edible decorations. Consider using colorful tissue paper or ribbon to add a festive touch. Ensure cookies are fully cooled before packing to prevent sogginess.
Are there any nut-free options in this collection?
This collection includes several nut-free recipes. Always double-check your ingredients and ensure your workspace is free of any cross-contamination if allergies are a concern. The recipes provided focus on classic baking ingredients and do not inherently contain nuts, but variations can be made.
Christmas Cookie Box: 12 Recipes and a Styling Guide
A comprehensive guide to creating a beautiful and delicious Christmas cookie box featuring 12 distinct recipes and tips for elegant presentation.
Ingredients
-
all-purpose flour
-
unsalted butter
-
granulated sugar
-
large eggs
-
pure vanilla extract
-
baking soda
-
salt
-
powdered sugar
-
almond extract
-
heavy cream
-
chocolate chips
-
pecans
Instructions
-
Step 1
Gather all your ingredients and preheat your oven to the temperature specified in each individual cookie recipe. Prepare baking sheets by lining them with parchment paper. -
Step 2
Follow the specific instructions for each of the 12 cookie recipes, paying close attention to ingredient measurements and mixing techniques. -
Step 3
Bake each type of cookie until golden brown and set, according to their individual recipe instructions. Allow them to cool completely on a wire rack. -
Step 4
Prepare any frostings, glazes, or icings as directed by the individual cookie recipes. Decorate the cooled cookies as desired. -
Step 5
Select a sturdy cookie box or tin. Arrange the cooled and decorated cookies artfully within the box, ensuring a visually appealing assortment. -
Step 6
Use parchment paper, tissue paper, or decorative dividers to separate cookies and prevent them from sticking or breaking during transport or storage. Consider adding small sprigs of rosemary or cinnamon sticks for a festive touch.
Important Information
Nutrition Facts (Per Serving)
It is important to consider this information as approximate and not to use it as definitive health advice.
Allergy Information
Please check ingredients for potential allergens and consult a health professional if in doubt.


Leave a Comment