
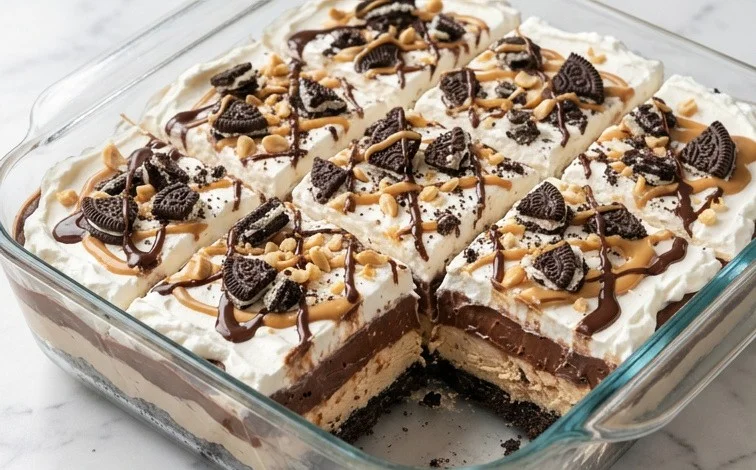
This No Bake Chocolate Peanut Butter Oreo Dessert is a chocolate lover’s dream, layered with creamy peanut butter goodness and crushed Oreos. It’s the kind of dessert you make when you want something incredibly decadent but don’t have hours to spend in the kitchen. The magic happens in how simple ingredients transform into something so satisfying. People love this dessert because it hits all the right notes: rich, chocolatey, peanut buttery, and with that signature Oreo crunch that we all adore. What makes it truly special is its no-bake nature – it means anyone can make it, and it’s always a crowd-pleaser, perfect for potlucks, birthdays, or just a Tuesday night craving. The distinct layers of flavor and texture are what truly set this No Bake Chocolate Peanut Butter Oreo Dessert apart, making each spoonful an experience.
No Bake Chocolate Peanut Butter Oreo Dessert
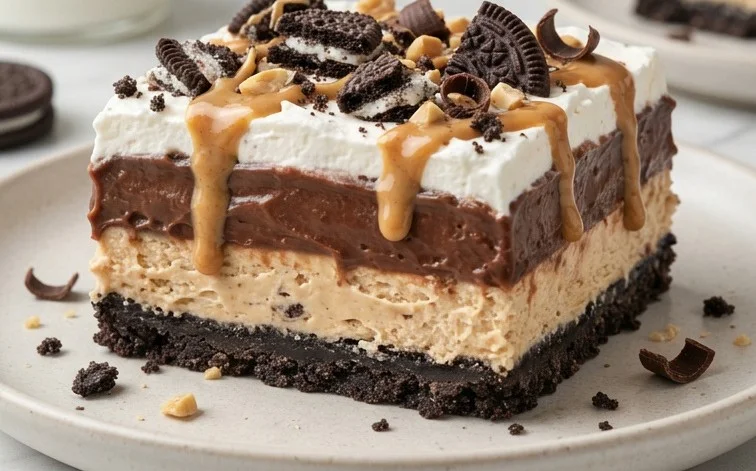
This no-bake dessert is a perfect combination of rich chocolate, creamy peanut butter, and the satisfying crunch of Oreos. It’s incredibly easy to whip up, making it ideal for last-minute gatherings or when you just need a decadent treat without turning on the oven. The layers of flavor and texture are what make this dessert so irresistible.
Ingredients:
- 12 oz milk chocolate chips, divided
- 3 1/2 cups milk
- 1 pkg Oreos (14.3 oz package, chocolate cream recommended)
- 16 oz cream cheese, divided (room temperature is key for smoothness)
- 1 box Instant Vanilla Pudding (3.4 oz box)
- 1 cup creamy peanut butter
- 1 box Instant Chocolate Pudding (3.4 oz box)
- 12 oz whipped topping (like Cool Whip), thawed
Preparing the Chocolate Base
We’ll start by creating a luscious chocolate layer that forms the foundation of our dessert. Take about 6 ounces of your milk chocolate chips and melt them. You can do this in a microwave-safe bowl in 30-second intervals, stirring well after each interval until completely smooth. Be patient; microwaving too quickly can scorch the chocolate. Alternatively, you can use a double boiler for a more controlled melt. Once melted, set this aside.
Making the Oreo Crust
Next, let’s get our Oreo crust ready. You’ll need to crush the entire package of Oreos. The easiest way to do this is to place them in a large zip-top bag and then use a rolling pin or the bottom of a sturdy glass to crush them into fine crumbs. Some larger chunks are fine for texture, but avoid huge pieces. Once crushed, you can either mix these crumbs directly with the melted chocolate, or for a more traditional crust that holds its shape a bit better, you can reserve about half a cup of the crumbs for topping later and mix the rest with the melted chocolate. If you’re mixing them all in, stir the Oreo crumbs into the melted milk chocolate until everything is well combined and the crumbs are evenly coated. This mixture will be the base layer in your serving dish. Press this chocolate-Oreo mixture firmly into the bottom of your chosen baking dish. A 9×13 inch pan works wonderfully for this recipe, or you can use individual dessert glasses or jars for a more elegant presentation. Make sure to press down evenly to create a compact base. Pop this into the refrigerator to set while you prepare the other layers.
Creating the Peanut Butter Pudding Layer
Now for the star of the show: the creamy peanut butter layer. In a large mixing bowl, beat the room temperature cream cheese until it’s completely smooth and free of lumps. This is essential for a silky-smooth filling. Add the creamy peanut butter to the softened cream cheese and beat them together until they are thoroughly combined and well incorporated. This creates a rich, decadent base.
Next, grab the box of instant vanilla pudding. In a separate, larger bowl, whisk together the 3 1/2 cups of milk with the contents of the instant vanilla pudding box. Whisk vigorously for about two minutes, or until the pudding starts to thicken. It’s important to let the pudding thicken up properly before combining it with the cream cheese mixture. Once thickened, gently fold the thickened vanilla pudding into the cream cheese and peanut butter mixture. Don’t overmix here; you want to keep it light and airy. Finally, gently fold in about half of the thawed whipped topping into this peanut butter mixture. Fold just until no white streaks remain. This lightens the filling and makes it incredibly smooth. Spread this peanut butter pudding layer evenly over the chilled Oreo crust.
Assembling the Chocolate Pudding Layer
We’re going to build another delicious layer. In a clean bowl, whisk together the 3 1/2 cups of milk with the contents of the instant chocolate pudding box. Just like with the vanilla pudding, whisk vigorously for about two minutes until it begins to thicken. Set this aside to allow it to set up further. Once it has reached a good pudding consistency, gently fold the remaining thawed whipped topping into the chocolate pudding. Again, fold carefully to maintain the airiness of the whipped topping. Spread this chocolate pudding layer evenly over the peanut butter layer.
Adding the Finishing Touches
For the final layer of indulgence, we’ll melt the remaining 6 ounces of milk chocolate chips. Melt them using the same method you used for the first batch of chocolate – either in the microwave in short bursts or over a double boiler. Once smooth and melted, let it cool slightly. You don’t want it piping hot, as it could melt the layers beneath. Drizzle this melted chocolate decoratively over the top of the chocolate pudding layer. If you reserved some Oreo crumbs, sprinkle them over the melted chocolate drizzle. This adds a lovely visual appeal and an extra bit of crunch.
Chilling and Serving
The most important step now is patience. Cover the dessert tightly with plastic wrap, making sure the plastic wrap doesn’t touch the surface of the dessert if possible. Refrigerate for at least 4 hours, but overnight is even better. This allows all the flavors to meld together and the dessert to set up properly, making it easy to slice and serve. When you’re ready to serve, cut into squares or scoop into individual bowls. This dessert is best served chilled and is a guaranteed crowd-pleaser.
Conclusion:
This No Bake Chocolate Peanut Butter Oreo Dessert truly delivers on its promise of rich, satisfying flavor with minimal effort. It’s a testament to how simple ingredients can create something spectacular, offering layers of chocolate, creamy peanut butter, and crunchy Oreos that appeal to everyone. Whether you’re hosting a party or just need a sweet treat to brighten your day, this dessert is a reliable winner. Serve it chilled, perhaps with a small dollop of extra whipped topping or a few chocolate shavings for an elegant touch. You can also get creative with variations – consider adding a sprinkle of sea salt on top to enhance the chocolate and peanut butter flavors, or even swirling in some caramel sauce between layers for an extra decadent twist. Don’t be afraid to make it your own! This recipe is forgiving and always turns out wonderfully.
Frequently Asked Questions:
Can I make this dessert ahead of time?
Absolutely! This No Bake Chocolate Peanut Butter Oreo Dessert is even better when made a few hours or even a day in advance. This allows the flavors to meld together beautifully and ensures all the layers are perfectly set. Just cover it tightly with plastic wrap and refrigerate until you’re ready to serve.
What kind of Oreos work best?
The original chocolate Oreos are fantastic and provide a great base. However, you can certainly experiment! Chocolate cream Oreos offer an extra layer of chocolate flavor, while mint Oreos would add an interesting twist. Even double-stuffed Oreos can add a richer cookie flavor to the crust. The key is to crush them well for a good crust texture.
Is it possible to use a different type of chocolate?
While milk chocolate chips are recommended for their sweetness and smooth melting properties, you can use semi-sweet chocolate chips if you prefer a less sweet dessert. Just ensure they melt smoothly. Dark chocolate chips would also work for a more intense chocolate flavor, but might require a little more stirring to achieve a smooth consistency.
No Bake Chocolate Peanut Butter Oreo Dessert
A rich and decadent no-bake dessert featuring layers of chocolate, peanut butter, and crushed Oreos, topped with whipped topping. Perfect for any occasion.
Ingredients
-
12 oz milk chocolate chips, divided
-
3 1/2 cups milk
-
1 pkg Oreos (14.3 oz package, chocolate cream)
-
16 oz cream cheese, room temperature, divided
-
1 box Instant Vanilla Pudding (3.4 oz box)
-
1 cup creamy peanut butter
-
1 box Instant Chocolate Pudding (3.4 oz box)
-
12 oz whipped topping
Instructions
-
Step 1
Crush the Oreos into fine crumbs. Set aside. -
Step 2
In a large bowl, beat softened cream cheese until smooth. Gradually beat in the peanut butter until well combined. -
Step 3
In a separate bowl, whisk together the milk and the instant vanilla pudding mix until thickened. Gently fold the vanilla pudding mixture into the cream cheese and peanut butter mixture. -
Step 4
In another bowl, whisk together the milk and the instant chocolate pudding mix until thickened. Gently fold the chocolate pudding mixture into the cream cheese mixture. -
Step 5
Fold in the whipped topping until just combined. Reserve a small amount for garnish if desired. -
Step 6
Layer the bottom of a 9×13 inch baking dish with half of the crushed Oreos. Spread half of the chocolate peanut butter pudding mixture over the cookie layer. -
Step 7
Repeat the layering process with the remaining crushed Oreos and the remaining pudding mixture. -
Step 8
Melt the milk chocolate chips (divided) in the microwave in 30-second intervals, stirring between each, until smooth. Drizzle the melted chocolate over the top of the dessert. -
Step 9
Refrigerate for at least 4 hours, or until firm. Garnish with reserved whipped topping and additional cookie crumbs if desired before serving.
Important Information
Nutrition Facts (Per Serving)
It is important to consider this information as approximate and not to use it as definitive health advice.
Allergy Information
Please check ingredients for potential allergens and consult a health professional if in doubt.


Leave a Comment