
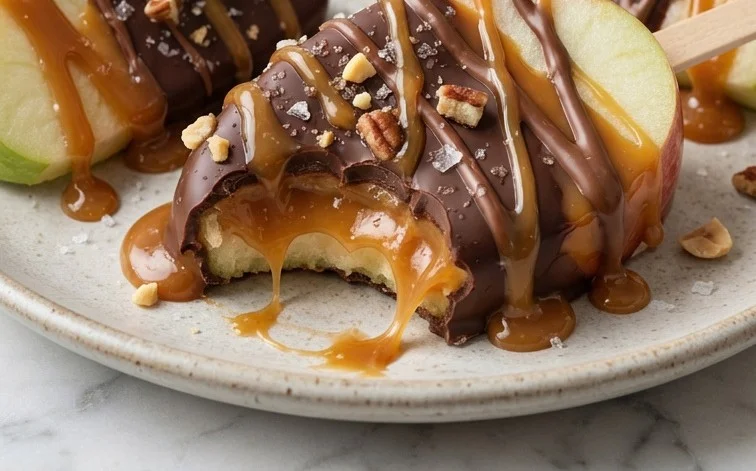
Chocolate covered caramel apple slices are a delightful way to enjoy apples, especially when they’re crisp and in season. The combination of tart apple, gooey caramel, and rich chocolate creates a treat that feels indulgent yet is surprisingly simple to make at home. Many people love this dessert because it takes a classic caramel apple and makes it easier to eat – no messy whole apples needed, just perfect bite-sized slices. What makes these chocolate covered caramel apple slices so special is the balance of textures and flavors. You get that satisfying crunch from the apple, followed by the soft chew of the caramel, all coated in a shell of smooth chocolate. Plus, you can customize them with your favorite toppings. This recipe breaks down the process so anyone can achieve professional-looking results, ensuring your homemade treats are a hit for any occasion, from fall gatherings to holiday parties or simply a sweet afternoon snack.

Chocolate Covered Caramel Apple Slices
The crisp bite of a Granny Smith apple, yielding to a chewy, sweet caramel, all enrobed in rich chocolate. That’s the magic of chocolate covered caramel apple slices. They’re a fantastic treat to make for parties, holidays, or just because you crave something special. Making them at home means you can control the quality of ingredients and customize them exactly how you like. This recipe breaks down the process into simple steps, making it approachable even for beginner cooks. The key is good preparation and working efficiently once your caramel and chocolate are melted.
Ingredients:
- 3 large Granny Smith or Honeycrisp apples (, washed and dried well)
- 10 ounces milk or dark chocolate melting wafers ((such as Ghirardelli))
- 8 ounces soft caramel squares ((1 cup), unwrapped (such as Kraft))
- 2 tablespoons heavy cream
- 1 cup complementary variety chocolate melting wafers (, optional but recommended (see note))
- mini M&M’s, chopped nuts (, and/or other assorted small toppings of your choosing*)
Preparing the Apples
The first step is getting your apples ready. You want to use firm apples that hold their shape well. Granny Smith apples offer a wonderful tartness that balances the sweetness of the caramel and chocolate. Honeycrisp apples are another excellent choice, providing a good crunch and a sweeter profile if you prefer. Regardless of your choice, wash them thoroughly under cool water and then dry them completely. Moisture is the enemy of smooth melting chocolate, so take your time with this step. Once dry, you’ll core the apples. A standard apple corer works well, or you can carefully cut around the core with a sharp knife. Then, slice the apples into wedges about half an inch thick. You can cut them into quarters first, then slice each quarter into wedges. Place the apple slices on a baking sheet lined with parchment paper. Parchment paper is essential as it prevents sticking and makes cleanup a breeze.
Making the Caramel Coating
Next, we’ll prepare the caramel that will coat the apple slices. In a microwave-safe bowl, combine the unwrapped soft caramel squares and the heavy cream. Start by microwaving the mixture on high for 60 seconds. Stir well. The caramel will still be lumpy at this point. Continue microwaving in 30-second intervals, stirring thoroughly after each interval, until the caramel is smooth and pourable. This usually takes about 2 to 3 minutes in total, depending on your microwave’s wattage. Be careful not to overheat the caramel, as it can become too stiff or even burn. You’re aiming for a consistency that coats the back of a spoon but can still be drizzled. Once smooth, let the caramel cool for a few minutes. It doesn’t need to be completely cold, but you don’t want it piping hot when you start dipping.
Dipping the Apples in Caramel
Now comes the fun part. Take one apple slice at a time and dip about two-thirds of it into the slightly cooled caramel. You can use a fork or a small spatula to help coat the slice evenly. Allow any excess caramel to drip back into the bowl for a few seconds before placing the caramel-coated apple slice back onto the parchment-lined baking sheet. Try to place them so they don’t touch each other, as this will make them easier to coat with chocolate later. Repeat this process for all your apple slices. If the caramel starts to thicken too much while you’re working, you can gently warm it in the microwave for another 15-20 seconds, stirring well, until it reaches a dippable consistency again.
Melting and Dipping in Chocolate
For the chocolate coating, place the 10 ounces of milk or dark chocolate melting wafers in a separate microwave-safe bowl. If you are using the complementary variety of chocolate melting wafers, add them to this bowl as well. These are often used to thin out the primary melting wafers and ensure a smoother, glossier finish. Microwave on high for 60 seconds, stir well, and then continue microwaving in 30-second intervals, stirring after each, until the chocolate is completely smooth and melted. Be very careful not to overheat chocolate, as it can seize up and become unusable. You want a fluid, glossy chocolate that will coat the apple slices beautifully.
The Final Enrobing
Once your chocolate is melted and smooth, it’s time for the final coating. Take a caramel-covered apple slice and dip it into the melted chocolate. You can use a fork to help coat the entire surface, ensuring the caramel is fully covered. Again, allow any excess chocolate to drip back into the bowl. Carefully place the chocolate-covered slice back onto the parchment-lined baking sheet. If you’re adding toppings, do this immediately after dipping each slice while the chocolate is still wet. Sprinkle mini M&M’s, chopped nuts, or any other toppings you desire over the chocolate. Work quickly, as the chocolate will start to set.
Setting and Serving
After all your apple slices have been dipped and decorated, place the baking sheet in the refrigerator for at least 20-30 minutes, or until the chocolate has completely set. This allows the chocolate to harden and gives the slices a clean finish. Once set, the chocolate covered caramel apple slices can be served. They are best enjoyed the same day they are made for the freshest apple crunch, but they can be stored in an airtight container in the refrigerator for up to 2 days. Be aware that the apples may soften slightly over time. Enjoy these delightful treats!
Conclusion:
Making chocolate covered caramel apple slices is a rewarding way to enjoy the best of autumn flavors. The satisfying crunch of the apple, the sweet chew of caramel, and the rich chocolate coating combine for a truly wonderful treat. These slices are perfect for sharing at parties, adding to a dessert platter, or just enjoying as a personal indulgence. You can easily adapt this recipe by experimenting with different types of chocolate or adding unique toppings that suit your taste. Don’t be afraid to get creative!
Frequently Asked Questions:
Can I use different kinds of apples?
Yes, absolutely. While Granny Smith and Honeycrisp are recommended for their firmness and flavor balance, you can use other crisp apples like Fuji, Gala, or Pink Lady. Just make sure they are firm enough to hold their shape once sliced and dipped.
How should I store leftover chocolate covered caramel apple slices?
Store them in a single layer in an airtight container in the refrigerator. They are best enjoyed within 2-3 days. Placing parchment paper between layers can prevent sticking if you need to stack them, though a single layer is ideal for maintaining their appearance.
What if my caramel is too thick or too thin?
If the caramel is too thick to spread, stir in a little more heavy cream, about a teaspoon at a time, until it reaches a spreadable consistency. If it’s too thin, it might be due to excess moisture. Let it cool slightly longer, and it should thicken. For future batches, ensure your caramel squares are fully unwrapped and at room temperature before melting.
Chocolate Covered Caramel Apple Slices
A delightful treat featuring crisp apple slices dipped in smooth caramel and rich chocolate, with optional toppings for added flair.
Ingredients
-
3 large Granny Smith or Honeycrisp apples, washed and dried well
-
10 ounces milk or dark chocolate melting wafers (such as Ghirardelli)
-
8 ounces soft caramel squares (1 cup), unwrapped (such as Kraft)
-
2 tablespoons heavy cream
-
1 cup complementary variety chocolate melting wafers (optional but recommended)
-
Mini M&M’s, chopped nuts, and/or other assorted small toppings of your choosing
Instructions
-
Step 1
Wash and thoroughly dry the apples. Core them and slice into wedges about 1/2 inch thick. -
Step 2
In a microwave-safe bowl, combine the soft caramel squares and heavy cream. Microwave in 30-second intervals, stirring between each, until smooth and fully melted. -
Step 3
Dip each apple slice into the warm caramel, allowing excess to drip off. Place on a parchment-lined baking sheet. -
Step 4
Melt the milk or dark chocolate melting wafers according to package directions (usually in the microwave in 30-second increments, stirring until smooth). -
Step 5
Dip the caramel-covered apple slices into the melted chocolate, ensuring they are fully coated. Let excess chocolate drip off and return to the parchment-lined baking sheet. -
Step 6
If using, melt the complementary chocolate wafers and drizzle over the chocolate-covered slices, or immediately sprinkle with your chosen toppings before the chocolate sets. -
Step 7
Allow the chocolate to set completely. This can be done at room temperature or in the refrigerator for faster setting.
Important Information
Nutrition Facts (Per Serving)
It is important to consider this information as approximate and not to use it as definitive health advice.
Allergy Information
Please check ingredients for potential allergens and consult a health professional if in doubt.

Leave a Comment