Cheesy Christmas Tree Bread is a showstopper appetizer that’s surprisingly simple to make. This fun, pull-apart bread shaped like a festive tree is always a hit at holiday gatherings. The combination of melted mozzarella cheese, herbs, and buttery crust makes it irresistible. It’s a savory treat that’s perfect for dipping into warm marinara or a fresh pesto. This Cheesy Christmas Tree Bread is not only a treat for the taste buds but also a visual delight, turning your appetizer spread into a holiday wonderland. It’s a wonderful activity to get the whole family involved in, from shaping the dough to brushing on the egg wash, making it a cherished holiday tradition.
Ingredients:
- 13 ounce can refrigerator pizza dough
- Parchment paper (for lining baking sheet)
- 6-7 mozzarella cheese sticks
- 1 large egg (+ 1 tablespoon water for egg wash)
- 3 tablespoons butter (melted)
- 1/2 cup grated parmesan cheese (divided)
- 1 tablespoon fresh parsley (finely chopped)
- 1/2 tablespoon fresh rosemary (finely chopped)
- 1/2 tablespoon fresh basil (finely chopped)
- 1 clove garlic (grated)
- 1 jar marinara and/or pesto (for dipping)
Preparing the Dough and Filling
The foundation of our festive bread is a simple can of refrigerator pizza dough. No need to worry about complex yeast proofing here; this dough is designed for ease and speed, making it ideal for holiday baking when time is precious. First, preheat your oven to 375 degrees Fahrenheit (190 degrees Celsius). Line a large baking sheet with parchment paper. This is a critical step to prevent any sticking.
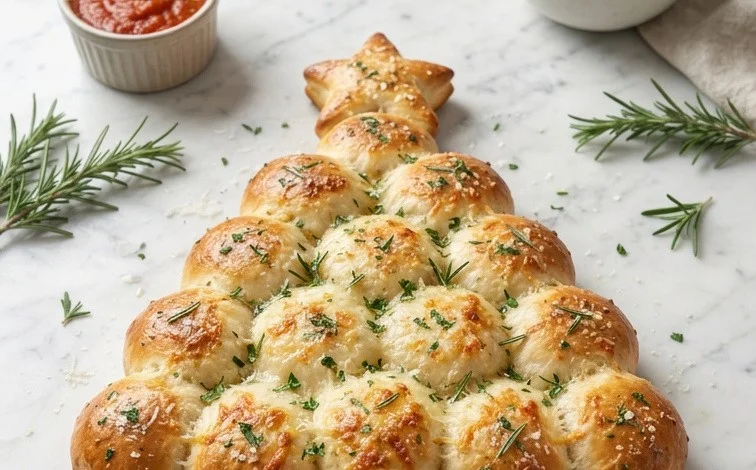
Cheesy Christmas Tree Bread
This Cheesy Christmas Tree Bread is a fun, festive, and incredibly easy appetizer that looks as good as it tastes. Imagine a golden-brown, pull-apart bread shaped like a Christmas tree, filled with melted mozzarella and seasoned with herbs. It’s the perfect centerpiece for any holiday gathering, and the best part is how simple it is to assemble, making it a great activity to do with family or friends, even the little ones. The aroma alone will fill your home with the spirit of the season. It’s a savory treat that pairs wonderfully with a warm bowl of marinara or a bright pesto for dipping.
Ingredients:
- 13 ounce can refrigerator pizza dough
- Parchment paper (for lining baking sheet)
- 6-7 mozzarella cheese sticks
- 1 large egg (+ 1 tablespoon water for egg wash)
- 3 tablespoons butter (melted)
- 1/2 cup grated parmesan cheese (divided)
- 1 tablespoon fresh parsley (finely chopped)
- 1/2 tablespoon fresh rosemary (finely chopped)
- 1/2 tablespoon fresh basil (finely chopped)
- 1 clove garlic (grated)
- 1 jar marinara and/or pesto (for dipping)
Preparing the Dough and Filling
The foundation of our festive bread is a simple can of refrigerator pizza dough. No need to worry about complex yeast proofing here; this dough is designed for ease and speed, making it ideal for holiday baking when time is precious. First, preheat your oven to 375 degrees Fahrenheit (190 degrees Celsius). Line a large baking sheet with parchment paper. This is a critical step to prevent any sticking and to make cleanup a breeze. Unwrap the pizza dough and unroll it onto a lightly floured surface. You want to gently stretch or roll it out into a rough rectangle, about 10×14 inches. Don’t strive for perfection; a little rustic charm is part of its appeal.
Next, we prepare the herby, garlicky butter mixture that will bring so much flavor. In a small bowl, combine the melted butter with the finely chopped fresh parsley, rosemary, and basil. Add the grated garlic clove and about half of the grated parmesan cheese (that’s 1/4 cup). Stir everything together until it’s well combined. This aromatic butter will be brushed over the dough, infusing it with deliciousness.
Assembling the Christmas Tree
Now for the fun part: turning our dough and cheese into a tree. Cut each mozzarella cheese stick into three equal pieces. You should have about 18-21 pieces in total, depending on how you cut them. Lay these cheese pieces in a line down the center of your prepared pizza dough rectangle. Leave a small gap between each piece of cheese.
Now, carefully fold the dough over the cheese sticks. Imagine you are making a large, very wide stuffed bread. You can either fold the dough in half lengthwise over the cheese, or fold each long side towards the center to meet over the cheese. Pinch the edges of the dough firmly together to seal the cheese inside, ensuring no cheesy escapees during baking. Try to make the seam as neat as possible.
Shaping the Tree
This is where the magic happens. Starting from one end of your sealed dough log, begin to cut triangular “branches.” Use a sharp knife or a pizza cutter for this. Make diagonal cuts from the sealed edge outwards, creating long, tapering strips. You want to cut down to, but not through, the cheese filling. These strips will be fanned out to create the shape of a Christmas tree.
Once you have cut your diagonal strips, carefully shape them. Gently fan out the dough strips on either side of the cheese filling, angling them slightly downwards. The goal is to create a roughly triangular shape, wider at the bottom and tapering towards the top. Don’t worry if it’s not perfectly symmetrical; the beauty is in its homemade charm. You can trim excess dough from the top to create a point, or even use a small piece of dough to fashion a star to place on top later.
Baking and Finishing Touches
To give our bread a beautiful golden-brown sheen, we’ll brush it with an egg wash. In a small bowl, whisk together the large egg and the tablespoon of water. Lightly brush this mixture all over the shaped bread, paying attention to all the nooks and crannies of your tree. This will help the parmesan cheese adhere and give the crust a lovely color.
Sprinkle the remaining 1/4 cup of grated parmesan cheese evenly over the top of the entire bread. Place the baking sheet into the preheated oven. Bake for 20-25 minutes, or until the bread is puffed up and golden brown. Keep an eye on it, as oven temperatures can vary. You’re looking for a beautifully browned crust and melted, gooey cheese peeking out in places.
Serving Your Festive Creation
Once baked to perfection, carefully remove the Cheesy Christmas Tree Bread from the oven. Let it cool on the baking sheet for about 5-10 minutes. This allows the cheese inside to set slightly, making it easier to handle and serve. While the bread is still warm, you can brush it with a little extra melted butter if you desire an even richer flavor and shine.
Transfer the bread to a festive serving platter. Serve warm with your favorite marinara sauce or pesto for dipping. The warm, gooey cheese, combined with the herby butter and the soft, chewy bread, is utterly irresistible. It’s a crowd-pleaser that’s sure to bring smiles to everyone’s faces during the holiday season. Store any leftovers loosely tented with foil at room temperature for a day, or refrigerate for up to 3 days. Reheat gently in a low oven to enjoy again.
Conclusion:
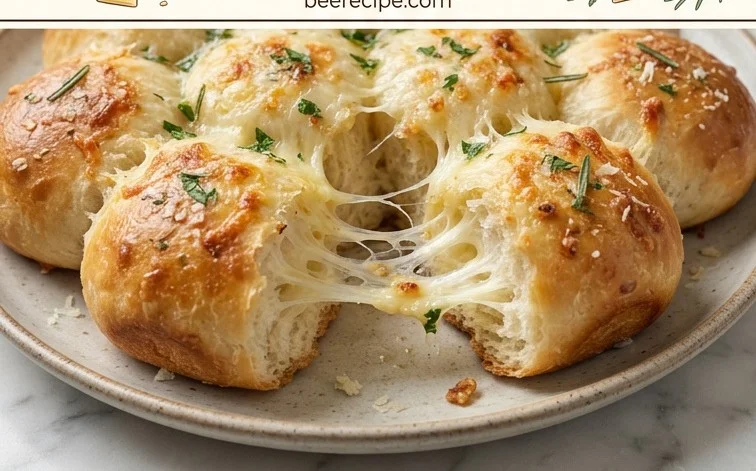
This Cheesy Christmas Tree Bread is a truly delightful addition to any holiday celebration. Its festive shape and gooey, cheesy center are sure to impress your guests, while its straightforward preparation means you can spend less time in the kitchen and more time enjoying the festivities. The golden-brown crust, infused with herbs and garlic, provides a wonderful base for the melted mozzarella. Serve it warm, with bowls of marinara or pesto for dipping, and watch it disappear. It’s a fun and interactive appetizer that brings smiles to faces of all ages, making it a memorable part of your holiday spread. Don’t hesitate to get creative with the herbs or even add a pinch of red pepper flakes for a subtle kick.
Frequently Asked Questions:
Can I make this Cheesy Christmas Tree Bread ahead of time?
While it’s best enjoyed fresh from the oven, you can assemble the bread a few hours in advance and refrigerate it. You might need to add a few extra minutes to the baking time if baking directly from the fridge. The herbs and cheese are most aromatic when freshly baked.
What can I use instead of fresh herbs?
If fresh herbs aren’t available, you can substitute dried herbs. Use about 1/3 of the amount called for fresh herbs (so about 1 teaspoon parsley, 1/2 teaspoon rosemary, and 1/2 teaspoon basil). Make sure to rub the dried herbs between your fingers before adding them to release their flavor.
How do I get a nice golden-brown color?
The egg wash is key! Beating the egg with a tablespoon of water and brushing it evenly over the dough before baking helps to create that beautiful, golden-brown sheen. You can also add a sprinkle of extra parmesan cheese over the top before baking for added color and flavor.
Cheesy Christmas Tree Bread
A festive and cheesy bread shaped like a Christmas tree, perfect for holiday gatherings and dipping.
Ingredients
-
13 ounce canned refrigerator pizza dough
-
6-7 mozzarella cheese sticks
-
1 large egg
-
1 tablespoon water
-
3 tablespoons butter
-
1/2 cup grated parmesan cheese
-
1 tablespoon fresh parsley
-
1/2 tablespoon fresh rosemary
-
1/2 tablespoon fresh basil
-
1 clove garlic
-
1 jar marinara and/or pesto
Instructions
-
Step 1
Preheat oven to 400°F (200°C). Line a baking sheet with parchment paper. -
Step 2
Unroll the pizza dough and place it on a lightly floured surface. Cut the dough into strips, about 1/2 inch wide. Cut cheese sticks into similar sized pieces. -
Step 3
Arrange the dough strips on the prepared baking sheet to form a Christmas tree shape. Weave the cheese stick pieces between the dough strips, pressing them gently into the dough. You can also wrap some dough around the cheese. -
Step 4
In a small bowl, whisk together the egg and 1 tablespoon of water to create an egg wash. Brush the egg wash over the entire bread. -
Step 5
In another small bowl, combine the melted butter, grated parmesan cheese, chopped parsley, chopped rosemary, chopped basil, and grated garlic. Brush this mixture over the bread, focusing on the exposed cheese. -
Step 6
Bake for 12-15 minutes, or until golden brown and the cheese is melted and bubbly. Let cool slightly before serving. -
Step 7
Serve warm with marinara and/or pesto for dipping.
Important Information
Nutrition Facts (Per Serving)
It is important to consider this information as approximate and not to use it as definitive health advice.
Allergy Information
Please check ingredients for potential allergens and consult a health professional if in doubt.



Leave a Comment