
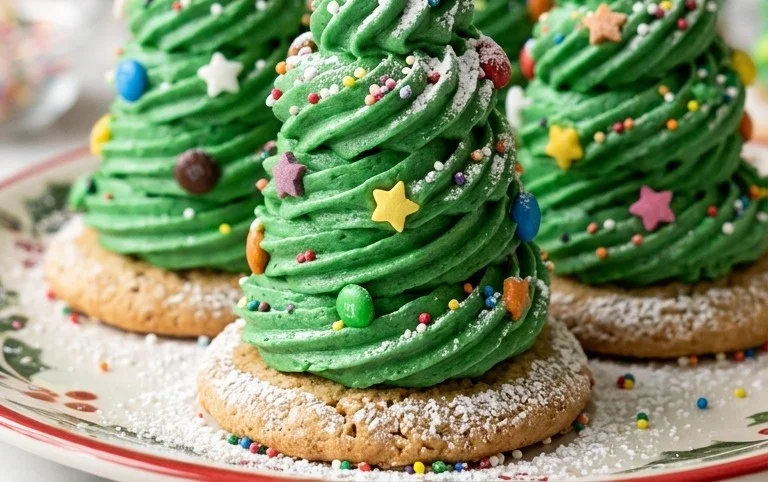
Candy Cookie Cone Christmas Trees are a delightful way to bring the holidays to life, combining crunchy sugar cones with sweet cookie ‘frosting’ and colorful candy decorations. These edible trees have a fantastic texture contrast: the crisp cone base gives way to a soft cookie topping, all adorned with bright candies that catch the eye. They’re not just treats; they’re a festive project that families can enjoy creating together, turning simple ingredients into charming holiday centerpieces. The visual appeal is undeniable, making any dessert table or holiday party spread look extra special. Each Candy Cookie Cone Christmas Tree is a miniature masterpiece, perfect for sharing and for anyone who loves a hands-on holiday craft. They bring a unique, festive touch that store-bought decorations just can’t match, and the taste is a sweet reminder of holiday joy.

Candy Cookie Cone Christmas Trees
These Candy Cookie Cone Christmas Trees are a fun and festive project that brings together the best of baking and candy decorating. They look fantastic on a dessert table and are surprisingly simple to make, making them a great activity for families or a festive contribution to a holiday party. The crunchy sugar cone base, topped with a cookie “frosting” and adorned with colorful candies, creates a delightful edible decoration. The combination of textures and sweet flavors is a guaranteed hit.
Ingredients:
- 12 sugar cones
- 12 long-size lollipop sticks
- 3 pieces of foil (each one about 10 inches long)
- 12 tablespoons of prepared cookie dough
- 12 tablespoons chocolate chips (semi-sweet or sweet)
- 8 ounces vanilla candy coating (4 squares of vanilla Almond Bark)
- 8 ounces chocolate candy coating (4 squares of chocolate Almond Bark)
- 1/2 cup shredded coconut
- 1/2 cup mini M&M candies
- 1/4 cup chocolate chips
- 1/4 cup white morsels
- Colored candy sprinkles
Preparing the Base
The foundation of our edible Christmas trees is the sugar cone. To make sure they stand tall and secure, we’ll be inserting lollipop sticks into them. This also gives us a handy handle for decorating later.
- Take each of the 12 sugar cones and carefully insert one long-size lollipop stick into the wide opening. Push it in gently until it feels secure, going about halfway into the cone. This will help anchor the cone and provide a stable base for building our tree. Make sure the stick is centered. If a cone feels a bit fragile, you can gently press the edges around the stick to help it hold.
Creating the “Cookie Frosting”
This step is where we create the delicious, cookie-flavored frosting that mimics the look and taste of real frosting, but with the added bonus of cookie dough.
- In a small bowl, combine 12 tablespoons of prepared cookie dough with 12 tablespoons of chocolate chips. You can use semi-sweet or sweet chocolate chips, depending on your preference. Stir these together until the chocolate chips are evenly distributed throughout the cookie dough. This mixture will be our “frosting.” It’s best to use a good quality cookie dough that holds its shape well. If your cookie dough is very soft, you might want to chill it slightly before using it to make it easier to handle.
Assembling the Trees
Now we’ll start building the structure of our Christmas trees by applying the cookie dough mixture to the cones.
- Take about 1 tablespoon of the cookie dough and chocolate chip mixture and press it firmly around the top, wider opening of each sugar cone. You want to create a relatively even layer that will act as the first “branch” of your tree. Think of it like frosting a cupcake, but in a more organic, tree-like fashion. As you work your way down the cone, you can add slightly smaller amounts of the mixture to create the tapering effect of a Christmas tree. This is also where you can start to shape the dough slightly to suggest branches.
Baking the Cookie Dough
We need to bake the cookie dough to set it and give it a delicious, cooked cookie flavor.
- Preheat your oven to 350 degrees Fahrenheit (175 degrees Celsius).
- Arrange the prepared sugar cones, with the cookie dough attached, on a baking sheet. It’s a good idea to line the baking sheet with parchment paper for easier cleanup.
- Carefully place the baking sheet in the preheated oven.
- Bake for 8-10 minutes, or until the cookie dough is lightly golden brown and set. Keep a close eye on them, as the sugar cones can burn if overbaked. The goal is to cook the cookie dough without letting the cone get too dark. Once baked, remove the baking sheet from the oven and let the trees cool completely on the sheet. This cooling process is important for allowing the cookie dough to firm up.
Decorating the Trees
This is the most fun part, where we transform our baked cookie cones into festive Christmas trees with colorful candies.
- Prepare your decorating station. You’ll need the foil pieces, shredded coconut, mini M&M candies, extra chocolate chips, white morsels, and colored candy sprinkles.
- Melt the vanilla candy coating and chocolate candy coating separately. You can do this in microwave-safe bowls in 30-second intervals, stirring in between, until smooth. Alternatively, you can use a double boiler.
- Once the trees are completely cool, it’s time to add the “snow” and “ornaments.” Dip the top of each tree, where you applied the cookie dough, into the melted vanilla candy coating. You can also drizzle some of the vanilla coating over the cookie dough to give it a frosted look. Immediately sprinkle with shredded coconut to resemble snow.
- Next, use the melted chocolate candy coating. You can either drizzle it over the trees to create a more rustic, garland-like effect, or use it to attach candies. For the “ornaments,” press mini M&M candies, extra chocolate chips, and white morsels onto the still-wet candy coating. Don’t be afraid to get creative with the placement.
- Finish by scattering colored candy sprinkles over the trees for extra festive sparkle. The foil pieces can be used to wrap the base of the trees once they are fully decorated and the candy coating has set, giving them a polished, gift-ready look. To do this, place the base of a cooled, decorated tree in the center of a foil piece and gather the foil up around the base, twisting it gently. Allow all the candy coating to harden completely before serving or storing. This usually takes about 15-20 minutes at room temperature, or you can speed it up by placing them in the refrigerator for about 10 minutes.
Conclusion:
These Candy Cookie Cone Christmas Trees are a wonderfully fun and festive project that truly brings the spirit of the holidays to your dessert table. They combine simple ingredients with creative decorating to produce edible decorations that are as delightful to look at as they are to eat. The crunch of the sugar cone, the softness of the cookie, and the colorful candy toppings offer a great mix of textures and sweet flavors. Whether you make them with family for a bonding activity or bring them as a unique contribution to a holiday gathering, these Candy Cookie Cone Christmas Trees are sure to be a memorable hit.
For serving, these trees stand perfectly on their own as a sweet treat after a meal. You can also arrange them in a festive display on a platter. For variations, consider using different colored cookie dough or different types of candies for the decorations – think edible glitter, silver dragees, or even small fondant stars.
Can I make these ahead of time?
Yes, absolutely. Once the cookie and candy decorations are fully set, you can store the Candy Cookie Cone Christmas Trees in an airtight container at room temperature for up to 3-4 days. Avoid refrigerating them, as this can make the sugar cones soggy.
What kind of cookie dough should I use?
The recipe calls for prepared cookie dough, and a basic sugar cookie dough works best. You can use store-bought dough for convenience or your favorite homemade sugar cookie recipe. Ensure it’s firm enough to hold its shape when piped.
Are these suitable for very young children to help with?
Yes, with supervision. Younger children can help with placing the candies onto the cookie ‘frosting’ once it’s applied, which is a less messy and very enjoyable part of the process. They can also help wrap the foil around the base.
Candy Cookie Cone Christmas Trees
Festive and edible Christmas trees made with sugar cones, cookie dough, and candy coatings. A fun and easy holiday treat for all ages.
Ingredients
-
12 sugar cones
-
12 long-size lollipop sticks
-
3 pieces of foil (each one about 10 inches long)
-
12 tablespoons of prepared cookie dough
-
12 tablespoons chocolate chips (semi-sweet or sweet)
-
8 ounces vanilla candy coating ((4 squares of vanilla Almond Bark))
-
8 ounces chocolate candy coating ((4 squares of chocolate Almond Bark))
-
1/2 cup shredded coconut
-
1/2 cup mini M&M candies
-
1/4 cup chocolate chips
-
1/4 cup white morsels
-
Colored candy sprinkles
Instructions
-
Step 1
Preheat oven to 350 degrees F (175 degrees C). Line a baking sheet with parchment paper. -
Step 2
Insert a lollipop stick into the wide end of each sugar cone. If necessary, use a small amount of cookie dough to secure the stick. -
Step 3
Carefully spread about 1 tablespoon of prepared cookie dough onto the outside of each cone, forming a tree shape. You can use the back of a spoon to help shape it. -
Step 4
Press 1 tablespoon of chocolate chips into the cookie dough on each cone. -
Step 5
Bake for 10-12 minutes, or until the cookie dough is golden brown and cooked through. Let cool completely on the baking sheet. -
Step 6
Melt the vanilla candy coating according to package directions in a microwave-safe bowl. Dip the cooled cookie cones into the melted vanilla coating, ensuring they are fully covered. Let excess drip off. -
Step 7
While the vanilla coating is still wet, decorate with shredded coconut (for snow), mini M&M candies (for ornaments), and colored candy sprinkles. -
Step 8
In a separate bowl, melt the chocolate candy coating. Drizzle the melted chocolate over the vanilla-coated cones for added detail or to create branches. -
Step 9
Melt the white morsels separately and drizzle them over the cones for contrast. -
Step 10
Allow the candy coating to set completely. Wrap the foil around the base of each cone to create a stand and help them remain upright. You can shape the foil to look like a tree trunk.
Important Information
Nutrition Facts (Per Serving)
It is important to consider this information as approximate and not to use it as definitive health advice.
Allergy Information
Please check ingredients for potential allergens and consult a health professional if in doubt.



Leave a Comment