
Candy Cookie Cone Christmas Trees are a truly fun project that brings out the holiday spirit, turning everyday ingredients into charming edible decorations. Imagine a crunchy sugar cone forming the base, topped with a soft cookie ‘trunk’ and adorned with colorful candy ‘foliage’ – it’s a delightful mix of textures and sweet flavors. They’re ideal for cookie exchanges, classroom parties, or just making your dessert table look extra festive. This recipe is quite straightforward, making it perfect for involving kids in holiday baking. We’ll use simple items like sugar cones, lollipop sticks, cookie dough, chocolate chips, and candy coatings to build these miniature edible trees.
Preparing Your Workstation
Before we begin assembling our trees, it’s helpful to get everything ready. This project involves melting candy coatings, which can set quickly, so having your decorating elements prepared beforehand will make the process much smoother. You’ll want to lay out your foil pieces. These will serve as a protective surface to catch any drips and make cleanup easier. They’re also handy for setting aside your finished trees as they harden. Make sure you have your cookie dough ready to portion, and all your candies and sprinkles within easy reach.

Candy Cookie Cone Christmas Trees
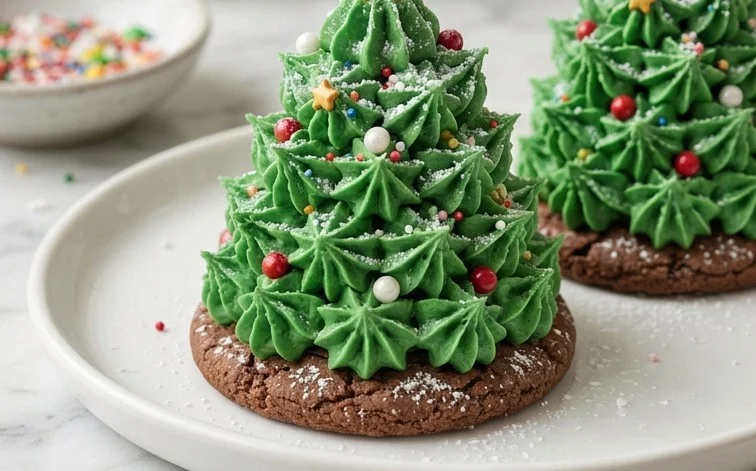
These Candy Cookie Cone Christmas Trees are a fun and festive project that the whole family can get involved with, turning simple ingredients into edible holiday decor. They’re perfect for cookie exchanges, classroom parties, or simply adding a whimsical touch to your dessert table during the Christmas season. The combination of a crunchy cone base, a soft cookie “trunk,” and a colorful candy “foliage” makes them as delightful to look at as they are to eat.
Ingredients:
- 12 sugar cones
- 12 long-size lollipop sticks
- 3 pieces of foil (each one about 10 inches long)
- 12 tablespoons of prepared cookie dough
- 12 tablespoons chocolate chips (semi-sweet or sweet)
- 8 ounces vanilla candy coating ((4 squares of vanilla Almond Bark))
- 8 ounces chocolate candy coating ((4 squares of chocolate Almond Bark))
- 1/2 cup shredded coconut
- 1/2 cup mini M&M candies
- 1/4 cup chocolate chips
- 1/4 cup white morsels
- Colored candy sprinkles.
Preparing Your Workstation
Before we begin assembling our trees, it’s helpful to get everything ready. This project involves melting candy coatings, which can set quickly, so having your decorating elements prepared beforehand will make the process much smoother. You’ll want to lay out your foil pieces. These will serve as a protective surface to catch any drips and make cleanup easier. They’re also handy for setting aside your finished trees as they harden. Make sure you have your cookie dough ready to portion, and all your candies and sprinkles within easy reach.
Forming the Cookie Trunks
Let’s start by preparing the “trunks” of our candy cookie cone trees. Take your prepared cookie dough. You’ll need about 1 tablespoon of dough for each tree. Roll this tablespoon of dough into a small ball. Then, gently flatten the ball into a small, thick disc. You want the disc to be about 1/2 inch thick. Next, take one of your long lollipop sticks and carefully insert it into the center of the flattened cookie dough disc. Press the dough around the stick slightly to secure it, forming a small, flat-bottomed trunk around the stick. Repeat this for all 12 lollipop sticks. You should end up with 12 cookie dough “trunks” ready to be baked.
Baking the Cookie Trunks
Now, it’s time to bake these little cookie trunks. Preheat your oven to 350 degrees Fahrenheit (175 degrees Celsius). Place your cookie-dough-covered lollipop sticks onto a baking sheet lined with parchment paper. Make sure there’s a little space between each one. Bake for about 10-12 minutes, or until the edges of the cookie dough are lightly golden brown and the center looks set. You don’t want them to be too crispy, as they will be pressed into the cone later. Once baked, carefully remove the baking sheet from the oven. Let the cookie trunks cool on the baking sheet for about 5 minutes. This is important because they will be hot and the dough will be soft. After 5 minutes, you can carefully transfer them to a wire rack to cool completely. It’s essential that they are fully cooled before you proceed to the next step to prevent them from falling apart.
Assembling the Tree Bases
With your cookie trunks cooled, we can start building the bases of our Christmas trees. Take a sugar cone. You can stand them upright on a flat surface, or if you have a cone holder, that works perfectly too. You’ll need about 1 tablespoon of chocolate chips. Place these chocolate chips into a microwave-safe bowl. Microwave in 30-second intervals, stirring after each interval, until they are melted and smooth. Be careful not to overheat them, as chocolate can seize up. Alternatively, you can melt them in a double boiler. Once melted, take one of your cooled cookie trunks. Dip the end of the lollipop stick that has the cookie on it into the melted chocolate. Then, carefully insert the chocolate-covered end of the stick into the wider opening of a sugar cone. Push it in gently so that the cookie disc sits snugly inside the cone’s opening, creating a stable base and preventing the cone from being hollow. The melted chocolate acts as glue. Work quickly, as the chocolate will start to set. If the chocolate cools too much, you can briefly re-melt it. Repeat this process for all 12 sugar cones.
Creating the Green Tree Foliage
Now for the fun part: making our trees green! You’ll need your vanilla candy coating. Break the squares into smaller pieces and place them in a microwave-safe bowl. Melt the vanilla candy coating according to the package directions, usually in 30-second intervals, stirring well after each one, until smooth and fluid. Avoid overheating. Once melted, stir in the 1/2 cup of shredded coconut. This will give your “snow-dusted” trees their lovely green hue and a fluffy texture. You want the coconut to be evenly coated. Take your assembled cone and cookie trunk base. Hold it by the lollipop stick and dip the sugar cone into the melted green candy coating mixture. Rotate the cone to ensure it’s evenly coated from the base all the way up to the tip. Let any excess coating drip back into the bowl for a few seconds. Then, place the coated cone onto one of your prepared foil pieces, standing it upright. You can use a bit of melted candy coating to help it stand if needed. Repeat this with the remaining cones, ensuring they are well-coated.
Decorating Your Christmas Trees
This is where your creativity shines! While the green candy coating is still wet, it’s time to add our festive decorations. You have a variety of options here. For a classic snowy look, you can sprinkle the wet coating with some of the colored candy sprinkles. To add ornaments, gently press mini M&M candies into the coating. You can also use a small amount of melted chocolate chips (melted as described in step 4) or white morsels to create “icicles” or “snow drifts” by drizzling them onto the green coating. You can even use a toothpick dipped in melted chocolate to draw small star shapes or patterns. Feel free to mix and match your decorations. Place the chocolate chips and white morsels into separate small bowls. You can use a spoon or a piping bag with a small tip (or even a Ziploc bag with a corner snipped off) to drizzle them. Drizzle the melted chocolate chips over the green coating to create garland effects, and then drizzle the white morsels to mimic snow or frosting. You can also sprinkle additional colored candy sprinkles over the melted chocolate and white morsels for extra sparkle. Let your imagination run wild to make each tree unique!
Setting and Serving
Once all your candy cookie cone Christmas trees are decorated, they need time to set. Leave them on the foil-covered surface at room temperature for about 30-60 minutes, or until the candy coating is completely hardened. If your kitchen is warm, or if you’re in a hurry, you can place them in the refrigerator for about 15-20 minutes to speed up the hardening process. Be cautious not to leave them in the fridge for too long, as condensation can form. Once set, your festive trees are ready to be displayed or enjoyed. They look wonderful arranged on a platter. You can also carefully wrap each one individually in cellophane for party favors or to give as gifts. These trees will stay fresh at room temperature for several days, making them a great make-ahead treat for the holiday season.
Conclusion:
Creating these Candy Cookie Cone Christmas Trees is a wonderfully rewarding activity, turning simple pantry staples into festive holiday decor that tastes as good as it looks. The combination of textures—the crisp cone, the soft cookie, and the smooth candy coating—along with the bursts of color from the candies, makes them a hit with both kids and adults. They’re perfect for adding a special touch to your Christmas spread, gifting to friends, or even as a fun activity for a holiday gathering. Don’t be afraid to get creative with your decorations; the more colorful and varied, the more festive they become!
Frequently Asked Questions:
How do I store the Candy Cookie Cone Christmas Trees?
Store the finished trees in an airtight container at room temperature. Avoid stacking them directly on top of each other; you can place parchment paper between layers if needed. They should stay fresh for about a week, making them great for preparing ahead of your holiday events.
Can I use different types of cookies for the trunk?
Yes, you can definitely experiment! While sugar cookie dough works well for a soft, neutral base, you could also use a sturdy gingerbread dough or even a vanilla wafer that you attach with melted chocolate. Just ensure the cookie ‘trunk’ is relatively flat and stable enough to attach to the cone.
What’s the best way to melt the candy coating?
The easiest method is in the microwave. Place the candy coating in a microwave-safe bowl and heat on 50% power for 30-second intervals, stirring well after each interval, until completely melted and smooth. Be careful not to overheat, as this can cause it to seize.
Candy Cookie Cone Christmas Trees
Festive and fun edible Christmas trees made with sugar cones, cookie dough, and candy decorations. Perfect for holiday parties!
Ingredients
-
12 sugar cones
-
12 long-size lollipop sticks
-
3 pieces of foil (each one about 10 inches long)
-
12 tablespoons of prepared cookie dough
-
12 tablespoons chocolate chips (semi-sweet or sweet)
-
8 ounces vanilla candy coating ((4 squares of vanilla Almond Bark))
-
8 ounces chocolate candy coating ((4 squares of chocolate Almond Bark))
-
1/2 cup shredded coconut
-
1/2 cup mini M&M candies
-
1/4 cup chocolate chips
-
1/4 cup white morsels
-
Colored candy sprinkles
Instructions
-
Step 1
Prepare your workspace by lining a baking sheet with parchment paper. Wrap the bottom of each sugar cone in foil to create a base. -
Step 2
Insert a lollipop stick into the bottom of each sugar cone. Mix 1 tablespoon of cookie dough with 1 tablespoon of chocolate chips. Place a heaping tablespoon of this mixture inside each sugar cone. -
Step 3
Bake according to cookie dough package directions, or until the dough is golden brown and cooked through. Let the cones cool completely on the baking sheet. -
Step 4
Melt the vanilla candy coating according to package directions. Dip each cooled cone into the melted vanilla coating, allowing excess to drip off. Place upright on parchment paper. -
Step 5
While the vanilla coating is still wet, decorate the trees with shredded coconut (for snow), mini M&M candies (for ornaments), and colored candy sprinkles. Add a few extra chocolate chips and white morsels as desired. -
Step 6
Melt the chocolate candy coating according to package directions. Use a piping bag or a toothpick to add a few chocolatey details or a trunk to the base of the trees, if desired. -
Step 7
Allow the candy coating to set completely before serving.
Important Information
Nutrition Facts (Per Serving)
It is important to consider this information as approximate and not to use it as definitive health advice.
Allergy Information
Please check ingredients for potential allergens and consult a health professional if in doubt.


Leave a Comment