
These Candy Cookie Cone Christmas Trees start with a simple sugar cone, ready to be transformed into a delightful edible decoration for your holiday table. They look impressive, almost like miniature evergreen trees frosted with colorful candies, but they’re surprisingly straightforward to assemble. This project is a fantastic way to add a homemade touch to your festive spread or to keep the kids entertained during the holiday season. Imagine a crunchy cone base, coated in sweet candy melts and adorned with mini M&Ms and sprinkles, standing tall as a charming centerpiece. We use basic ingredients like sugar cones, cookie dough, and your favorite candies to create these festive treats. The process involves baking a cookie dough center for stability and then decorating the cones to resemble perfectly decorated Christmas trees, ready to be admired and enjoyed by everyone.
Why You’ll Love Making These
The appeal of these Candy Cookie Cone Christmas Trees lies in their visual impact and the fun of their creation. They combine the satisfying crunch of a sugar cone with a baked cookie element, all topped off with a sugary, colorful finish. Children especially love the hands-on aspect of decorating their own tree, making it a cherished holiday activity. The variety of candies you can use means each tree can be unique, reflecting personal tastes and creativity. Plus, they store well, so you can make them a day or two in advance, freeing up time on Christmas Day for other festivities. They are a sweet and charming addition that brings joy to both the making and the eating.
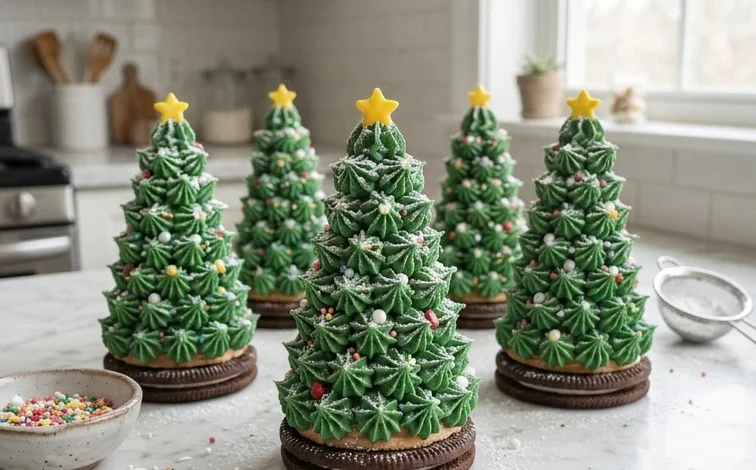
Candy Cookie Cone Christmas Trees
These Candy Cookie Cone Christmas Trees are a fun and festive project that looks impressive but is surprisingly simple to make. They’re perfect for adding a homemade touch to your holiday table or for a fun activity to do with kids. The sweet, crunchy cone base topped with colorful candies makes them a delightful edible decoration. We start with simple sugar cones and transform them into miniature evergreen trees, ready to adorn your holiday spread.
Ingredients:
- 12 sugar cones
- 12 long-size lollipop sticks
- 3 pieces of foil (each one about 10 inches long)
- 12 tablespoons of prepared cookie dough
- 12 tablespoons chocolate chips (semi-sweet or sweet)
- 8 ounces vanilla candy coating ((4 squares of vanilla Almond Bark))
- 8 ounces chocolate candy coating ((4 squares of chocolate Almond Bark))
- 1/2 cup shredded coconut
- 1/2 cup mini M&M candies
- 1/4 cup chocolate chips
- 1/4 cup white morsels
- Colored candy sprinkles.
Instructions:
Preparing the Cookie Dough Centers
- Bake the Cookie Dough Centers: Preheat your oven to 350 degrees Fahrenheit (175 degrees Celsius). Take your 12 lollipop sticks and carefully insert one into the wide end of each sugar cone. This will serve as the trunk of your tree. Next, you’ll create the “cookies” for your tree’s base. For each cone, take one tablespoon of prepared cookie dough and flatten it into a small disc. Place about three to four chocolate chips in the center of this disc and then carefully fold the cookie dough around the chips to enclose them, forming a small, round cookie ball with chocolate chips inside. You should end up with 12 cookie balls. Place these cookie balls on a baking sheet lined with parchment paper. Bake for 8-10 minutes, or until they are lightly golden brown around the edges. Allow them to cool completely on the baking sheet. Once cooled, gently press one cookie ball onto the pointed end of each sugar cone, securing it with a small dab of melted vanilla candy coating if needed. This forms the base and a sweet surprise inside each tree.
Creating the Tree Cones
- Prepare the Candy Coating: Unwrap your vanilla and chocolate candy coating squares. Place the vanilla candy coating squares in a microwave-safe bowl and the chocolate candy coating squares in a separate microwave-safe bowl. Melt each type of candy coating separately in the microwave. Heat on 50% power for 30-second intervals, stirring well after each interval, until completely smooth and melted. Be careful not to overheat, as this can cause the coating to seize. You want a smooth, pourable consistency.
- Coat the Cones: Take one sugar cone at a time. Holding it by the lollipop stick, dip the wide end of the cone into the melted vanilla candy coating. Rotate the cone to ensure it’s evenly coated all the way around, letting any excess drip back into the bowl. You can use a spoon or spatula to help smooth out any drips if desired. Place the coated cone upright on one of the prepared foil pieces, using a small dollop of melted vanilla candy coating to help it stand steady if needed. Repeat this process with all 12 sugar cones, coating them in vanilla candy coating. Let these set at room temperature until the coating is firm to the touch, which usually takes about 15-20 minutes. Once the vanilla coating has set, you’ll repeat the process with the chocolate candy coating, dipping the pointed end of the cone into the chocolate coating and letting the excess drip off. This creates a lovely layered effect, mimicking the soil and foliage of a tree.
- Decorate the Trees: This is where the fun really begins! While the chocolate candy coating is still wet on the pointed end of the cones, immediately start decorating. You can use a combination of mini M&M candies, shredded coconut (which can be colored green with a tiny drop of green food coloring mixed with a teaspoon of water if you prefer), and colored candy sprinkles. Gently press these candies onto the wet coating to adhere them. For the mini M&Ms, you can arrange them in a pattern or sprinkle them randomly. The shredded coconut gives a nice fluffy texture. For the chocolate chips and white morsels, you can gently press them onto the wet coating as well, or you can melt them separately and drizzle them over the decorated sections for added detail and flavor. Work quickly before the candy coating sets. You want to create a festive, tree-like appearance.
- Assemble and Chill: Once all your cones are decorated, place them upright on the foil pieces. You can insert the lollipop sticks into a Styrofoam block or an empty egg carton to keep them standing straight while they finish setting. Place the decorated trees in the refrigerator for at least 30 minutes, or until the candy coating is completely firm. This ensures they hold their shape and are ready for display. When you’re ready to serve them, you can remove them from the refrigerator about 15-20 minutes before so the coating isn’t quite so hard.
Finishing Touches and Serving
To add even more detail, you can melt the reserved chocolate chips and white morsels separately. Place them in small piping bags or zip-top bags with the corner snipped off. Drizzle the melted chocolate and white morsels over the decorated cones in a swirling pattern to resemble garland or snow. You can also use a toothpick to create finer details. Remember to work quickly as the candy coating will set. The shredded coconut can be placed in a shallow dish and you can roll the wet chocolate-coated tip in it for a snowy effect. For an extra touch of sparkle, consider using edible glitter or dusting them with powdered sugar after the candy coating has set. These Candy Cookie Cone Christmas Trees are best enjoyed within a few days and should be stored in an airtight container in a cool, dry place. They make wonderful edible favors for parties or a delightful addition to a holiday dessert platter. Enjoy your beautiful, homemade Christmas trees!
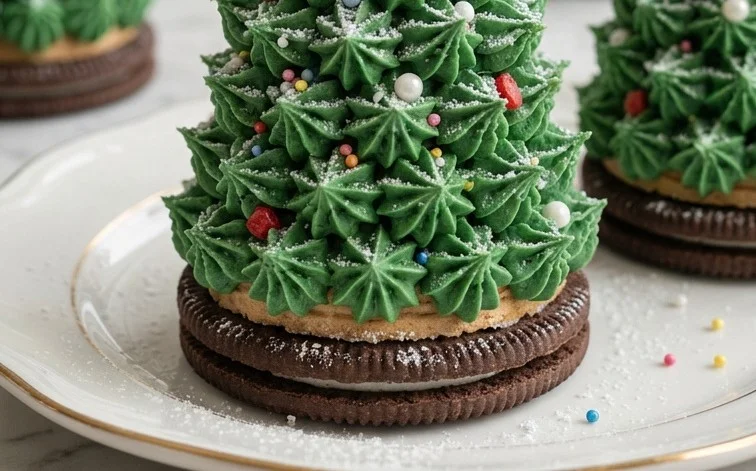
Conclusion:
These Candy Cookie Cone Christmas Trees are a delightful project that brings festive charm and edible fun to your holiday celebrations. Their impressive appearance belies their simple construction, making them accessible for bakers of all skill levels. They provide a wonderful opportunity for a family activity, turning your kitchen into a Christmas wonderland. The combination of the crunchy cone, the soft cookie center, and the colorful candy decorations makes each tree a miniature masterpiece. Serve them as part of your dessert spread, use them as edible table decorations, or package them up as thoughtful homemade gifts. The satisfaction of creating these unique treats is immense, and they are sure to be a hit with both adults and children alike. Don’t hesitate to experiment with different candy colors and types to make your Candy Cookie Cone Christmas Trees truly your own this holiday season!
Frequently Asked Questions
Can I make these ahead of time?
Yes, you can absolutely make these Candy Cookie Cone Christmas Trees ahead of time. Once the candy coating has fully hardened, they can be stored in an airtight container at room temperature for up to 3-4 days. It’s best to place parchment paper between layers to prevent sticking. Store them in a cool, dry place away from direct sunlight to maintain their crispness and prevent the candy from melting.
What kind of candies work best for decorating?
Mini M&Ms are great for adding color and are easy to press into the wet candy coating. Small sprinkles, nonpareils, and even edible glitter can also be used. For a more traditional look, consider using green and red colored candies. Just make sure the candies are small enough to adhere well to the cone and don’t have too much weight, which could cause them to fall off. Small chocolate chips or even edible pearls can also add a nice touch.
How do I get the candy coating to stick smoothly to the cone?
To get a smooth coating, ensure your candy melts are at the right consistency. If they are too thick, you can thin them slightly with a bit of vegetable oil or shortening (about 1 teaspoon per cup of melts). Melt them according to package directions, typically in the microwave in short intervals or using a double boiler. Dip the cone into the melted coating and rotate it to cover evenly. For thicker coverage, allow the first layer to set slightly, then apply a second coat. A thin layer of melted vanilla coating on the cone itself before applying the colored coating can also help with adhesion.
Candy Cookie Cone Christmas Trees
Festive and fun Christmas trees made with sugar cones, cookie dough, and colorful candy decorations.
Ingredients
-
12 sugar cones
-
12 long-size lollipop sticks
-
3 pieces of foil (each one about 10 inches long)
-
12 tablespoons of prepared cookie dough
-
12 tablespoons chocolate chips (semi-sweet or sweet)
-
8 ounces vanilla candy coating ((4 squares of vanilla Almond Bark))
-
8 ounces chocolate candy coating ((4 squares of chocolate Almond Bark))
-
1/2 cup shredded coconut
-
1/2 cup mini M&M candies
-
1/4 cup chocolate chips
-
1/4 cup white morsels
-
Colored candy sprinkles
Instructions
-
Step 1
Prepare your work area by lining a baking sheet with parchment paper. Wrap the bottom of each sugar cone with foil to create a stable base for decorating. -
Step 2
Insert a lollipop stick into the wide end of each sugar cone. Gently press 1 tablespoon of cookie dough into the cone, ensuring it fills the tip and adheres to the stick. -
Step 3
Place 1 tablespoon of chocolate chips into the cookie dough inside each cone. Bake according to cookie dough package directions. Let cool completely on a wire rack. -
Step 4
Melt vanilla candy coating according to package directions. Dip the cooled cookie cone trees into the melted vanilla coating, allowing excess to drip off. Place on parchment paper to set. -
Step 5
Melt chocolate candy coating according to package directions. Drizzle or pipe the melted chocolate onto the vanilla-coated trees to create garland or other decorative effects. Immediately sprinkle with shredded coconut, mini M&Ms, additional chocolate chips, white morsels, and colored candy sprinkles before the chocolate sets. -
Step 6
Allow the decorations to harden completely before serving or storing. Store in an airtight container at room temperature.
Important Information
Nutrition Facts (Per Serving)
It is important to consider this information as approximate and not to use it as definitive health advice.
Allergy Information
Please check ingredients for potential allergens and consult a health professional if in doubt.


Leave a Comment