
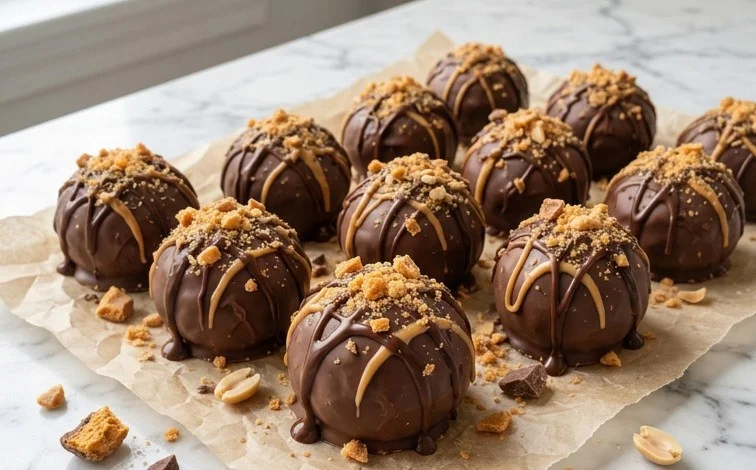
Butterfinger Balls bring that signature crisp, peanut-buttery, flaky crunch into a perfect bite-sized treat. These no-bake wonders are incredibly simple, meaning you can satisfy a serious sweet craving with minimal effort. They’re fantastic for parties because they disappear fast, or just as a wonderful afternoon pick-me-up. What makes them special is the way crushed Butterfinger candy bars are mixed into a creamy peanut butter and butter base, creating a delightful contrast in textures. A touch of vanilla and a pinch of salt help balance the sweetness, making each bite satisfying. If you want to go the extra mile, dipping these Butterfinger Balls in melted chocolate adds a layer of richness that takes them from good to absolutely decadent. They’re a family favorite for a reason – pure nostalgia and fantastic flavor in every single ball.
Butterfinger Balls
The crisp, flaky, peanut-buttery crunch of a Butterfinger bar is something special, and when you transform that iconic flavor into bite-sized, no-bake balls, you get a treat that’s utterly irresistible. These Butterfinger Balls are wonderfully simple to make, perfect for a quick dessert fix, a party appetizer, or just when a serious sweet craving hits. They come together with minimal fuss, using ingredients you probably already have, making them a go-to for any occasion. The magic happens when the creamy peanut butter base melds with the sweet crunch of crushed Butterfingers, all brought together by a touch of vanilla and salt for balance. And if you’re feeling fancy, a dip in chocolate takes them from delicious to downright decadent.
Ingredients:
- 1 cup creamy peanut butter
- 1/4 cup unsalted butter (softened)
- 2 cups powdered sugar
- 1 teaspoon vanilla extract
- Pinch of salt
- 6 Butterfinger candy bars (finely crushed)
- 12 ounces semisweet or milk chocolate (chopped (for dipping, optional))
Instructions:
Making the Ball Mixture
Start by getting your base mixture ready. In a medium-sized mixing bowl, combine the creamy peanut butter and the softened unsalted butter. It’s important that the butter is softened, not melted. This ensures it creams nicely with the peanut butter, creating a smooth and homogenous base without any greasy pockets. You can soften butter by leaving it out on the counter for about an hour, or by microwaving it in short bursts of 10-15 seconds until it’s pliable but not liquid. Beat these two ingredients together until they are well combined and have a fluffy texture. A hand mixer works great for this, but you can also use a sturdy whisk or a spatula if you’re up for a bit of arm work.
Next, gradually add the powdered sugar to the peanut butter and butter mixture. It’s best to add it a cup at a time, mixing well after each addition. This prevents the powdered sugar from flying everywhere and helps it incorporate smoothly. After you’ve added all the powdered sugar, add the vanilla extract and the pinch of salt. The vanilla extract enhances the sweetness and adds a lovely aroma, while the salt is a secret weapon that balances out the sweetness and brings out the nutty flavor of the peanut butter. Mix everything until it forms a stiff dough. This dough will be thick and somewhat crumbly, but it should hold together when you press it.
Incorporating the Butterfinger Crunch
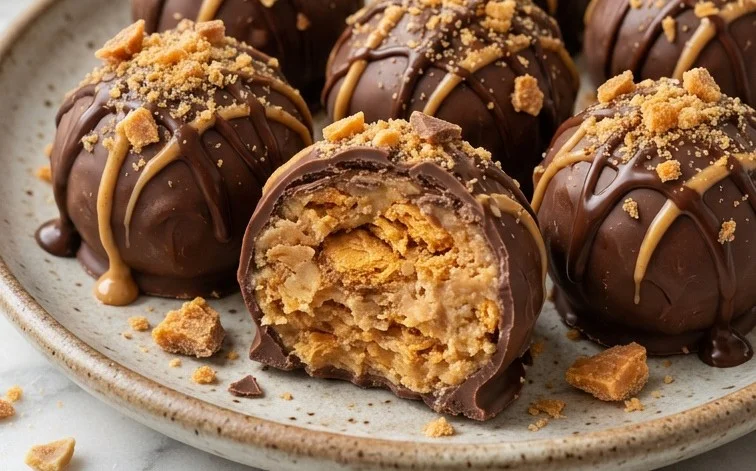
Now for the star of the show: the Butterfinger candy bars. You’ll need to crush them finely. You can do this by placing them in a zip-top bag and giving them a good bash with a rolling pin or the bottom of a heavy pan. Alternatively, a food processor can quickly turn them into fine crumbs. Aim for a texture that’s not quite dust but small enough to distribute evenly throughout the balls. Once crushed, gently fold the Butterfinger crumbs into the peanut butter dough. Be careful not to overmix at this stage; you want to distribute the crunchy bits evenly without turning the whole mixture into a mushy paste. The goal is to have pockets of creamy peanut butter interspersed with the sweet, flaky candy bar pieces.
Forming and Chilling the Balls
It’s time to shape the balls. Take small portions of the dough, about a tablespoon each, and roll them between your palms to form compact balls. If the dough feels too sticky to handle, you can lightly dust your hands with a bit more powdered sugar or even a tiny bit of flour, though keep in mind this might slightly alter the texture. The size of the balls is up to you; smaller ones are great for popping into your mouth, while slightly larger ones feel more substantial. As you form the balls, place them on a baking sheet lined with parchment paper. This prevents them from sticking and makes for easy cleanup. Once all the balls are formed, it’s essential to chill them. Place the baking sheet in the refrigerator for at least 30 minutes. Chilling firms up the balls, making them easier to handle, especially if you plan to dip them in chocolate.
Optional Chocolate Dipping
If you’re looking to add an extra layer of indulgence, dipping the chilled Butterfinger Balls in chocolate is the way to go. Melt your chopped semisweet or milk chocolate. You can do this in a double boiler over simmering water, stirring constantly until smooth, or in the microwave in 30-second intervals, stirring between each one, until fully melted and smooth. Be careful not to overheat the chocolate, as it can seize up. Once the chocolate is melted and smooth, dip each chilled ball into the chocolate, using a fork or a dipping tool to ensure it’s fully coated. Let any excess chocolate drip off back into the bowl. Place the chocolate-dipped balls back on the parchment-lined baking sheet. You can sprinkle a few extra Butterfinger crumbs on top immediately after dipping for an extra decorative touch and more crunch. Return the baking sheet to the refrigerator for another 15-20 minutes, or until the chocolate has set completely.
Storage and Serving
Once your Butterfinger Balls are firm, whether they’re dipped in chocolate or plain, they are ready to be stored and enjoyed. Keep them in an airtight container in the refrigerator. They will stay fresh for about a week. The refrigeration helps them maintain their shape and texture, especially in warmer temperatures. When you’re ready to serve, you can place them on a platter. They are perfect for parties, bake sales, or just enjoying with a glass of milk. The combination of the creamy peanut butter filling and the crispy, peanut-buttery candy bar pieces makes these a truly satisfying treat that’s hard to resist. Their delightful texture and familiar flavor profile make them a crowd-pleaser for both kids and adults alike.
Conclusion:
These Butterfinger Balls are a testament to how simple ingredients can create something truly spectacular. The combination of creamy peanut butter, the unmistakable crunch of Butterfingers, and the optional chocolate coating makes them an absolute winner. They’re incredibly versatile, fitting in perfectly at a holiday cookie exchange, a birthday party, or simply as a sweet treat to have on hand. You’ll find yourself making them again and again because they are so reliably good and quick to assemble. Don’t be afraid to experiment with the chocolate coating; milk chocolate, dark chocolate, or even white chocolate can offer a nice twist. For an extra flair, you could even sprinkle some chopped peanuts or extra crushed Butterfinger pieces on top before the chocolate sets. They store wonderfully, so making a big batch is never a bad idea. Enjoy sharing these delightful Butterfinger Balls with everyone!
FAQ
How long do Butterfinger Balls last?
Stored in an airtight container in the refrigerator, Butterfinger Balls will stay fresh for up to a week. The chill helps maintain their texture, especially if they have a chocolate coating.
Can I use crunchy peanut butter instead of creamy?
While creamy peanut butter creates the smoothest base, you can certainly use crunchy peanut butter. Just be aware that it might slightly alter the texture, adding a bit more chewiness from the peanut skins. You might need to adjust the powdered sugar slightly depending on the consistency.
Can I make these ahead of time?
Yes, absolutely! Butterfinger Balls are an excellent make-ahead treat. You can prepare the mixture and roll the balls a day or two in advance. If you plan to dip them in chocolate, it’s best to do that closer to when you’ll serve them for the freshest finish.
Butterfinger Balls
Delicious no-bake balls featuring the crunchy, peanut-buttery flavor of Butterfinger candy bars, coated in chocolate.
Ingredients
-
1 cup creamy peanut butter
-
1/4 cup unsalted butter, softened
-
2 cups powdered sugar
-
1 teaspoon vanilla extract
-
Pinch of salt
-
6 Butterfinger candy bars, finely crushed
-
12 ounces semisweet or milk chocolate, chopped (for dipping, optional)
Instructions
-
Step 1
In a large bowl, cream together the peanut butter and softened butter until smooth. -
Step 2
Gradually add the powdered sugar, vanilla extract, and salt, mixing until well combined and a dough forms. -
Step 3
Stir in the finely crushed Butterfinger candy bars until evenly distributed throughout the mixture. -
Step 4
Roll the mixture into small balls, about 1-inch in diameter. Place them on a parchment-lined baking sheet. -
Step 5
If desired, melt the chocolate in a double boiler or microwave. Dip each ball halfway into the melted chocolate and place back on the parchment-lined sheet. -
Step 6
Chill the Butterfinger balls in the refrigerator for at least 30 minutes, or until firm, before serving.
Important Information
Nutrition Facts (Per Serving)
It is important to consider this information as approximate and not to use it as definitive health advice.
Allergy Information
Please check ingredients for potential allergens and consult a health professional if in doubt.


Leave a Comment