
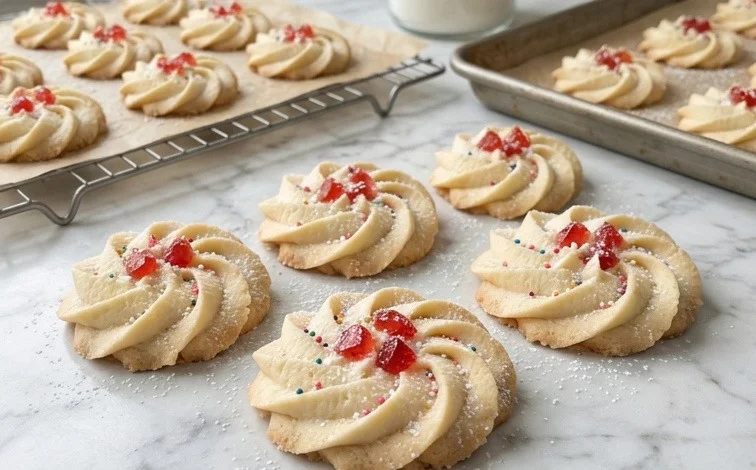
Whipped shortbread cookies are a delightful departure from their denser cousins. They have an incredibly light and airy texture that just melts on your tongue, a dream for both bakers and eaters. The secret to this tender crumb is the unique whipping process, which infuses the dough with air, creating a wonderfully delicate cookie. These are perfect for a sophisticated afternoon tea, a beautiful addition to holiday cookie tins, or simply when you crave a sweet treat. The classic vanilla flavor is lovely, but a hint of lemon or orange extract can add a bright, citrusy note if you prefer. And for a touch of fun and visual appeal, a sprinkle of your favorite colorful decorations makes these cookies as pretty as they are delicious. I love making these when I want something that feels a little special but comes together without fuss.
Whipped Shortbread Cookies
These whipped shortbread cookies are an absolute dream to make and even better to eat. They have a melt-in-your-mouth texture that is incredibly light and airy, a stark contrast to traditional dense shortbread. The secret to this delightful crumb is the “whipping” process, which incorporates air into the dough, making them wonderfully tender. They are perfect for afternoon tea, holiday cookie boxes, or just when you need a little something sweet. The subtle vanilla flavor is a classic, but feel free to experiment with lemon or orange extract for a citrusy twist. And the sprinkles? They add a fun pop of color and a hint of sweetness, making these cookies as pretty as they are delicious.
Ingredients:
- 1 and ½ Cups Butter (at Room Temperature , salted)
- ¾ Cup Confectioners’ Sugar
- 2 and ¼ Cups All Purpose Flour
- ¾ Cup Cornstarch
- 2 teaspoons Pure vanilla extract ((or Lemon extract or Orange extract))
- ¼ Cup Sprinkles (of choice) ((I used non-pareils)).
Making the Whipped Shortbread Dough
The first step is to get your butter ready. Make sure it’s truly at room temperature. This means it should be soft enough to indent easily with your finger, but not melted or greasy. Softened butter is key to creaming properly and incorporating air. If your butter is too cold, it will be difficult to whip and your cookies might be dense. If it’s too warm, it can make the dough greasy and spread too much.
In a large mixing bowl, or the bowl of your stand mixer fitted with the paddle attachment, cream together the softened butter and the confectioners’ sugar. Beat them on medium-high speed for about 3 to 5 minutes. You’re looking for a pale, fluffy mixture. This is where the “whipping” really happens, so don’t rush this step. Scrape down the sides of the bowl occasionally to ensure everything is evenly incorporated. The mixture should look significantly lighter in color and airy in texture.
Next, we’ll add the dry ingredients. In a separate medium bowl, whisk together the all-purpose flour and the cornstarch. Whisking them together before adding them to the butter mixture helps to distribute the cornstarch evenly, which contributes to the cookie’s tender texture. Cornstarch acts as a tenderizer in baked goods, helping to create that delicate crumb we’re aiming for.
Gradually add the flour and cornstarch mixture to the creamed butter and sugar, mixing on low speed until just combined. Be careful not to overmix the dough once the flour is added. Overmixing can develop the gluten in the flour, leading to tougher cookies. Once the flour is mostly incorporated, add the pure vanilla extract. If you’re using lemon or orange extract, now is the time to add it. Mix on low speed until everything is just combined into a soft dough. The dough will be quite soft and perhaps a little sticky at this stage.
Adding the Sprinkles and Shaping
Now for the fun part: the sprinkles! Gently fold in the ¼ cup of sprinkles. I prefer non-pareils for a classic look, but feel free to use jimmies, confetti sprinkles, or whatever your heart desires. Just be sure not to overmix when adding the sprinkles, as this can cause them to bleed their color into the dough, especially if they are very vibrant. You want distinct pops of color throughout the cookies.
The dough is very soft, so chilling it is a good idea before shaping. Cover the bowl tightly with plastic wrap and refrigerate for at least 30 minutes, or until the dough is firm enough to handle. Chilling the dough makes it much easier to scoop and shape, and it also helps prevent the cookies from spreading too much during baking, preserving their lovely shape.
Baking the Whipped Shortbread
Preheat your oven to 325 degrees Fahrenheit (160 degrees Celsius). Line baking sheets with parchment paper. Parchment paper is essential here; it prevents sticking and makes for easy cleanup, and it helps ensure even baking.
Use a cookie scoop or two spoons to drop rounded portions of the dough onto the prepared baking sheets. I like to use a medium-sized cookie scoop, which yields cookies that are about 1.5 inches in diameter. Space them about 2 inches apart, as they will spread slightly. If the dough becomes too soft to scoop easily, return it to the refrigerator for another 10-15 minutes.
Bake for 15 to 20 minutes, or until the edges are lightly golden brown and the centers are just set. They should not be deeply browned. The cookies will continue to firm up as they cool on the baking sheet. Keep a close eye on them in the last few minutes of baking, as they can go from perfectly baked to overdone very quickly due to their delicate nature.
Cooling and Enjoying
Once baked, let the cookies cool on the baking sheets for about 10 minutes. This is a critical step. They are very fragile when hot. Allowing them to set on the baking sheet for a bit will prevent them from breaking when you move them. After 10 minutes, carefully transfer the cookies to a wire rack to cool completely.
Once completely cooled, these whipped shortbread cookies are ready to be enjoyed. They are wonderfully crumbly and tender. Store them in an airtight container at room temperature for up to a week. They also freeze beautifully, so you can make a big batch and have them on hand whenever a craving strikes.

Conclusion:
These whipped shortbread cookies truly are a standout. Their delicate, melt-in-your-mouth texture and subtle sweetness make them a joy to eat and share. You’ve seen how the simple act of whipping the butter and creaming the ingredients creates a wonderfully tender dough, so don’t be afraid to give it a try. They are wonderfully versatile; while vanilla is a classic, consider adding a pinch of cardamom or a little almond extract to the dough for a different flavor profile. For serving, they pair beautifully with a cup of hot tea or coffee, and they look stunning arranged on a dessert platter. Store them in an airtight container at room temperature for up to a week, though they rarely last that long!
Frequently Asked Questions
Why are my whipped shortbread cookies spreading too much?
This usually happens if the butter was too soft or even melted when you started, or if the dough became too warm during mixing. Ensure your butter is at cool room temperature, not greasy. If the dough feels warm, chill it briefly before shaping.
Can I make these cookies ahead of time?
Yes, absolutely. The unbaked dough can be shaped and frozen for up to a month. Bake them directly from frozen, adding a few extra minutes to the baking time. Baked cookies also store well in an airtight container for about a week.
How can I make my whipped shortbread cookies softer?
The “whipping” technique is key for softness, but you can also ensure you don’t overmix the flour. Mix just until combined. Overmixing develops gluten, which can make cookies tougher.
Whipped Shortbread Cookies
Delicate and melt-in-your-mouth whipped shortbread cookies, perfect for any occasion. These cookies are incredibly light and airy due to the whipping method, resulting in a tender crumb. The recipe offers flexibility with optional extracts and customizable sprinkles.
Ingredients
-
1 and ½ Cups Butter (at Room Temperature , salted)
-
¾ Cup Confectioners’ Sugar
-
2 and ¼ Cups All Purpose Flour
-
¾ Cup Cornstarch
-
2 teaspoons Pure vanilla extract
-
¼ Cup Sprinkles (of choice)
Instructions
-
Step 1
In a large bowl, cream the softened butter and confectioners’ sugar together until light and fluffy. This may take several minutes with an electric mixer. -
Step 2
In a separate bowl, whisk together the all-purpose flour and cornstarch until well combined. -
Step 3
Gradually add the dry ingredients to the creamed butter mixture, mixing on low speed until just combined. Be careful not to overmix. -
Step 4
Stir in the pure vanilla extract (or your chosen extract). If using, gently fold in the sprinkles. -
Step 5
Drop rounded tablespoons of dough onto ungreased baking sheets. For a smoother cookie, you can also pipe the dough using a star tip. -
Step 6
Bake at 325°F (160°C) for 18-22 minutes, or until the edges are lightly golden. The cookies will not spread much. -
Step 7
Let the cookies cool on the baking sheets for 5-10 minutes before transferring them to a wire rack to cool completely.
Important Information
Nutrition Facts (Per Serving)
It is important to consider this information as approximate and not to use it as definitive health advice.
Allergy Information
Please check ingredients for potential allergens and consult a health professional if in doubt.


Leave a Comment