
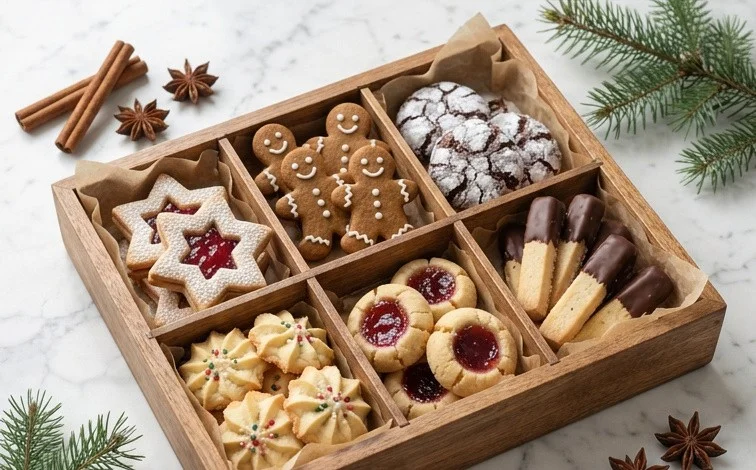
The 2024 Christmas Cookie Box tradition brings a unique kind of joy, especially when it’s filled with homemade treats that look as good as they taste. This year, let’s create a collection that’s both beautiful and delicious. I love starting with a solid, reliable sugar cookie base because it’s so versatile. It’s the canvas for all our festive decorations. The beauty of a Christmas cookie box isn’t just about variety; it’s about the care put into each cookie, making them perfect for sharing with family, friends, or colleagues. These cookies are sturdy enough to handle intricate decorating but also have a tender bite. They’re the kind of cookies that make a holiday table truly special and are a wonderful way to express holiday cheer. We’re going to focus on a base recipe that’s straightforward, allowing plenty of room for creativity. Get ready to fill your cookie tins with edible art!
Ingredients:
- 1 cup (2 sticks) unsalted butter, softened
- 1 cup granulated sugar
- 2 large eggs
- 1 teaspoon vanilla extract
- 3 cups all-purpose flour
- 1 teaspoon baking powder
- 1/2 teaspoon salt
- Assorted sprinkles, sanding sugar, and edible decorations for finishing
- Optional: 1/4 cup milk (if dough is too dry)
Instructions:
Creaming the Butter and Sugar
Start by ensuring your butter is properly softened. It should be pliable enough to indent with your finger but not greasy or melted. In a large mixing bowl, cream together the softened unsalted butter and the granulated sugar using an electric mixer. Beat them on medium speed for about 3-5 minutes, until the mixture is light, fluffy, and pale yellow. This step is really important because it incorporates air into the dough, which helps the cookies hold their shape and gives them a tender texture. Scrape down the sides of the bowl occasionally to make sure everything is evenly mixed.
Adding Wet Ingredients
Once the butter and sugar are well combined, it’s time to add the eggs and vanilla extract. Add the two large eggs, one at a time, beating well after each addition until fully incorporated. Don’t rush this; giving each egg a moment to blend in helps create a smooth, emulsified base. Next, stir in the teaspoon of vanilla extract. The vanilla not only adds a wonderful aroma but also enhances the overall flavor of the cookies. The mixture at this point should be smooth and slightly glossy.
Combining Dry Ingredients
In a separate medium bowl, whisk together the dry ingredients: the 3 cups of all-purpose flour, the 1 teaspoon of baking powder, and the 1/2 teaspoon of salt. Whisking them together ensures that the baking powder and salt are evenly distributed throughout the flour. This is key to preventing pockets of saltiness or uneven leavening in your cookies.
Combining Wet and Dry Mixtures
Gradually add the dry ingredients to the wet ingredients in the large mixing bowl. Start mixing on low speed until just combined. Be careful not to overmix the dough at this stage. Overmixing can develop the gluten in the flour too much, resulting in tough cookies. If the dough seems a bit dry and crumbly, you can add a tablespoon of milk at a time, up to a quarter cup, until it just comes together. The dough should be soft but not sticky. You can test it by pinching a bit; it should hold its shape without clinging too much to your fingers.
Chilling and Rolling the Dough
Divide the dough in half. Shape each half into a flat disc, wrap it tightly in plastic wrap, and refrigerate for at least 1 hour, or until firm. Chilling the dough is a crucial step. It allows the gluten to relax and the fats to firm up, which makes the dough easier to roll out and helps the cookies maintain their shape during baking. Once chilled, take one disc out at a time and let it sit at room temperature for about 5-10 minutes if it’s too hard to roll. On a lightly floured surface, roll out the dough to about 1/4 inch thickness. Use your favorite Christmas cookie cutters to create festive shapes like stars, trees, gingerbread men, and snowflakes. Transfer the cut-out cookies to baking sheets lined with parchment paper, leaving about 1 inch of space between them.
Baking and Decorating
Preheat your oven to 350°F (175°C). Bake the cookies for 8-10 minutes, or until the edges are lightly golden brown. The baking time can vary depending on the size and thickness of your cookies, so keep an eye on them, especially during the last few minutes. Once baked, let the cookies cool on the baking sheet for 2-3 minutes before transferring them to a wire rack to cool completely. While the cookies are still slightly warm but not hot, this is the perfect time to apply your decorations. You can use assorted sprinkles, sanding sugar, or even a simple royal icing for more detailed designs. Let the decorations set completely before storing. These cookies are wonderful on their own, but a well-decorated cookie box makes for a truly special gift.

Conclusion:
This sugar cookie recipe is the perfect foundation for your 2024 Christmas Cookie Box, offering a tender yet sturdy cookie ideal for decorating. Its simple base allows for endless creativity, making it a joy to assemble a personalized collection. Whether you pipe on royal icing, cover them in sprinkles, or use edible glitter, these cookies are sure to impress. They store beautifully, making them ideal for making ahead of your holiday festivities. Consider adding a touch of almond extract alongside the vanilla for a different flavor profile, or incorporate a tablespoon of finely chopped citrus zest into the dough for a bright note. The key is to have fun with the process. Don’t worry about perfection; the charm of a homemade cookie box comes from its personal touch.
Frequently Asked Questions:
How should I store my Christmas cookies?
Once completely cooled, store decorated cookies in an airtight container. Layer them between parchment paper or wax paper to prevent decorations from smudging. They can be kept at room temperature for up to a week. For longer storage, you can freeze undecorated, baked cookies (without frosting or decorations) in an airtight container or freezer bag for up to 3 months.
My cookie dough is too crumbly. What can I do?
If your dough feels too dry and crumbly after mixing, the easiest fix is to add a tablespoon of milk or cream at a time, mixing gently until the dough just comes together. Be careful not to overmix. Sometimes humidity levels can affect the flour, so a little liquid can often rescue a dry dough.
Can I make these cookies ahead of time?
Yes, absolutely! The dough can be made a day or two in advance and refrigerated. Baked and cooled cookies can also be stored for several days before decorating. This is a great way to break down the holiday baking tasks and reduce stress closer to the date.
2024 Christmas Cookie Box
A delightful assortment of festive holiday cookies perfect for gifting or enjoying during the Christmas season.
Ingredients
-
1 cup unsalted butter, softened
-
1 cup granulated sugar
-
2 large eggs
-
1 teaspoon vanilla extract
-
2.5 cups all-purpose flour
-
1 teaspoon baking soda
-
0.5 teaspoon salt
-
1/4 cup milk
-
1 cup confectioners’ sugar
-
2 tablespoons cranberry juice
Instructions
-
Step 1
Cream together softened butter and granulated sugar in a large bowl until light and fluffy. -
Step 2
Beat in the eggs one at a time, then stir in the vanilla extract. -
Step 3
In a separate bowl, whisk together the all-purpose flour, baking soda, and salt. -
Step 4
Gradually add the dry ingredients to the wet ingredients, alternating with the milk, mixing until just combined. Do not overmix. -
Step 5
Drop rounded tablespoons of dough onto ungreased baking sheets. Bake at 375°F (190°C) for 8-10 minutes, or until lightly golden. -
Step 6
While cookies are baking, whisk together confectioners’ sugar and cranberry juice to create a glaze. Adjust consistency with more juice or sugar as needed. -
Step 7
Let cookies cool on baking sheets for a few minutes before transferring to a wire rack to cool completely. Drizzle with glaze once cooled.
Important Information
Nutrition Facts (Per Serving)
It is important to consider this information as approximate and not to use it as definitive health advice.
Allergy Information
Please check ingredients for potential allergens and consult a health professional if in doubt.


Leave a Comment