
Mary Berry Fork Biscuits are a delightful treat that brings a touch of nostalgia to any gathering. As a fan of classic British baking, I find these biscuits to be a perfect blend of simplicity and flavor. Originating from the beloved Mary Berry, a culinary icon in the UK, these fork biscuits have become a staple in many households, cherished for their buttery texture and melt-in-your-mouth goodness.
What I love most about Mary Berry Fork Biscuits is their versatility; they can be enjoyed with a cup of tea or as a sweet snack any time of the day. The ease of preparation makes them a favorite among both novice and experienced bakers alike. With just a few ingredients, you can create a batch that not only satisfies your sweet tooth but also fills your home with an irresistible aroma. Join me as we explore this delightful recipe that has captured the hearts of many, and discover why Mary Berry Fork Biscuits are a must-try for anyone who appreciates the art of baking.

Ingredients:
- 225g unsalted butter, softened
- 100g caster sugar
- 275g plain flour
- 75g cornflour
- 1 tsp vanilla extract
- Pinch of salt
- Extra caster sugar for sprinkling
Preparing the Dough
1. **Cream the Butter and Sugar**: In a large mixing bowl, I start by adding the softened unsalted butter and caster sugar. Using an electric mixer or a wooden spoon, I cream them together until the mixture is light and fluffy. This usually takes about 3-5 minutes. The key here is to incorporate as much air as possible, which will help the biscuits to be light and tender. 2. **Add Vanilla Extract**: Once the butter and sugar are well combined, I add in the vanilla extract. This adds a lovely flavor to the biscuits. I mix it in until its fully incorporated. 3. **Combine the Dry Ingredients**: In a separate bowl, I sift together the plain flour, cornflour, and a pinch of salt. Sifting helps to aerate the flour and remove any lumps, ensuring a smooth dough. 4. **Mix Dry Ingredients into Wet Ingredients**: Gradually, I add the dry mixture to the creamed butter and sugar. I do this in batches, mixing gently with a spatula or wooden spoon until just combined. Its important not to overmix at this stage, as this can lead to tough biscuits. 5. **Form the Dough**: Once the mixture is combined, I use my hands to bring it together into a soft dough. If the dough feels too sticky, I can add a little more plain flour, but it should be soft and pliable.Chilling the Dough
6. **Wrap and Chill**: I wrap the dough in cling film and place it in the refrigerator for about 30 minutes. Chilling the dough helps to firm it up, making it easier to shape the biscuits later on.Shaping the Biscuits
7. **Preheat the Oven**: While the dough is chilling, I preheat my oven to 180°C (350°F) and line a baking tray with parchment paper. This ensures that the biscuits wont stick and will bake evenly. 8. **Roll Out the Dough**: After 30 minutes, I take the dough out of the fridge. On a lightly floured surface, I roll it out to about 1cm thick. If the dough is too soft, I can chill it for a bit longer. 9. **Cutting the Biscuits**: Using a fork, I cut the dough into rectangles or squares, about 5cm by 3cm. I like to use a sharp knife for clean edges, but you can also use cookie cutters if you prefer a different shape. 10. **Prick the Biscuits**: To give the biscuits their signature look, I use a fork to prick the tops of each biscuit. This not only adds a decorative touch but also helps them bake evenly.Baking the Biscuits
11. **Transfer to Baking Tray**: I carefully transfer the cut biscuits onto the prepared baking tray, leaving a little space between each one to allow for spreading. 12. **Sprinkle with Sugar**: Before baking, I sprinkle a little extra caster sugar on top of each biscuit. This gives them a lovely sweet crust once baked. 13. **Bake**: I place the tray in the preheated oven and bake for about 12-15 minutes, or until the edges are lightly golden. I keep an eye on them, as oven temperatures can vary. The biscuits should be firm to the touch but not overly browned.Cooling and Storing
14. **Cool on a Wire Rack**: Once baked, I remove the tray from the oven and let the biscuits cool on the tray for a few minutes. Then, I carefully transfer them to a wire rack to cool completely. This step is crucial as it allows the biscuits to firm up and develop their texture. 15. **Storing the Biscuits**: Once cooled, I store the biscuits in an airtight container. They can last for up to a week, but I can guarantee they wont last that long in my house!Serving Suggestions
16. **Enjoy with Tea or Coffee**: These fork biscuits are perfect for enjoying with a cup of tea or coffee. I love serving them at afternoon tea or as a sweet treat after dinner. 17. **Variations**: If I want to mix things
Conclusion:
In summary, Mary Berry’s Fork Biscuits are an absolute must-try for anyone who loves a delightful treat thats both simple to make and utterly delicious. These biscuits are not only perfect for afternoon tea but also make a wonderful addition to any gathering or celebration. Their buttery flavor and crisp texture are sure to impress your family and friends, and the best part is that they can be easily customized to suit your taste. Consider adding a sprinkle of chocolate chips, a dash of cinnamon, or even a hint of lemon zest to elevate the flavor profile. You can also experiment with different toppings, such as a light dusting of powdered sugar or a drizzle of icing for a touch of sweetness. I encourage you to give this recipe a try and experience the joy of baking these delightful Mary Berry Fork Biscuits. Once youve made them, Id love to hear about your experience! Share your thoughts, any variations you tried, or even a photo of your delicious creations. Happy baking! Print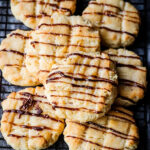
Mary Berry Fork Biscuits: A Delicious Recipe for Perfectly Baked Treats
- Total Time: 45 minutes
- Yield: 20 biscuits 1x
Description
These fork biscuits are light, tender, and buttery, making them the perfect accompaniment to tea or coffee. With a hint of vanilla and a simple preparation, they are sure to impress your guests!
Ingredients
- 225g unsalted butter, softened
- 100g caster sugar
- 275g plain flour
- 75g cornflour
- 1 tsp vanilla extract
- Pinch of salt
- Extra caster sugar for sprinkling
Instructions
- Cream the Butter and Sugar: In a large mixing bowl, add the softened unsalted butter and caster sugar. Cream together until light and fluffy (about 3-5 minutes).
- Add Vanilla Extract: Mix in the vanilla extract until fully incorporated.
- Combine the Dry Ingredients: In a separate bowl, sift together the plain flour, cornflour, and a pinch of salt.
- Mix Dry Ingredients into Wet Ingredients: Gradually add the dry mixture to the creamed butter and sugar in batches, mixing gently until just combined.
- Form the Dough: Bring the mixture together into a soft dough using your hands. If too sticky, add a little more plain flour.
- Wrap and Chill: Wrap the dough in cling film and refrigerate for about 30 minutes.
- Preheat the Oven: Preheat the oven to 180°C (350°F) and line a baking tray with parchment paper.
- Roll Out the Dough: Roll the chilled dough on a lightly floured surface to about 1cm thick.
- Cutting the Biscuits: Cut the dough into rectangles or squares (about 5cm by 3cm) using a fork or sharp knife.
- Prick the Biscuits: Prick the tops of each biscuit with a fork for decoration and even baking.
- Transfer to Baking Tray: Place the cut biscuits on the prepared baking tray, leaving space between each.
- Sprinkle with Sugar: Sprinkle extra caster sugar on top of each biscuit.
- Bake: Bake in the preheated oven for 12-15 minutes, or until edges are lightly golden.
- Cool on a Wire Rack: Let the biscuits cool on the tray for a few minutes, then transfer to a wire rack to cool completely.
- Storing the Biscuits: Store cooled biscuits in an airtight container for up to a week.
Notes
- These biscuits are best enjoyed fresh but can be stored for up to a week in an airtight container.
- Feel free to experiment with different shapes using cookie cutters or add chocolate chips for a twist.
- Prep Time: 30 minutes
- Cook Time: 15 minutes


Leave a Comment