
Crispy Buttermilk Chicken is a dish that never fails to impress, whether it’s served at a family gathering or a casual weeknight dinner. The secret to its irresistible crunch lies in the marination process, where tender chicken is soaked in a rich buttermilk mixture, allowing the flavors to penetrate deeply. This recipe has roots in Southern cuisine, where fried chicken is a beloved staple, often associated with comfort and home-cooked meals. People adore crispy buttermilk chicken not just for its delightful texture but also for its savory, tangy flavor that keeps you coming back for more. Plus, its surprisingly easy to prepare, making it a go-to choice for both novice cooks and seasoned chefs alike. Join me as we dive into this delicious recipe that promises to elevate your dining experience!

Ingredients:
- 4 large chicken thighs, bone-in and skin-on
- 2 cups buttermilk
- 1 tablespoon hot sauce (optional)
- 2 cups all-purpose flour
- 1 tablespoon garlic powder
- 1 tablespoon onion powder
- 1 tablespoon smoked paprika
- 1 teaspoon cayenne pepper (adjust to taste)
- 1 teaspoon salt
- 1 teaspoon black pepper
- Vegetable oil, for frying
Preparing the Marinade
1. In a large mixing bowl, pour in the 2 cups of buttermilk. If you like a little kick, add the tablespoon of hot sauce to the buttermilk and whisk it together until well combined. The hot sauce is optional, but it adds a nice depth of flavor to the chicken. 2. Take your chicken thighs and make sure they are clean. Pat them dry with paper towels to remove excess moisture. This helps the buttermilk adhere better to the chicken. 3. Submerge the chicken thighs in the buttermilk mixture, ensuring they are fully coated. Cover the bowl with plastic wrap or a lid and refrigerate for at least 4 hours, or ideally overnight. This marinating process is crucial as it tenderizes the chicken and infuses it with flavor.Preparing the Coating
4. Once the chicken has marinated, its time to prepare the coating. In a separate large bowl, combine the 2 cups of all-purpose flour, 1 tablespoon of garlic powder, 1 tablespoon of onion powder, 1 tablespoon of smoked paprika, 1 teaspoon of cayenne pepper, 1 teaspoon of salt, and 1 teaspoon of black pepper. 5. Whisk the dry ingredients together until they are evenly mixed. This will be the crispy coating that gives the chicken its delicious crunch.Coating the Chicken
6. Remove the chicken from the buttermilk, allowing any excess to drip off. You want the chicken to be coated but not dripping wet. 7. Dredge each piece of chicken in the flour mixture, making sure to coat it thoroughly. Press the flour onto the chicken to ensure it sticks well. Shake off any excess flour and set the coated chicken aside on a wire rack or a plate. This step is important as it allows the coating to adhere better during frying. 8. Repeat the dredging process for all the chicken thighs. If you have any leftover flour mixture, you can sprinkle it over the chicken for an extra crispy layer.Cooking Process
9. In a large, heavy-bottomed skillet or Dutch oven, pour in enough vegetable oil to cover the bottom of the pan by about 1 inch. Heat the oil over medium-high heat until it reaches 350°F (175°C). You can test the oil by dropping a small amount of the flour mixture into the oil; if it sizzles and bubbles, its ready. 10. Carefully place the coated chicken thighs into the hot oil, skin side down. Be sure not to overcrowd the pan; you may need to fry in batches depending on the size of your skillet. Fry the chicken for about 7-10 minutes on the first side, or until its golden brown and crispy. 11. Once the first side is golden, flip the chicken over using tongs and fry for an additional 7-10 minutes on the other side. The internal temperature of the chicken should reach 165°F (75°C) for it to be fully cooked. 12. If you find that the chicken is browning too quickly, reduce the heat slightly to ensure it cooks through without burning the coating. 13. Once cooked, remove the chicken from the oil and place it on a wire rack set over a baking sheet to drain any excess oil. This helps keep the chicken crispy.Assembling and Serving
14. While the chicken is resting, you can prepare any sides youd like to serve with it. Some great options include coleslaw, mashed potatoes, or a fresh garden salad. 15. Once the chicken has rested for about 5-10 minutes, its ready to be served. You can serve it as is, or if you want to elevate the presentation, place the chicken on a large serving platter and garnish with fresh herbs like parsley or thyme. 16. For an extra touch, you can drizzle a little honey or hot sauce over the chicken before serving, depending on your preference. 17. Enjoy your crispy buttermilk chicken with your favorite dipping sauces, such as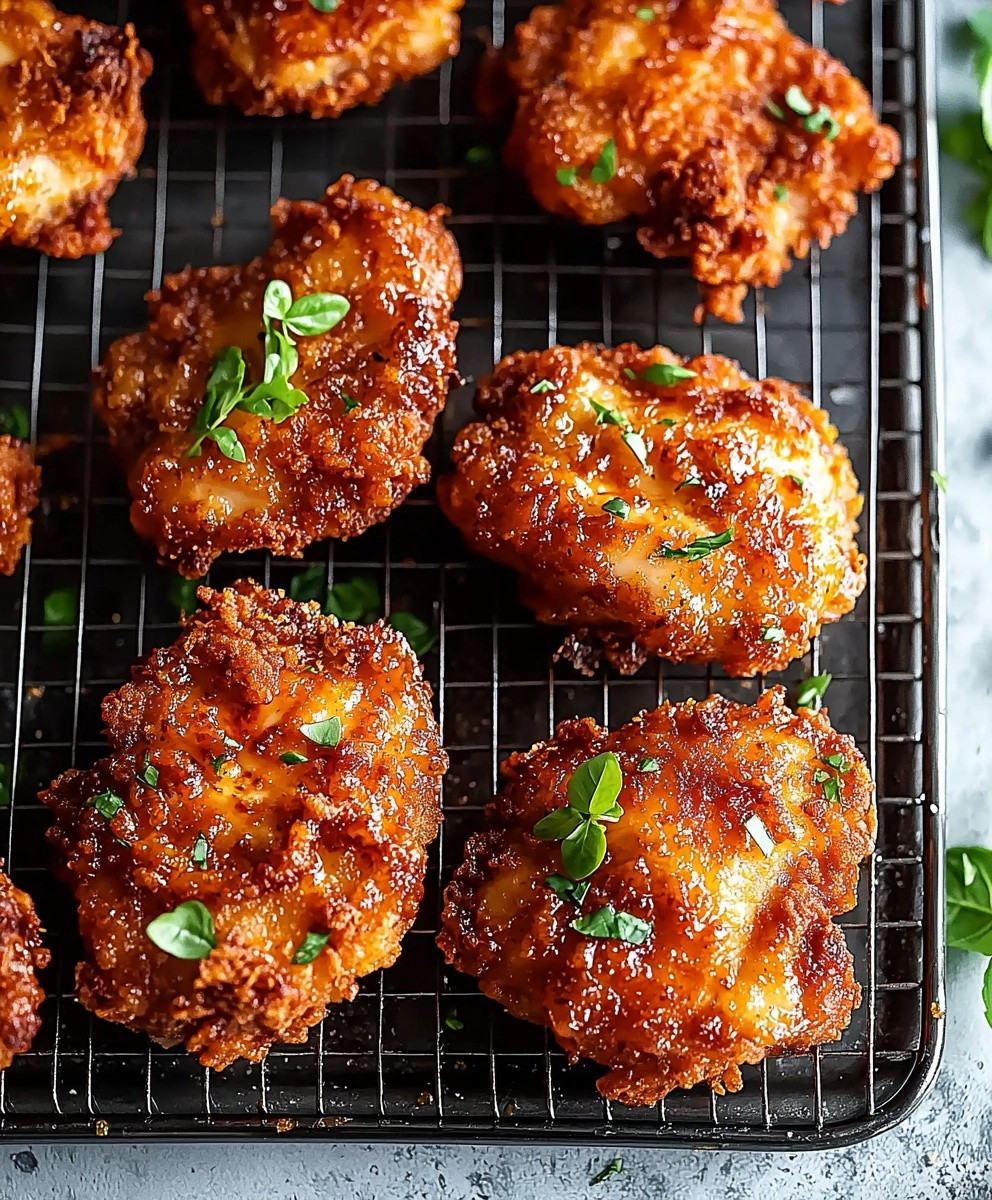
Conclusion:
In summary, this Crispy Buttermilk Chicken recipe is an absolute must-try for anyone looking to elevate their dinner game. The combination of tender, juicy chicken marinated in a rich buttermilk mixture, paired with a perfectly seasoned crispy coating, creates a dish that is not only delicious but also incredibly satisfying. Whether you’re serving it up for a family gathering, a casual weeknight dinner, or even a special occasion, this recipe is sure to impress. For serving suggestions, consider pairing your Crispy Buttermilk Chicken with a side of creamy coleslaw, fluffy mashed potatoes, or a fresh garden salad to balance out the richness of the chicken. If you’re feeling adventurous, you can also experiment with different spices in the coating or try adding a touch of hot sauce to the buttermilk marinade for an extra kick. I encourage you to give this recipe a try and make it your own! Once youve whipped up your batch of Crispy Buttermilk Chicken, Id love to hear about your experience. Share your thoughts, any variations you tried, or even a photo of your delicious creation. Cooking is all about sharing and enjoying, so lets spread the love for this amazing dish together! Print
Crispy Buttermilk Chicken: The Ultimate Recipe for Perfectly Fried Chicken
- Total Time: 260 minutes
- Yield: 4 servings 1x
Description
Enjoy the ultimate comfort food with this crispy buttermilk fried chicken. Marinated in a flavorful buttermilk mixture and coated in a seasoned flour blend, these chicken thighs are fried to golden perfection, offering a crunchy exterior and juicy interior. Ideal for family dinners or gatherings!
Ingredients
- 4 large chicken thighs, bone-in and skin-on
- 2 cups buttermilk
- 1 tablespoon hot sauce (optional)
- 2 cups all-purpose flour
- 1 tablespoon garlic powder
- 1 tablespoon onion powder
- 1 tablespoon smoked paprika
- 1 teaspoon cayenne pepper (adjust to taste)
- 1 teaspoon salt
- 1 teaspoon black pepper
- Vegetable oil, for frying
Instructions
- In a large mixing bowl, pour in the 2 cups of buttermilk. If desired, add the tablespoon of hot sauce and whisk until well combined.
- Pat the chicken thighs dry with paper towels. Submerge them in the buttermilk mixture, ensuring they are fully coated. Cover and refrigerate for at least 4 hours, preferably overnight.
- In a separate bowl, combine the flour, garlic powder, onion powder, smoked paprika, cayenne pepper, salt, and black pepper. Whisk until evenly mixed.
- Remove the chicken from the buttermilk, allowing excess to drip off. Dredge each piece in the flour mixture, pressing to ensure it sticks. Shake off excess flour and set aside on a wire rack or plate.
- In a large skillet or Dutch oven, heat enough vegetable oil to cover the bottom by about 1 inch over medium-high heat until it reaches 350°F (175°C).
- Carefully place the chicken thighs skin side down into the hot oil, frying in batches if necessary. Cook for 7-10 minutes until golden brown.
- Flip the chicken and fry for an additional 7-10 minutes, ensuring the internal temperature reaches 165°F (75°C).
- Remove the chicken and place it on a wire rack over a baking sheet to drain excess oil.
- Let the chicken rest for 5-10 minutes. Serve as is or on a platter garnished with fresh herbs. Optionally, drizzle with honey or hot sauce before serving.
Notes
- For extra flavor, consider adding herbs like thyme or rosemary to the buttermilk marinade.
- Adjust the cayenne pepper to your spice preference.
- Serve with sides like coleslaw, mashed potatoes, or a fresh garden salad for a complete meal.
- Prep Time: 240 minutes
- Cook Time: 20 minutes
Leave a Comment